| Live Search | ||
|---|---|---|
|
...
Setting Up Planned Treatment Appointment
| Expand |
|---|
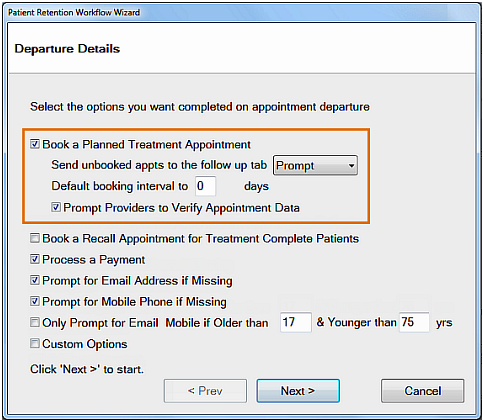
What does this configuration set up achieve? With the patient in the chair, Providers set guidelines for the planned treatment appointments that they want for the patient. When the patient moves through to reception to depart the practice, the Receptionist is prompted in the Departure List (See: Using the Departure Task List) to schedule these planned treatment appointments, following the Provider's guidelines. Receptionists have multiple tools to facilitate the booking. For example, they can can book these appointments by means of drag and drop or by editing: Click the Appointment hyperlink to open the Edit Appointment window: This functionality needs to be configured... To configure Planned Treatment Appointment departure tasks
|


Configuring Online Booking of Planned Treatment
| Expand |
|---|
Configuration is per Provider In the Online Booking Configuration screen a Planning tab enables configuration per Provider. Configuration parameters for each Provider include:
To configure the planned appointment Times, Providers and Email/SMS Templates Select Configuration > Online Booking to open the Online Booking Configuration screen. Select the Planned tab:  Practice Manager users only: Order of Appointments: In the case of a combined recall, this sets the order of appointments. Maximum Minutes between appointments: Determines the gap between multiple appointments, should they be booked. Emergency contact email: Error notifications are sent to this Email address. Select the +1 button to open a window in which to configure a Provider for the planned treatment booking:  Provider: Select a Provider for whom you will set up the availability for bookings. Note that you can optionally populate these fields by selecting the Copy settings from Provider button and then selecting the other Provider from the popup window:  Configure the Free time available for planned treatment appointments: Specific clinic: Check (tick) this checkbox if you are limiting online bookings to one specific clinic. All unbooked non-clinic time: Check (tick) this checkbox if you are limiting online bookings to all time available outside of clinics. All unbooked time: Check (tick) this checkbox if you are limiting online bookings to all free time, whether in or out of clinics. Setup Confirmation Templates (where the patient receives confirmation of the booking) in SMS and Email. Either use the same templates as for other booking types or create templates especially for treatment planning online booking. Setup the Sending Templates (where the patient is sent an online booking link to a web page populated with the patient's planned treatment details). Either use the default templates provided for SMS and Email, or create custom templates. Default Sending Templates:  Default SMS Sending Template (•PLND_OLB_SMS):  Default Email Sending Template (•PLND_OLB_EMAIL):  Merge field requirement for custom templatesIMPORTANT: Notice the [patient.planned.url] merge field in the above SMS and Email default templates. It propagates the planned treatment details to the booking website so that patients book specifically for their planned treatment. This merge field needs to be inserted in any custom planned treatment booking template that you create
|
Related Articles
| Page Tree | ||||
|---|---|---|---|---|
|