Versions Compared

Key

  • This line was added.
  • This line was removed.
  • Formatting was changed.

...

Expand
  1. In the View Day area, right-click the Block or Clinic you want to delete, and select it for deletion. For example:

  2. Click Yes when prompted Permanently delete this block?

Creating Rotas (Permanent Working Hours)

Expand

Rotas are used to identify the times a provider works.

The Rota allows:
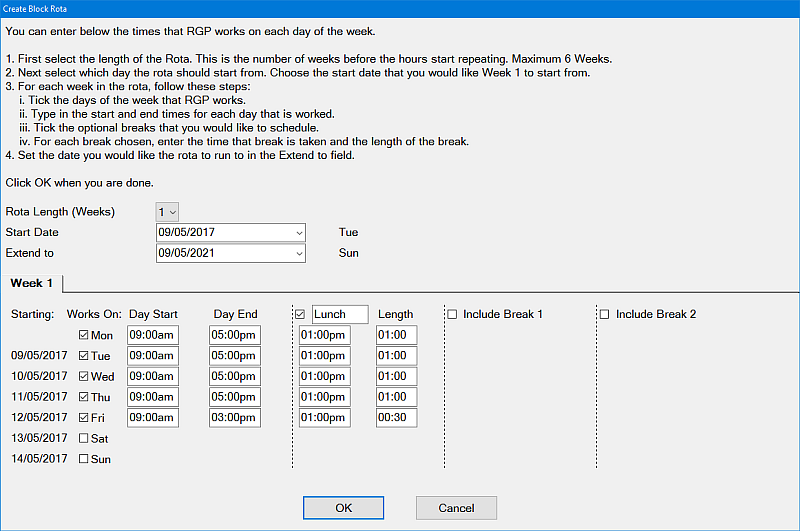
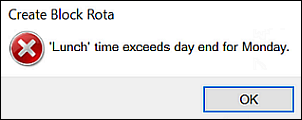
  • A weekly cycle to easily be repeated for a specified number of rotations (e.g., a 3-weekly cycle repeated for one year)

  • Additional daily ‘breaks’ in addition to lunches (e.g., for administration, maintenance, research, etc.)

To set up a Rota:

  1. Click on the Provider Bar to view the Restrict Appointment Times icon.

    For example:


    Result:


  2. Click the Restrict Appointment Times icon

    to open the Restrict Appointment Times window, and then click the Create Block Rota button:


    The Create Block Rota window displays:


  3. Rota Length (Weeks): Enter the number of weeks in the cycle.

    • To repeat the same hours every week the Rota Length would be 1.

    • If the provider worked different hours / different weeks then you can select the appropriate number of weeks in the rota.
      As the number of weeks is increased (up to a maximum of 6) extra Tabs will be added.

  4. Start Date: Enter the date you want the rotation/cycle to begin.

  5. Works On: Tick the check boxes beside each day to indicate when the provider is available.

  6. Day Start: Enter the appropriate start times for each day, am and pm must be specified, unless using the 24 hour clock.

  7. Day End: Enter the appropriate end times for each day, as mentioned above using the correct time format.

  8. Include Lunch: If you wish to include a lunch break, tick the check box. You will then need to enter a start time for lunch, along with a length of the lunch break (not a time).

    EXACT will alert if you inadvertently enter a time rather than a duration:

  9. Include Break 1/Include Break 2: If you wish to incorporate breaks into the day, tick the appropriate check box; enter a start time for the break along with a length for the break. If the check boxes are not ticked no breaks will be included.

    The same validation applies as for the Lunch Length.

  10. Complete the entries for the remaining weeks of the Rotation.

  11. Click OK to enter the blocks into the appointment book for the selected provider

...

Expand

Rosters, Clinics and Blocks can also be created from the Provider File and the Provider Bar.

The advantages of creating directly in the appointment book are

  • It is a visual and hands-on procedure where you create the event in the book itself.

  • Receptionists can conveniently create one-off (single) events at the moment of need.

To create a recurring Roster, Clinic or Block from the appointment book

At the appropriate place in the appointment book View Day area, drag to select the period with the right mouse button Icon-MouseRightClick_17x20px, then select an option (Add Roster, Add Clinic or Add Block) from the menu:

A configuration window displays. For example:

The fields are self-evident, but take note of the following:

Recurring and one-off (single) events

Example of a recurring event: the Dentist has a Yoga class every Tuesday and Friday 04:00pm to 05:00pm.

Example of a one-off event: the Hygienist needs to take one hour 2:00pm to 3:00pm to fetch kids from a special school event today only.

For a recurring event, check (tick) the Repeat Interval checkbox and specify the repeat interval in days (up to 365 days):

For a one-off event, ensure that the Repeat Interval checkbox is de-selected (unticked):

Appointment Category

This is only for the Clinic setup. The Category determines the colour and shading for the Clinic in the appointment book.

Add to all Providers

Use this checkbox when blocking off events that apply to all Providers, such as Practice training courses, Practice meetings or bank holidays.

Configuration screen examples

Add a one-off (single) Roster:

Add a one-off (single) Clinic:

Add a one-off (single) Block:

To add an image click the button on the right of the description field and add/edit a new Block and select picture and browse for an image stored on the computer.

Image RemovedImage Added

The providers column now shows this image between the dates/time’s specified.