...
Colour coding
Some Status fields are coloured to represent different values.
For example, attachment over a certain value can trigger colouring the field red. Note how different values have associated colours in these fields. Configure Exact to follow your specific order when you enter data
You can specify the order in which you enter data as you go around the mouth, so that EXACT automatically links the data in that order. You can choose the order in which you do quadrants and which direction they should be done. You can choose to enter recession data immediately after each pocket, after each quadrant, or after all the pocket depths have bee charted.

EXACT knows the order in which each provider records data in order to correctly apply it. Each provider can adjust this order to suit their preference.
Option to Skip the 8s
You can optionally configure Exact to ignore the 8s in your sequential movement around the mouth.Element comment field
Each Element has an optional comment field of up to 10 characters.
(Note that depending on the character chosen not all may be visible.
...
Diagnosis and Treatment comment fields
The Perio Chart has comments fields for diagnosis and treatment plan:
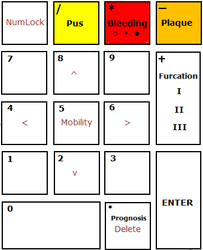
Enter data using the keyboard
To speed up data entry, providers can enter data using the numeric keypad.
Many keys function as a toggle, by going through the values for that field
Configuring Single Screen Perio
This can be customised per provider login, or providers can simply use the default settings.
Parameters that can be customised:
Attachment level threshold
How recession data is entered (either after each pocket depth, after each quadrant, or after all pocket depths)
Whether or not to include the eights in the progression around the mouth
The order of progression through all pieces of the dental arch: four quadrants, each with outside and inside
The direction of progression for each piece of the dental arch.
To open the Configure Perio Chart window
Click the Configure button  in either the background (read-only) chart, or in the Add/Edit Perio Chart window:
The Configure Perio Chart screen (default values shown)
The chart includes instructions:
Attachment Level Threshold When pocket depth and recession are recorded, EXACT calculates an attachment figure and automatically populates this field.
4 and over will highlight with a red colour (the threshold has been breached).
Enter recession data This refers to the point at which EXACT automatically tabs over to recession.
Default is after each pocket depth is recorded.
Tab Order selectors
Set the dropdown selectors to specify the order in which you want to proceed around the mouth.
As you select a position for a quadrant, the quadrant that already has that position will swap over with the one you that chose.
Direction
Click the blue arrows to toggle their direction.
...
Skip the 8s
EXACT offers an option to remove the 8s from the tab order.
If you do not routinely take the data for 8s, check the box to Skip the 8s. When the cursor comes to the 8, whether the tooth is present or not, the cursor will move to the next tooth.
You can manually click on an 8 to record data if you wish, even with this option in the field. If the Skip the 8s check box is selected, the blue arrows will shorten to indicate that the 8's are not included.
Notice that the blue line indicating the order of data entry no longer includes the 8s. If you enter data, 8s are not included in the series.
To view a Single Screen Perio Chart
On the patient desktop, select a patient and click on the Perio tab:
...
The main screen of Perio is displayed. The most recent perio chart is automatically displayed. The grid will be blank if the patient does not yet have any charts recorded. The view is read only.
...
Note: Charts captured in the older multi-tab format will be shown in the new single screen format. The multi tab format can also show charts captured in single screen format. You can change back and forth at will by ticking an unticking the ‘Use single screen perio’ option. The only thing to remember is that the single screen perio can capture more data than the multi-tab version, so not all data will be shown.
Adding, editing, deleting a Perio ChartTo Add a Perio Chart
1. Click the Add button in the Perio workspace area:
...
2. The Add Perio Chart window will display, overlaid on the Perio tab area:
...
3. Type a name for the chart.
4. Press the Tab key to tab to the 1st section, as defined in the tab order in the Configure Perio Chart Screen
5. Complete it as required and click OK to save.
...
Select it to view the read only chart at right
Edit, Print or Delete it
To Edit a Perio Chart
1. Select a chart in the Perio workspace area and then click the Edit button: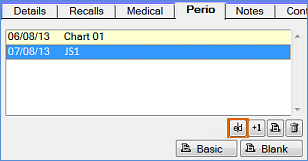
2. This opens the existing chart with data.
3. Complete it as required and click OK to save it.To Delete a Perio Chart
Use the Delete button to mark a selected perio chart as deleted:
...
Print or e-mail a completed Perio Chart
Use the Print button to print or email a perio chart:
...
The print dialog appears allowing you to optionally Edit the Layout, Preview, Email or Print the chart.
Note: you can still print the old style graphical perio printout for patients by choosing the ‘Basic’ print button.
To enter data on the Perio Chart
data entry
Press the Tab key to tab to the pocket depth of the 1st section (section order is as defined in the tab order in the Configure Perio Chart Screen).
Enter the data with procedures indicated below:
To enter a number on the Perio chart and move the cursor to the next box
Press a number key to enter a value (from 0-9) in the current box. This also moves the cursor on to the next box.
For Pocket depth holding the number down will cycle between the number and the number +10. Release the number key when the correct value is shown
For Recession holding the number down will cycle between the number, the number +10 and – the number then back to the number again. Eg 6, 16 , -6. Release the number key when the correct value is shown
...
To record plaque on or off at the current position Left-click in the Plaque field to cycle: plaque on > plaque off at that position.-
OR -
Press '-' to cycle: plaque on > plaque off.
...
To record the Mobility at the current positionLeft-click in the Mobility field to cycle: blank > 0 > 1 > 2 > 3 and then back to blank-
OR -
NMLK+5 cycles the Mobility field at the current position: blank > 0 > 1 > 2 > 3 and then back to blank.
NOTE: Blank is unrecorded, zero is 'No Mobility'
To record Furcation at the current positionLeft-click in the Furcation field to cycle: blank > I > II > III-
OR -
Press '+' to cycle the Furcation field at the current position: blank > I > II > III.
NOTE: On teeth where there are two furcation positions, if the cursor is in a 'middle' position, the key will cycle the left most field.
To delete the entry at the current cursor position, and keep the cursor in that position
Press NMLK+'.' to delete the entry in the current field and revert it to blank. The cursor will not move.Summary of mouse left-click options:
...
You can also place the cursor into the following fields to gain focus for editing:
Recession, Bleeding, Comment, Diagnosis and Treatment plan
...
...
Skip the 8s
EXACT offers an option to remove the 8s from the tab order.
If you do not routinely take the data for 8s, check the box to Skip the 8s. When the cursor comes to the 8, whether the tooth is present or not, the cursor will move to the next tooth.
You can manually click on an 8 to record data if you wish, even with this option in the field. If the Skip the 8s check box is selected, the blue arrows will shorten to indicate that the 8's are not included.
Notice that the blue line indicating the order of data entry no longer includes the 8s. If you enter data, 8s are not included in the seriesTo Edit a Perio Chart
1. Select a chart in the Perio workspace area and then click the Edit button:
2. This opens the existing chart with data.
3. Complete it as required and click OK to save it.
To Delete a Perio Chart
Use the Delete button to mark a selected perio chart as deleted:
...
Print or e-mail a completed Perio Chart
Use the Print button to print or email a perio chart:
...
The print dialog appears allowing you to optionally Edit the Layout, Preview, Email or Print the chart.
Note: you can still print the old style graphical perio printout for patients by choosing the ‘Basic’ print button.