The Chart Tab primary function is to Chart treatment onto a patient. Services can be charted in a number of ways and belong in a Course of Treatment split up by Appointments.For base charting see:
Creating a Course of Treatment (COT)
Before you can chart a service you need to create a Course of Treatment (COT). To start a Course of Treatment.
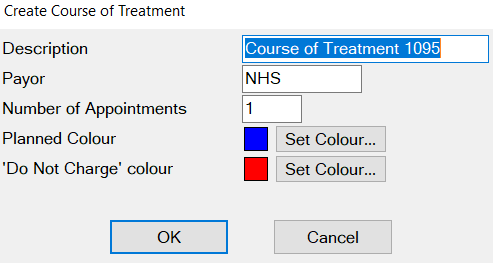
In the Patients Chart tab, click the +1 COT button to display the Add COT window (image below).
Specify the Payor, this will default to the payor set in their patient details but can be overridden. For Private treatment leave it blank.
You can set the number of expected Appointments and set the Planned Colour/Do Not Charge colour
Click the OK button.

A Course of Treatment has been created and will sit as a COT tab. You can have multiple charting COT tabs if required.
...
Charting a Service
You can chart services using the Quick Chart, Quick Plans or Item by Item. Below we will focus on Item by Item. individually.
Once you have an open COT and have the tab selected created a new COT you can use search the service list to find and chart an item.You can find the service with the help of categories or the search optionService list/Service Categories on the right-hand side. Once you have found the required service highlight it (left click).
You can then either double click that service or click now click on the appropriate tooth/surface to chart that service or double click if you prefer. If you double click and it needs more information, such as tooth/surface, then it will request it then.prompt you for this information. Repeat this for all services that are being performed in that appointment.
Editing a Service
Editing a Service can be done anytime before the treatment is charged, otherwise it needs to be resubmitted.
To edit a service you can either double click the treatment on the COT or right click and select edit…edit.
From here you can edit the Provider, Planned/Completed Date, Estimates/Actual Time, Tooth number and the fee. You can also add clinical notes here.
...
When the first service is charted in a patient’s Treatment Plan, an entry automatically appears in the Treatment Planning area along with the Course of Treatment number, the first Appointment and the selected Service to be provided.

If your computer is not creating the first appointment automatically, 1) Select Configure> Local Parameters User Settings, 2)Tick the Auto-Create Course of Treatment checkbox and enter 1 in theDefault Number of Appointments field.
Right-click on any line in the Treatment Planning Area and choose Add Appointment.

A new appointment will be added directly below the line you initiated the command from.

Each click on the Add Appointment menu item will add another appointment to the Treatment Plan.
When adding appointments don’t forget that the first one has already been created.
Moving Services into Appointments
...
Click on the service name within the treatment plan line, and keeping the left mouse button pressed down, drag the service into the required appointment.
To select multiple services together in the treatment plan, click the first service, then hold down the SHIFT key and click the last service.
If the services you wish to select are not adjacent to each other, hold down the CTRL key then click on each service required.To make it easier to select services that are commonly used together in a Course of Treatment, set them up with adjacent codes in the Services List and/or group them in service categories.
Editing Appointment Length
EXACT EXACT automatically adds the time required to complete each Service into an overall appointment length.
The estimated time to complete each Service is defined in the Service Filewithin each Service’s parameters.
To assist Reception Staff to accurately schedule the patient’s future appointments, it is possible to change the estimated time for each appointment in the Current Course of Treatment area.
...
Double-click on the appointment in the Treatment Area. This is displayed on the Appointment line in bold black text:

An Edit Appointment window will display:

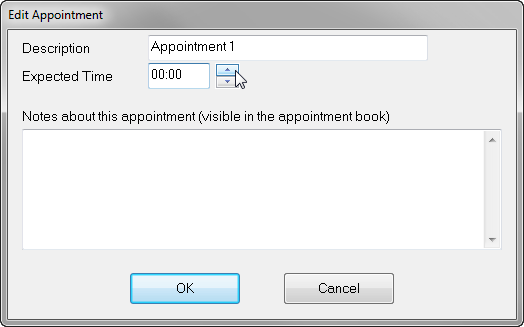
Click in the Expected Time field and type in a time, or use the

button up/down arrow buttons to enter the new required appointment length. The first two digits indicate hours and the next two digits indicate minutes.
00:25 represents 0 hour and 25 minutes
01:30 represents 1 hour and 30 minutes.
If you wish to make any changes to the appointment description or add a note, click in those fields and type in the text you want to appear. Click the

OK button to save changes.
To Hide Treatment Within Appointments
Treatment within appointments can be ‘hidden’ from view using the ‘+’ and ‘–’ icons on the Appointment Line. This feature is ideal when dealing with complex Treatment Plans with multiple appointments. The Current Course of Treatment area can be altered to hide areas you do not need at the moment and only view the current appointment.
Click on the
...
button beside the appropriate line. This will ‘hide’ the contents of the Appointment.
Click on the

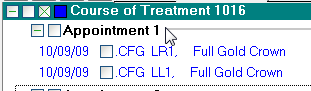
button to display the contents again. Below is an example a Course of Treatment with an appointment minimised:
When a Course of Treatment is minimised the

symbol is displayed next to the Appointment line, and a list of treatment within the appointment is displayed underneath. To view the treatment in more detail, click onto the minimised icon. The appointment will then be maximised and all notes will be visible.
...
“-” or “+” buttons to hide/collapse and show/expand appointments
...
Moving Treatment between Treatment Plan Tabs
Once a Treatment Plan has been created, it may be necessary to move treatments between the COT tabs. Treatment can either be dragged from one tab to another, or you can copy, cut and paste treatment between the tabs.
...
Click on the item you wish to move. (Select multiple items by holding down the CTRL key as you click on each item).
Right-click on any of the selected items, to display the drop-down menu:

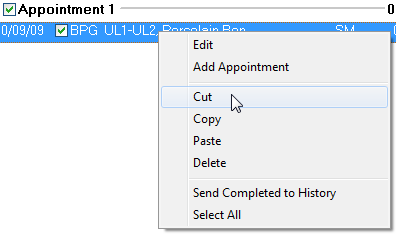
If you are copying, select Copy; if you are removing from the original plan, select Cut.
Click on the appropriate tab; use the arrow within the Treatment Plan as a guide to find the appointment that you wish to place the item into. Right-click and select Paste
...
If you need to delete a service highlight the service and click , right-click and select delete or simply press the Delete key on the delete buttonkeyboard. This can only be done if the treatment has not been charged yet.
Multiple Treatment/Service Items
EXACT EXACT gives you the ability to chart multiple items at once, such as several adjacent extractions or implants when fitting appliances, or the charting of multiple different treatment items if you do your charting after the patient has left the surgery or at the end of the day. Charting is performed by selecting a tooth on the chart and highlighting a service, or vice-versa. To chart items such as bridges that span multiple teeth, you choose the appropriate service code, then click on the first tooth to be selected. Hold down the mouse button, and drag the rectangle that is displayed on the chart over the teeth you wish to include. All teeth that the rectangle passes over will be highlighted when you release the mouse button.
...
As the instructions above indicate, you can either enter the number for the tooth or teeth the service applies to, or select using the left mouse button for individual teeth, or the right mouse button for multiple adjacent teeth.
To delete Services
To delete services (for example, if you make an error), highlight the service in the treatment plan, and press the DELETE button on the keyboard. If you want to delete multiple services that are adjacent to one another in the treatment plan, you can click the first one, then hold down the SHIFT key and click the last one. Alternatively, hold down the CTRL key, and click with the mouse on each of the services to highlight them. Press the DELETE button on the keyboard (or right-click with your mouse and select 'Delete' from the drop-down menu), and all the highlighted services will be deleted.
To edit Services
To edit multiple services uses the same method as above, except once you have highlighted the items, right-click with your mouse, and select 'Edit' from the drop-down menu:
...
This will open a window similar to the following example:
...
As indicated by the instructions on the screen, you can update (edit) a particular field or fields by entering the appropriate value in that field, For instance, if treatment had been charted to one provider erroneously, or that provider was now no longer available, you could change the 'Provider' code. Similarly, either of the dates, or the Price Code or Fee Schedule could be altered (note however that the Completion Date can be changed only for completed treatment).
...
The Tooth field enables you to enter a different tooth number, either by typing it in, or selecting using the
...
“Tooth” button. Note that you can use this on only one tooth at a time, as it would be nonsensical to change the charting for more than one tooth to a single tooth. If you need to do this, then it is better to delete the charting and re-enter the correct tooth.
Auto Charting
EXACT gives you the ability to set up a service so that when it is charted, other related services are automatically charted at the same time. This saves time looking for and selecting services when a treatment has common steps involved. For example, fitting a crown to a tooth may involve an x-ray, grinding the tooth to shape, taking an impression, some lab services, and fitting the crown. Further more, there may be some documents involved, such as an order to the lab for the porcelain crown to be made.
To set up automatic charting for a service, see the "Service Item Details Tab" topic for more information about setting up the additional services.
You can also add a document to a service; this is covered in the same topic. The document can be attached to the service, and set to pop up on screen either when the service is charted, or when completed, as appropriate.
Modifying ‘Course of Treatment’ Settings
Double-click on the coloured ‘Course of Treatment’ line, or right-click and choose ‘Edit this Course of Treatment’:
...
An Edit Course of Treatment window will display:
...
Alteration of Completion Dates - Backdating Treatment
When entering a patient’s treatment it may sometimes be necessary to alter the date on which the treatment was completed. When treatment in the current Course of Treatment is ticked as complete, the date changes from the date the service was planned, to ‘Today’s’ date. For whatever reason - such as neglecting to tick the treatment on the day - this might not be correct.
...
Ensure that the treatment line has been ticked as completed (but not charged).
Double-click on the date, which will bring up the ‘Edit Chart Item’ screen.


Click in the ‘Completion Date’ field and type in enter the required completion date; alternatively you could use the

button to select the required date. From this screen you can also see the date the treatment was planned.
Press

Enter or click the

button “OK” to accept the change.
Mixing Payors for Treatment
...
If the patient has a Payor entered in Patient Details, this Payor will also be displayed just below the ‘Current Course of Treatment’ area, as shown in the above example, where the patient’s Payor is HIC.
When treatment is charted for the patient, the Course of Treatment will automatically be charged through the Payor. The example below is of a Treatment Plan, which is being charged to a Payor, in this case HIC.
...
The first fee column is the total cost of the treatment, the second column displays the portion of the fee the patient will be charged. If a patient is exempt from charges the second column will show as 00.00. The difference between the fee and the patient amount will be charged to the Payor.
Many treatment plans operate with the patient paying a regular fixed amount towards their treatment costs, and no actual invoices are issued to the treatment plan for reimbursement of patient treatment. In such cases you will notice that both fees are set as zero, (e.g., patient charge zero, treatment plan zero, as neither the patient nor the treatment plan are actually invoiced).
You can add a laboratory service to your plan and enter in a patient amount for lab work if required. If however all the treatment is being covered privately, it is necessary to remove the Payor assigned to the Course of Treatment. This will then ensure that your Private Fees appear.
TIP: When charting Payor treatment use Private Service Codes, so that should you need to alter the cost of treatment, your normal fees will be available.
Mixing Payor and Private Courses of Treatment
If a registered Payor patient requires a Private item of treatment, e.g. a posterior composite filling, this treatment will need to be placed in a separate Course of Treatment to their Payor treatment. If the item is mistakenly placed into a Payor Course of Treatment no fee will be displayed. To create an additional Course of Treatment, follow the steps below.
Enter any Payor treatment required, using that Payor’s services.
Click onto the +1 button, shown below, to create another Course of Treatment.

The ‘Create Course of Treatment’ window will open with the patient’s usual Payor displayed in the Payor field:

Highlight the usual Payor and press the ‘Delete’ button, and then press ‘OK’. The treatment area will now look as the one below:

The patient’s normal Payor is still assigned (as they are still registered as a Payor patient), as shown below:

Any treatment charged within this Treatment Plan will be charged privately. The Private fee list is generally used when charting private treatment. Note also that within a private Course of Treatment there is only one fee column.
Custom Screens Attached to Services
Custom Screens are used to design customised data entry windows that can be attached to various parts of the EXACT Dental program, but are usually attached to service items.
Example of a Custom Screen attached to a service:
...
Double-click to record information in this Custom Screen .
A screen like the following example then appears:
...
Enter the relevant information and click OK to store this information against the service.
NOTE:
By default, custom screens that are attached to services that are then charged, can still be edited up until midnight of the day of charging, but this functionality can optionally be disabled for the practice. See Editing and Viewing Custom Screens and Clinical NotesRelated Articles:
Quick Plans
Quick Chart
Auto Charting
Custom screens archive