| Table of Contents | ||
|---|---|---|
|
User Settings apply only to the named user on any computer where that user logs into EXACT.
View/change User Settings local parameters
Overview
| Expand |
|---|
Select Configure > User Settings: |
...
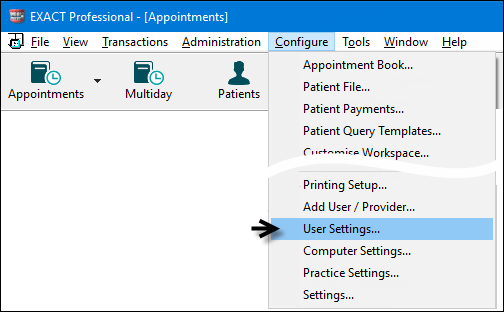 A User Settings window displays, with the current (logged in) user pre-selected. Configure the options in the User Settings window: (Remember to click the Save |
...
button (or press CTRL-S ) to save the User File record when you have finished making changes  Code To view existing users, use the selector buttons |
...
to locate the user’s code.   To add a new user, click the +1 button |
...
, to open the Add User window.  Click in the Code field and enter a code. Any short code (up to 10 alphanumeric characters) may be entered - usually the user’s first name or initials. Password Click in the Password field and enter a password (something the user will remember). Alternatively, you can leave the password blank, but tick the "User must change password..." box, to let the user set their own password the first time they log on. Security Group Click in the Security Group field and use the selectors |
...
to specify the Security Group for this user Copy Profile Optionally copy another user's settings to this user. |
...
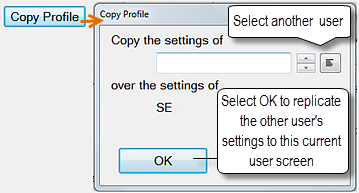 |
...
Administrator If the selected user is an Administrator, place a check in the box, which will give the user full administrative security rights (access to all system functions). If a dentist is also to be an administrator, it is often advisable to give them two user logons: one for day-to-day use with dentist privileges, and the other for administrative use |
...
The following options define the user’s password - how often it must be changed:
...
. |
Passwords
| Expand |
|---|
Customers using an SOEConnect related feature such as Payment Sense, eDental, eOrtho etc will be required to manage their password via SOEConnect. If you need to change yor email linked to your account ask your SOEConnect admin user (usually practice manager) to login and change it for you by visiting https://PRACTICEID.SOECONNECT.NET (replace PRACTICEID with your unique ID example = UKABC01) User must change password at next login Tick this checkbox for a new user (or one who has forgotten their password), to allow them to select a new password for themselves the next time they log on to |
...
EXACT. You can either assign them a password in the Password field above, and tell them what it is, or leave it blank. Either way, they must set a password next time they access |
...
EXACT. |
...
User cannot change password Tick this option if for some reason passwords are to intended to be permanent, and/or are set by the administrator. Whatever password is set in the Password field above will be the user’s password until this option is un-checked or the password is changed using this window. |
...
Password never expires This option offers the lowest level of security, particularly if the Password field is left blank. The password will always be the same for the current user, unless it is changed in this window. If this option is ticked, the option below is inoperative. User must change password every [ ] days This option offers the highest level of security, particularly if the number of days is set very low (which can also be irritating for the user). You can use this with the other options un-checked, or check the User must change password at next login option when setting up new users |
Workspace, Multi ApptBook and Charting Tabs
| Expand |
|---|
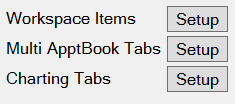 Workspace items Setup |
...
The Workspace Items setup button configures the menu options across the top of the screen: |
...
 Click the Setup button to customise the workspace for the user – add, remove, and order the option buttons displayed. This will open the Customise Workspace window. Multi ApptBook Tabs |
...
![]()
Click the Setup button to set up the tabs in the Multi Appointment Book for this user.
Charting Tabs Setup
![]()
Click the Setup button to setup the chart tabs for this user.
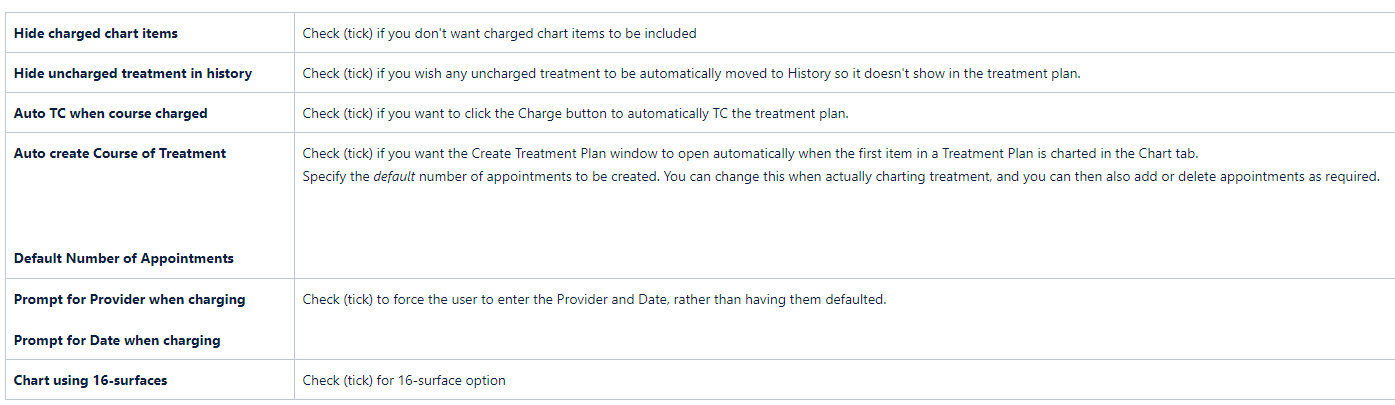
Chart
...
Hide charged chart items
...
Check (tick) if you don't want charged chart items to be included
...
Hide uncharged treatment in history
...
Check (tick) if you wish any uncharged treatment to be automatically moved to History so it doesn't show in the treatment plan.
...
Auto TC when course charged
...
Check (tick) if you want to click the Charge button to automatically TC the treatment plan.
Auto create Course of Treatment
Default Number of Appointments
...
Check (tick) if you want the Create Treatment Plan window to open automatically when the first item in a Treatment Plan is charted in the Chart tab.
Specify the default number of appointments to be created. You can change this when actually charting treatment, and you can then also add or delete appointments as required.
...
Prompt for Provider when charging
Prompt for Date when charging
...
Check (tick) to force the user to enter the Provider and Date, rather than having them defaulted.
...
Chart using 16-surfaces
...
Check (tick) for 16-surface option
Patient File
...
Balance Flashing
This configures which tabs your user account sees when using the multi column appointment book.  Move the items to the right hand section to make them visible for your user. 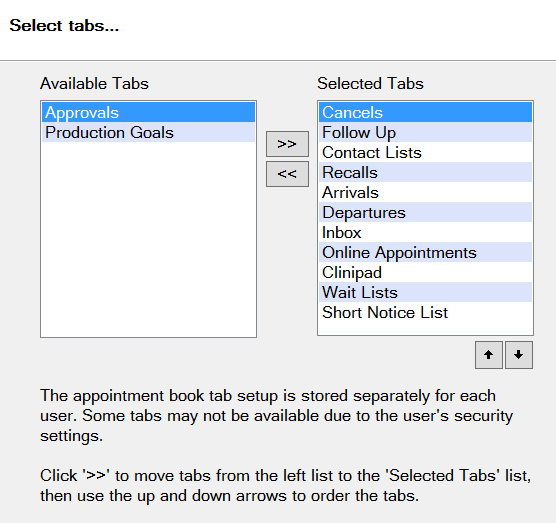 Charting Tabs Setup 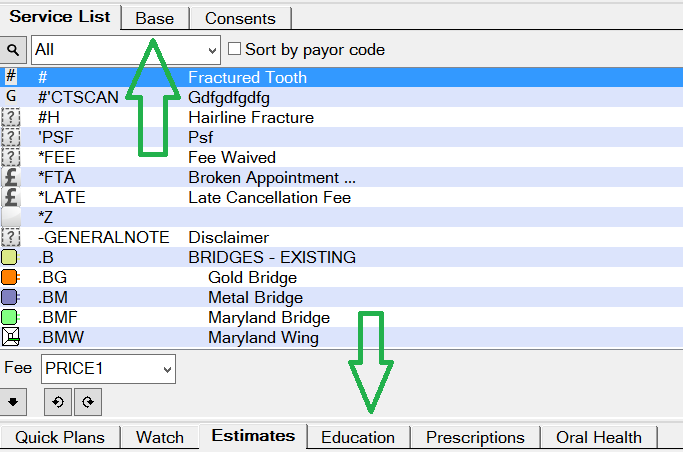 |
Chart
| Expand |
|---|
 |
Patient File
| Expand |
|---|
Balance Flashing: If this checkbox is ticked, the patient's outstanding account balance in the toolbar at the top will flash to draw attention to it |
...
Med Alert Flashing
...
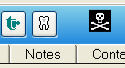
. 'Stop Credit' Alert Flashing |
...
![]() Stop Credit Alert Flashing
Stop Credit Alert Flashing
: Leave this box checked to cause the financial alert icon shown below to flash at the top of a patient’s details view, if the patient has a financial alert registered in their record. |
...
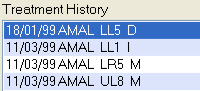
 Show Treatment History in Notes Tab |
...
: If required, check this box to add a pane to the Notes tab, showing the services that have been provided to the patient. |
...
 Show guru link button |
...
: Show the button for (optional) |
...
guru module. |
Appointments
| Expand |
|---|
Prompt to Complete Appointments |
...
: Check this box if you want |
...
EXACT to open a window prompting Providers to complete appointments when they click the Charge or TC button on completing a Treatment Plan. Arrival Sound |
...
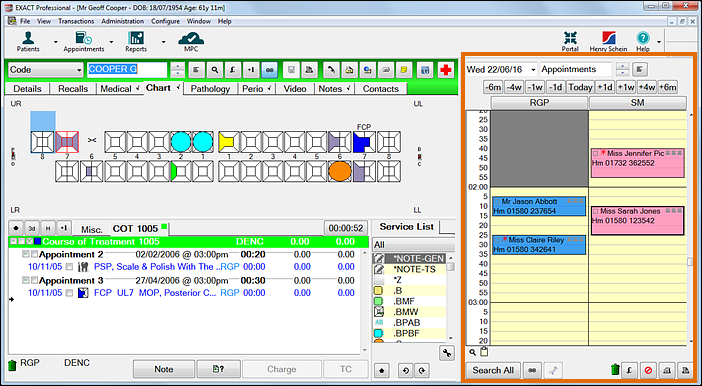
: If you wish to have a sound (other than the default Windows beep) play when a patient is marked as arrived, click the Browse button to select the appropriate .wav file. Your PC must have the appropriate hardware (sound card and speakers) and configuration to play the selected sound file. Display Sidebar (widescreen only) |
...
: If the current User File record is for a provider, you may place a tick in the checkbox to display the appointment book in a sidebar appointment book clipped to the right-hand side of the screen, as in the example below (highlight added). This leaves the rest of the screen available for other windows (in the example, the Patient File window). |
...
Note that to do this you must have a widescreen monitor. |
...
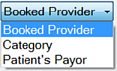
 Colour week view by |
...
: Not displayed in the preview graphic display. Colour day view by |
...
: This is the specific user-level week view. It overrides the default practice setting at Configure > Appointment Book > Appearance Options. |
...
The colours set up for the Booked Provider for each patient, or |
...
The colour of the appointment Category code (usually used only for clinics), or |
...
The colour assigned to the Patient's Payor. Hide Appointment Workflow |
...
: Opt not to show the Appointment Workflow sidebar. This user-level setting overrides the practice setting at Configure > Practice Settings > Enable Appointment Workflow Show the first available appointment time |
...
: Show the appointment rather than have the user locate it manually. Use modern search window |
...
: The "modern" search is the advanced Appointment Search functionality that was introduced in version 11 |
...
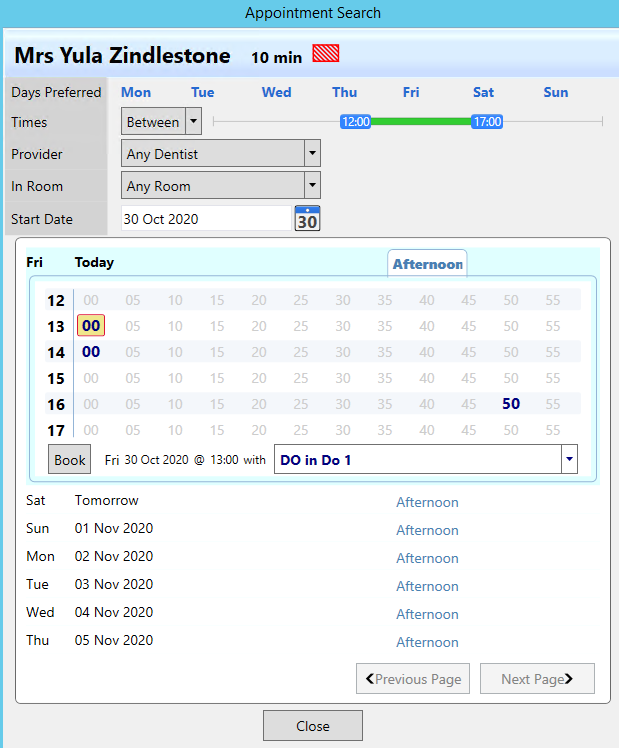 Only show ideal search results |
...
: "Ideal" search results allow booking into conventional time slots that don't adversely affect other potential bookings. |
...

|
...
: By default in |
...
EXACT when you double-click an appointment in both the main Appointment Book and the Sidebar Appointment book the Edit Appointment window opens. |
...
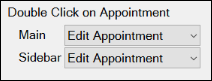 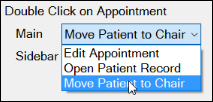 Double-click options are to Edit the Appointment, Open the patient record (from where all patient tabs are accessible), or Move Patient to Chair (only users with appropriate access rights will see this option). This enables custom workflow processing, including patient workflow processing entirely by one individual from one location, such as in a single-dentist practice. |
...
...
|
...
|
Candy Stripe Lists
...
| Expand |
|---|
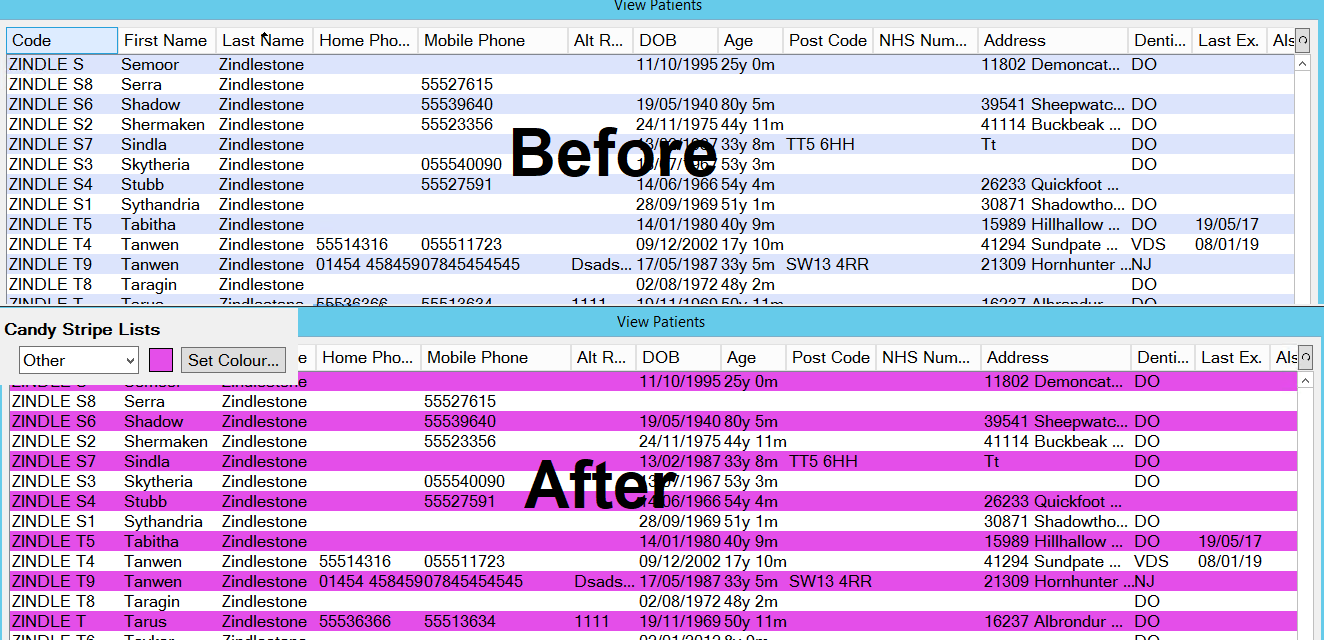
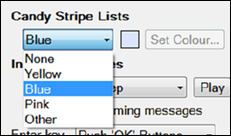 Simply select a colour from the dropdown (image at left), |
...
or |
...
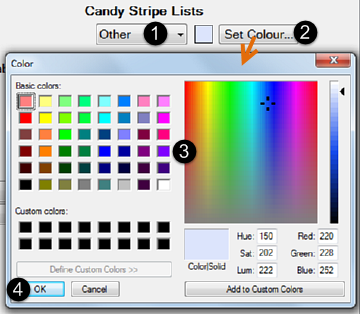
Select Other to enable the Windows colour selector, |
...
click Set Colour... |
...
Select a colour and |
...
click OK: |
...
  |
Other Settings
| Expand |
|---|
Instant |
...
Messages Audio Alert |
...
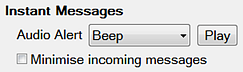 Select an alert. |
...
Click the Play button to hear it. |
...
Check the checkbox if you wish to minimise incoming messages rather than displaying them onscreen. Minimise incoming messages Stop the IM’s from instantly appeaing on screen. With this ticked you have to open them up manually as they will be minimised in windows. Windows 10 now includes focus assist and new notifications settings which may send messages through to the bottom right corner of windows. Use of Enter Key |
...
Select the appropriate option to define how you want to use the |
...
Enter key. Normally you would use the Tab key to move between fields in a window, so for this option select the Push OK Buttons option. If you wish to press the Enter key as you finish data entry at each field, then click the Move Between Fields option instead. Time Format am/pm or 24 hours |
...
: These radio buttons control the Appointment Book time slot grid display. Choose the one most suited for Appointment Book use at your practice. |
![]() or
or ![]()
Security Lockout |
...
Inactivity period
After this period of inactivity a user is logged out. A value of 0 represents never (no automated security lockout). Invoice Printing |
...
These options control the printing of invoices when the Charge button is used. Choose the option appropriate to the way the practice charges patients. Receipt Printing |
...
Select an option to automatically print a receipt or statement when payments are taken, or leave set to the default so that users are prompted for an option when taking payments. Remember to click the |
...
save button to save your changes.  |
Related Articles
| Page Tree | ||||
|---|---|---|---|---|
|