| Live Search | ||
|---|---|---|
|
...
| Table of Contents | ||
|---|---|---|
|
Configuration within EXACT
With the EXACT Online Booking Website Builder all configuration is within EXACT; there is no need to go online for configuration.
Emphasis on Booking Reasons as the driving force behind online booking
...
Create an initial list of Providers who can take online bookings, with booking rules that integrate with the appointment book.
From the Online Booking Configuration window - Providers who can take bookings from these types of patients: New Patient, Recall Patient, Planned Treatment, Existing Patient .
(The initial settings are not critical, as these can be changed as you add the providers to their respective reasons)
Set up the booking reasons.
From the Online Booking Configuration window - Setup your booking website from within the EXACT software.
Map the Providers to the booking reasons.
To configure online appointment bookings
...
Configuration is primarily from the Online Booking Configuration screen (access from Configure > Online Appointments).
...
Configuring New Patient online booking
Configuring Recall Patient online booking
Configuring Planned Treatment online booking
Configuring Existing Patient online bookinganal
...
Web Setup button: Setup your booking website from within the EXACT software.
Enabling the Online Appointments tab in the Appointment Book
...
Open the Appointment Book for the current user.
Click the Configure button at bottom right
 .
.In the Appointment Book Setup Wizard, tick Select tabs for your activity bar, and then click Next:

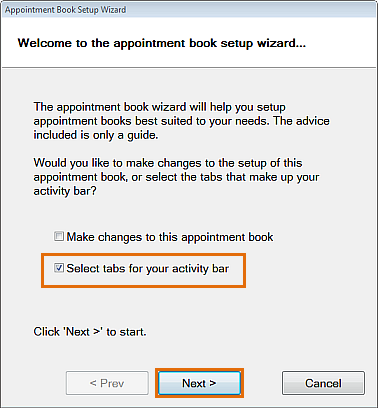
You will see a statement:


Click Next to continue.
In the Select Tabs window, select Online Appointments and click the arrow button to move it to the right pane:

Select Online Appointments in the right pane and use the Up / Down arrows to position the Online Appointments tab (the order of tabs in the right pane will be the ordering of the tabs in the Appointment Book Activity Bar):

For example, the current ordering in the image above will order the Activity Bar tabs as follows:

Click the Finish button and check that the Online Appointments tab appears in the Appointment Book activity bar.
Important: Repeat this procedure for every user who will manage Online Appointments.
...
Select Configuration > Online Booking to open the Online Booking Configuration screen.
Select the New Patient tab:
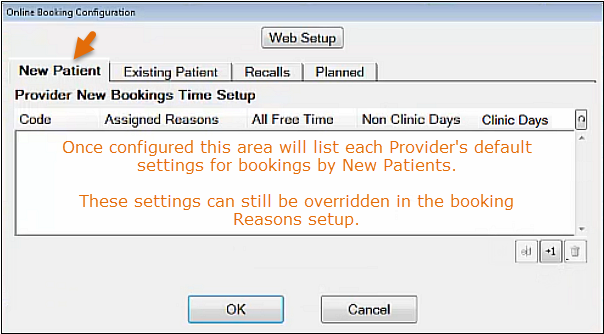
The task now is to set up each Provider with their own default settings that apply when New Patients book with that Provider.
Overview: You need to click the +1 button to open a configuration screen, edit the fields on the screen and save, then repeat by means of the +1 button for all Providers who will be available for online bookings.
Select the [+1] button to open a window in which to configure a Provider for the New Patient online booking:
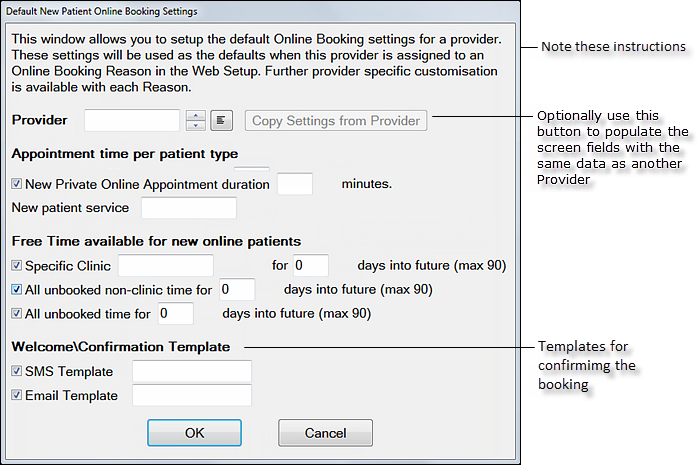
Provider: Select a Provider or type a Provider code.
Note that you can optionally populate these fields by selecting the Copy settings from Provider button and then selecting the other Provider from the popup window:

Configure the Appointment time per patient type:
Either set a default appointment duration in minutes or type in the New patient service code (each service is configured with a service duration that EXACT will note as the appointment duration)
Configure the Free time available for new online patients.
Specific clinic:
Check (tick) this checkbox if you are limiting online bookings to one specific clinic.
Select the clinic:

Specify the days into the future.
All unbooked non-clinic time: Check (tick) this checkbox if you are limiting online bookings to all time available outside of clinics. Set the days into the future.
All unbooked time: Check (tick) this checkbox if you are limiting online bookings to all free time, whether in or out of clinics. Set the days into the future.
Setup Welcome\Confirmation Templates (where the new patient is welcomed and receives confirmation of the booking) in SMS and Email. Either use the same templates as for other booking types or create templates especially for new patient online booking.
Select OK to save.
You may see a NOTE:

This clarifies that the custom settings in the Web Setup > Reasons will not be overridden by the default setup.
Repeat this procedure for all appropriate Providers.
...
Select Configuration > Online Booking to open the Online Booking Configuration screen.
Select the Existing Patient tab.

Select the +1 button
 at bottom right to open the configuration window:
Provider:
Select a Provider for whom you will set up the availability for bookings.
Note that you can optionally populate these fields by selecting the Copy settings from Provider button and then selecting the other Provider from the popup window:
Appointment Time per patient type
Either set a default appointment duration in minutes or type in the default patient service code (each service is configured with a service duration that EXACT will note as the appointment duration).
Existing patient service: The default service for an existing patient
Free time available for new online patients
Specific clinic: Check (tick) this checkbox if you are limiting online bookings to one specific clinic.
All unbooked non-clinic time: Check (tick) this checkbox if you are limiting online bookings to all time available outside of clinics.
All unbooked time: Check (tick) this checkbox if you are limiting online bookings to all free time, whether in or out of clinics.
Confirmation Templates
Setup (where the new patient is welcomed and receives confirmation of the booking) in SMS and Email. For example:

Either use the same templates as for other booking types or create templates especially for existing patient online booking.
Select OK.
EXACT will start to upload available times for the existing patients to book into.
You may see a NOTE:
This clarifies that the custom settings in the Web Setup > Reasons will not be overridden by the default setup.
Repeat the above procedure for all Providers who will treat Existing patients booking online.
...
Select Configuration > Online Appointments to open the Online Booking Configuration screen.
Open the Recalls tab:

Order of Appointments: In the case of a combined recall, this sets the order of appointments.
Maximum Minutes between appointments: Determines the gap between multiple appointments, should they be booked.
Select the +1 button
to open a window in which to configure a Provider for the Recalls online booking:
Provider: Select a Provider for whom you will set up the availability for bookings.
Note that you can optionally populate these fields by selecting the Copy settings from Provider button and then selecting the other Provider from the popup window:
Configure the Free time available for Recall online patients.
Specific clinic: Check (tick) this checkbox if you are limiting online bookings to one specific clinic.
All unbooked non-clinic time: Check (tick) this checkbox if you are limiting online bookings to all time available outside of clinics.
All unbooked time: Check (tick) this checkbox if you are limiting online bookings to all free time, whether in or out of clinics.
Setup Confirmation Templates (where the patient receives confirmation of the booking) in SMS and Email. Either use the same templates as for other booking types or create templates especially for Recalls online booking. Important: Ensure that you include the [recall.url] merge field, as this is required for the patient to make an online booking. You can either type this in, or select it from the All or Recall merge field lists
...
Select Configuration > Online Booking to open the Online Booking Configuration screen.
Select the Planned tab:

Practice Manager users only:
Order of Appointments: In the case of a combined recall, this sets the order of appointments.
Maximum Minutes between appointments: Determines the gap between multiple appointments, should they be booked.
Emergency contact email: Error notifications are sent to this Email address.
Select the +1 button
to open a window in which to configure a Provider for the planned treatment booking:
Provider: Select a Provider for whom you will set up the availability for bookings.
Note that you can optionally populate these fields by selecting the Copy settings from Provider button and then selecting the other Provider from the popup window:
Configure the Free time available for planned treatment appointments:
Specific clinic: Check (tick) this checkbox if you are limiting online bookings to one specific clinic.
All unbooked non-clinic time: Check (tick) this checkbox if you are limiting online bookings to all time available outside of clinics.
All unbooked time: Check (tick) this checkbox if you are limiting online bookings to all free time, whether in or out of clinics.
Setup Confirmation Templates (where the patient receives confirmation of the booking) in SMS and Email. Either use the same templates as for other booking types or create templates especially for treatment planning online booking.
Setup the Sending Templates (where the patient is sent an online booking link to a web page populated with the patient's planned treatment details). Either use the default templates provided for SMS and Email, or create custom templates.
Default Sending Templates:

Default SMS Sending Template (•PLND_OLB_SMS):

Default Email Sending Template (•PLND_OLB_EMAIL):

Merge field requirement for custom templates
...
Online Recalls / Bookings needs to be configured correctly, but is also dependent on multiple EXACT configuration requirements (see Requirements for Online Recalls / Bookings).
...
To set up Online Appointment recall parameters within EXACT
Set this up by means of the Recall Parameters Screen.
...
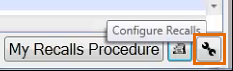
Open the Recall Manager.
Click the Configure Recalls button:
The Recall Parameters Screen displays:

NOTE: Each time that you upgrade the EXACT software, existing settings will propagate into the upgraded Recall Manager.
Configure the different Recall Parameters as indicated below:
...
Recall Types | Dentist and Hygienist, with Providers listed for each. Edit Recall Type for Dentist or Hygienist TIP: You can manually override the default assignment of Providers to Dentist / Hygienist Recall Type. For example, you can re-assign Therapists to the Hygienist Recall Type for practical recall reasons, as they are not permitted to do diagnostics. |
Merge Fields | Click to open a Merge Fields Window. From here you can see how the merge fields will appear in patient communications. This includes:
IMPORTANT: This screen provides a means of specifying whether Dentist and Hygienist recall appointments should be booked separately or in combination, which affects how Receptionists book recalls in the Appointment Book. |
Online Recalls | Click this button to open a screen for configuring the times during which patients can book recalls online. |
Automation | Configure EXACT to automatically send recalls by available means such as SMS, Email and EasyPost. See: Automating Recalls |
...
Customise the website colour scheme and fonts.
Incorporate a practice logo.
Create a practice bio/overview, including opening hours.
The software automatically populates your web page with a Google map based on your physical address.
Cater to all forms of patient booking:
New Patients (Private/NHS/Payors)
Existing Patients (Private/NHS/Payors)
Recall Bookings
Planned Treatment Bookings
Create multiple Booking Reasons, with defined Price and Deposit (the Deposit field is only available if you have the Online Payments module)
Customise the Booking Reason display order.
Flexibly configure Providers who will be associated with Booking Reasons, and customise all appointment parameters per Reason/Provider.
Note that Providers who are associated with a Booking Reason can be configured with different appointment durations, Service, Clinics, unbooked time, SMS template and Email template - a Booking Reason is not locked to one service, Provider or any particular appointment parameter.
Campaigns created in Marketing Manager can be associated with a particular Booking Reason. Users booking online as a result of a campaign can then be tracked for marketing metrics.
View all marketing-related Booking Reasons in the Web Setup screen.
Add a Google Analytics Tracking ID that enables Google analysis and reporting on the number of people clicking through to the online booking portal.
Opt to take payments from the website, for which receipts are generated from EXACT (requires the Online Payments module)
Customise the policies and procedures that patients view on the booking site.
...
All configuration tasks can be conducted within EXACT; there is no need to go to an external website for configuration.
Customise, add and remove Booking Reasons that patients will see as options. These Reasons are not constrained to limited preset options - create any reasons that suit your bookings.
Because the EXACT Online Booking Website Builder is built into EXACT,
Our software developers can build upon the tight integration between EXACT and online bookings (Existing Patient online booking is an example).
Going forward the website builder will evolve in step with EXACT to directly suit the needs of our EXACT users.
Practices secure committed bookings by taking online deposit payments.
...
Prerequisites for Location support in Online Booking:
EXACT v12.8 or later.
The practice is configured for Online Booking, with booking functionality.
Practice Locations are enabled:
(Configure - > Practice Settings >
 Enable Locations)
Once Practice Location is enabled (above), it becomes possible to enable online appointments Enable Locations as follows:
Configure > Online Appointments > Web Setup window >
Enable LocationThe practice must be configured for multiple Locations, where EXACT then treats each Location as a separate "practice" for patient booking purposes and for Provider free time available for bookings.
Online booking Free Time must be uploaded to activate each Location as a new practice.
This is only possible if Providers are configured for a Preferred Location (in the Provider File), so that their free time is available in the new Location.
If provider Preferred Location is not specified, EXACT assumes the practice Default Location as the Provider's preferred location, and the free time will only upload to the practice default location.Recommended: Patents are configured for a Preferred Location (in the Patient File Details tab). If not specified, EXACT assumes the practice default Location as the patient's preferred location.
On upgrade to EXACT v12.8:
Practices with multiple existing Locations will have those locations listed in the Web Setup, but without being configured or enabled.
...
If not already set up, configure multiple locations for your practice.
NOTE: Once locations are enabled, until you define them, on logging into EXACT you will see this message:

When configuring Web Setup, tick to Enable Locations, then select a Location:

Default Location for Providers and Patients who have none specified:
The top Location in the dropdown menu is used by EXACT as the preferred Location for those Providers and Patients who have not specifically been configured with a Location:

So, unless you assign New patients a Location, EXACT will assume this as their Location.
Click the Practice Info button to set up the online booking page for the selected location.
(You can independently set up a booking website for each of your created Locations):

Repeat the Practice Info setup for each Location in the dropdown list.
Appearance options:
Maintain a common corporate appearance across Locations, or
Configure different looking Locations:

In the Web Setup, customise the booking websites / locations to match the Practice Info.
For example:

Setup the address, phone number and description per location.
Use the same practice Email address across all locations.
EXACT applies the following logic in using Preferred Locations versus other locations:
...
If an online booking Provider has this preferred location field specified in Provider file > Pref Location, EXACT uploads their free time to their preferred location booking page.
Otherwise the provider's free time is uploaded to the default online booking location.
...
The Patient Details tab has a Pref Location field.
EXACT first uses a patient's Preferred Location, if specified in Patient file > Details tab > Pref Location.
If a patient does nothave a specified preferred location, EXACT uses the patient Provider's location.
If the patient Provider does nothave a specified preferred location, EXACT uses the default online booking location.
...
Combined Recalls:
For Combined Recalls, EXACT uses location options in this order:
...
Family Recalls:
For family recall, EXACT uses the main contact patient's location in this order:
...
Marketing Campaign:
For marketing campaigns EXACT uses locations in this order:
...
Appointment Workflow:
From EXACT v12.9 practitioners who log in to a Location and use the Appointment Workflow will see only that Location's patients on the Departure Task List (Exit Workflow). Patients who are booked for a different Location will not display.
...
Merge Fields for Preferred Location:
From EXACT v12.9 EXACT has merge fields specifically for using the Preferred Location in patient correspondence.
...
Select File > Providers...
Choose a Provider.
At bottom left of the Provider Setup, use the selectors to specify a Pref. Location:

If you do not configure a Provider Preferred Location:
The top Location in the dropdown menu will be used by EXACT as the preferred Location for those Providers who have not specifically been configured with a Location:
If the Preferred Location is deleted from Locations setup:
In this situation EXACT will prompt you to update the Provider's Preferred Location.
...
Select the Patients desktop > Details tab.
Select a Patient.
Use the selectors in the Pref. Location field to select the Preferred Location:

If you do not configure a Patient Preferred Location:
The top Location in the dropdown menu will be used by EXACT as the preferred Location for those Patients who have not specifically been configured with a Location:
Location field in the Edit Appointment window
...
EXACT Online Booking Website Builder
Use the EXACT online booking website builder to configure your dental practice online booking website from within EXACT.
Overview of EXACT Online Booking Website Builder
EXACT's Online Booking Website Builder enables dental practices to configure their online booking websites from within EXACT, without leaving the EXACT software.
Features:
Customise the website colour scheme and fonts.
Incorporate a practice logo.
Create a practice bio/overview, including opening hours.
The software automatically populates your web page with a Google map based on your physical address.
Cater to all forms of patient booking:
New Patients (Private/NHS/Payors)
Existing Patients (Private/NHS/Payors)
Recall Bookings
Planned Treatment Bookings
Create multiple Booking Reasons, with defined Price and Deposit (the Deposit field is only available if you have the Online Payments module)
Customise the Booking Reason display order.
Flexibly configure Providers who will be associated with Booking Reasons, and customise all appointment parameters per Reason/Provider.
Note that Providers who are associated with a Booking Reason can be configured with different appointment durations, Service, Clinics, unbooked time, SMS template and Email template - a Booking Reason is not locked to one service, Provider or any particular appointment parameter.
Campaigns created in Marketing Manager can be associated with a particular Booking Reason. Users booking online as a result of a campaign can then be tracked for marketing metrics.
View all marketing-related Booking Reasons in the Web Setup screen.
Add a Google Analytics Tracking ID that enables Google analysis and reporting on the number of people clicking through to the online booking portal.
Opt to take payments from the website, for which receipts are generated from EXACT (requires the Online Payments module)
Customise the policies and procedures that patients view on the booking site.
...
All configuration tasks can be conducted within EXACT; there is no need to go to an external website for configuration.
Customise, add and remove Booking Reasons that patients will see as options. These Reasons are not constrained to limited preset options - create any reasons that suit your bookings.
Because the EXACT Online Booking Website Builder is built into EXACT,
Our software developers can build upon the tight integration between EXACT and online bookings (Existing Patient online booking is an example).
Going forward the website builder will evolve in step with EXACT to directly suit the needs of our EXACT users.
Practices secure committed bookings by taking online deposit payments.
...
Select Configure > Online Appointments and select the Web Setup button:

The Web Setup - Online Booking window displays:

Decide whether to display the Call Me option.

If you leave this checkbox un-checked the booking patient will see no Call Me Back option.

If you check (tick) this the booking patient will see a Call me Back checkbox:

Decide whether to use Appointment Stacking.

If you leave this checkbox un-checked (default), the software shows only those appointment gaps at the top of a series of gaps. In this way you constrain bookings to fill up in an orderly manner, without leaving large blank gaps, and the practice appears to be professionally busy.
For example, booking gaps exist tomorrow from 8.00am through to 3.00pm, but with Appointment Stacking disabled, a patient will only see the 08.00am slot.

Select this checkbox if you want to show all available appointment gaps to patients using the booking site.

Decide whether to have Open Recalls.

If you leave this checkbox un-checked, then when Recall patients go to book their recall appointments they will see only the available appointment slots after their recall due date (it is not open to any dates).

If you check (tick) this then when Recall patients go to book their recall appointments it is open to any booking - they will see all available appointment slots, not just the appointment slots after their recall due date.
Decide whether to Use Rostered Available Time (Rooms).
This feature enables practices to specify which rooms apply to online booking.
Practices often use Rooms for non-booking purposes. For example, a practice that doesn't normally use rooms adds a room for a business purpose, but they do not want this room to be used for online booking, or a practice uses rooms, but doesn't want all of these rooms to be used for patient online booking purposes.
Prior to v11.10 these practices could not benefit from online booking because they needed to set Schedule to Rooms in the appointment book setup wizard, and this stopped any times from being uploaded to the online booking site.
The Use Rostered Available Time (Rooms) checkbox enables these practices to properly use online bookings.
The checkbox only appears if you have at least one Room in an Appointment Book. Its default state is checked.
The implications of checked versus un-checked for sending data to the online booking site:

Summary:
When this checkbox is checked, EXACT only uploads the Rostered free time to the online booking site (no free time is uploaded if there is no rostered free time).
When this checkbox is un-checked, EXACT uploads all Provider free time as slots (including both rostered and unrostered) to the online booking site.
When the Appointment Book is set for Schedule to rooms but no room is added in any appointment book, this checkbox does not appear and there will be no free time uploaded to the online booking site.
If you have Locations enabled (Configure > Practice Settings >
 Enable Locations)...
... then this field is visible, but by default un-checked (disabled)To enable, tick the checkbox and select the default Location (from the dropdown menu) for this particular Web Setup:

Note that each of the Locations in the dropdown menu needs to be set up separately.
Configure the Booking Reasons:
-Customise, add and remove booking reasons that New and Existing patients will see as options on the booking website.
- Use the Up / Down arrows to re-order the reasons as you want them to appear on the booking site.

The above example will appear as follows on the patient booking site:

On upgrade:
If your practice has never configured reasons before, on software upgrade you will see the default booking reasons. However, if you have configured reasons previously, these will display on upgrade (you won't lose them).
Each Booking Reason requires configuration. If you leave any fields blank, EXACT will fall back on your Provider default setup configuration.Either select an existing reason and select the Edit button, or select the [+1] button to create a new booking reason.
Add Booking Reason screen (options):
Start by typing a Booking Reason name, taking into account how this will appear to booking patients...
How the Reason displays on the booking website:

TIPS:
 Patients will see this name on a dropdown list of Reasons, so they need to understand what it means. The name does not necessarily equate to one service because each configured Provider may specify a different service. For marketing-campaign respondents the Booking Reason will be pre-selected.
Decide on the Settings options for New and Existing Patients:
Configure them separately:

Configure only New or only Existing by checking / unchecking the checkboxes in each tab

Use the same settings for both New and Existing Patients:

Specify a Price for patients to view.
If you have the Online Payments module configured you can also specify a Deposit:

(Practices without the online payments module can only set a Price for patients to view online)
This financial functionality must have been enabled for your practice by Software of Excellence FIT Team or Operations Team personnel, whom you can contact by querying the Support Desk.
If you leave a Price or Deposit field blank the field is not used at all, so for a value of zero, specify a value of 0.00.
EXACT will not let you specify a Deposit value greater than the Price value.
In the Add Booking Reason window, select the Configure Providers button
Provider/s must be specified for bookings.
If you do not configure Providers, this booking reason will display in red text in your Web Setup window, but will not display to patients on the booking site.The Default Provider Reason Configuration displays:

Here you have the opportunity to simply use default settings from the Provider Types:

Select Yes to use default settings (which you can still edit) or select No to customise settings.
If you select Yes, EXACT automatically populates the Online Booking Reason Configuration window:

If you select No, you will need to manually populate the Online Booking Reason Configuration window:

In this window, select a tab (New or Existing Patient), and then click the [+1] button to open the configuration window for a single Provider:

Once configured, click the [+1] button to add further Providers.
If required, repeat the process for both New and Existing tabs.
Marketing Reasons display:
In marketing campaign setup Booking Reasons are associated with the automated marketing campaigns.
These reasons are shown in the Web Setup - Online Booking window as a reference list for the practice; they do not display to patients on the booking site.
They can be edited from this window, but cannot be created or deleted.

Configure the Provider Images and Practice Info:
Provider Images button |  Only Providers who are configured for Online Bookings will display in this window. Configure identifying images for Providers, such as photos, cartoons or symbols:  The image must be on a web server that the system can access continuously without a password or access restrictions. Location examples: on your main practice website, on a freely accessible Flickr page, a shared Google Drive folder, or a shared Dropbox folder. For each Provider, enter a web address to the image and then click the Connect to Picture button to display the image and check that the connection functions. |
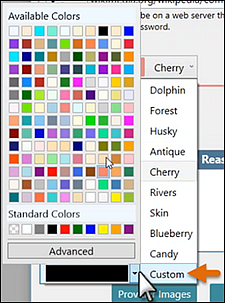
Practice Information |  Select the Practice Info button to configure Practice Logo, colour scheme, a textual summary of the practice (opening times, services, specials, location, etc.), and optionally, the Google Analytics code for the practice:  Select a Practice Logo. As the instructions state (see above image), the logo image must be on a web server that the system can access continuously without a password or access restrictions. Mouseover the logo to see it at actual size: 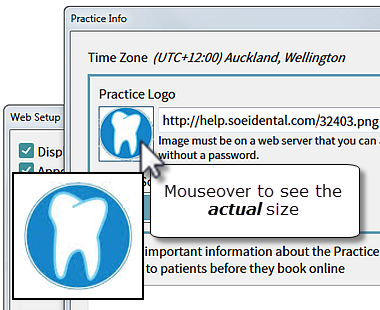 Select a Colour Scheme to function as the dominant colour in the patient booking page. 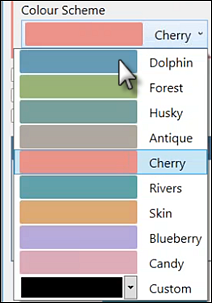
Booking page example for Dolphin colour scheme (as about to be selected in the image above left): 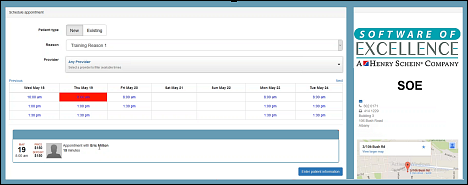 Add important practice information.| 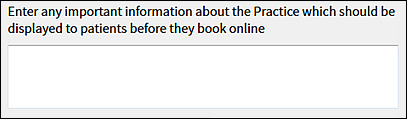 Practices can add a Google Analytics Tracking ID that enables Google analysis and reporting on the number of people clicking through to the online booking portal.  For practices with Locations, either
The field has validation, so EXACT will warn you if your Google Analytics Tracking ID does not conform to the correct format. Google Analytics is independent of EXACT and is not reported within EXACT - once set up you will need to log into a Google account to use the functionality. 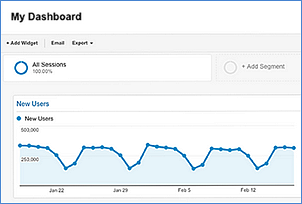 |
Custom Text |  Optionally add custom text: Online Booking configuration includes a means of configuring two text areas for display on the booking website. By default the intention is that when patients book online, at the end of the booking procedure they can view the practice policies/procedures for Complaints and Cancellations, however, these two text areas are completely customisable - give them ANY headers and ANY content. |
Emergency contact email |  On the booking site patients will see this email address as the optional contact address. |
...
At the end of the online booking procedure booking patients can view the practice complaints and cancellation procedures.
From EXACT v12.2 onwards you can customise these Configurable Policies.
...
By default the intention is that at the end of the booking procedure patients can view the practice policies/procedures for Complaints and Cancellations:
...
However you don't have to call them Complaints and Cancellation - these two text areas are completely customisable - give them ANY headers and ANY content.
To customise these text areas
...
It also creates a payment method of .OLB (Online Booking), for use when EXACT receives a payment through online booking. The .OLB payment method is not available for use with standard (offline) payments.
...
Online payments configuration also creates a payment method of .OLB (Online Booking), for use when EXACT receives a payment through online booking.
...
Requirements for Online Payments
Requirements
EXACT version 12.1.
Online Booking (OLB) module has been configured for the practice.
The setup process includes practice registration with a third party online payments management company.
...
Contact your regional Software of Excellence FIT Team or Operations Team (query the Support Desk).
The team will check (tick) the Enable Online Payments checkbox in your Practice Settings window as a means of registering the online payments module for your practice:

The team will explain any further actions required on your part, including your registration with a third party online payments infrastructure.
...
Stripe Online Payments Infrastructure
EXACT integrates with the Stripe online payment infrastructure.
...
IMPORTANT: The online booking financial figures reported in EXACT are before service charges by the third party Stripe banking, so the EXACT figures are not identical to the payments into your bank account.
...
When online booking becomes enabled EXACT creates an .OLB Patient Payment Method.
...
When a payment is received via the .OLB payment method, the following occurs in EXACT:
EXACT creates a new open patient transaction record:

Within the transaction record detail the Comment field displays the third party Authorisation ID for that payment transaction and the Payment Method is set to .OLB:

EXACT sends a receipt of the received OLB transaction to the patient email address.
This receipt template in EXACT is Online Payment Receipt.
This template can be viewed and edited
The sent receipt is added to the patient’s Contacts with the description Online Payment Receipt.
Note that the system does not support electronic refunding - all refunds must be managed by means of the standard practice process.
...
Online Booking Receipt Template
EXACT has a default Email template for sending online booking receipts: .OLB_RECEIPT_EMAIL
...
Select Configure > Email Templates...
Locate and select the .OLB_RECEIPT_EMAIL template

Double-click or click the Edit button to open the template:

Edit and Save the template as required