...
...
...
...
...
...
...
...
...
...
...
...
...
...
...
...
...
...
...
...
...
...
...
...
...
...
...
...
...
...
...
...
...
...
...
...
...
...
...
...
...
...
...
...
...
...
...
...
...
...
...
...
...
...
...
...
...
...
...
...
...
...
...
...
...
...
...
...
...
...
...
...
...
...
...
...
...
...
...
...
...
...
...
...
...
...
...
...
...
...
...
...
...
...
...
...
...
...
...
...
...
...
...
...
...
...
...
...
...
...
...
...
...
...
...
...
...
...
...
...
...
...
...
...
...
...
...
...
...
...
...
...
...
...
...
...
...
...
...
...
...
...
...
...
...
...
...
...
...
...
...
...
...
...
...
...
...
...
...
...
...
...
...
...
...
...
...
...
...
...
...
...
...
...
...
...
...
...
...
...
...
...
...
...
...
...
...
...
...
...
...
...
...
...
...
...
...
...
...
...
...
...
...
...
...
...
...
...
...
...
...
...
...
...
...
...
...
...
...
...
...
...
...
...
...
...
...
...
...
...
...
...
...
...
...
...
...
...
...
...
...
...
...
...
...
...
...
...
...
...
Search these help files
| Live Search | ||||
|---|---|---|---|---|
|
| Table of Contents | ||
|---|---|---|
|
...
| Run Recalls Button | This appears if you have configured for manual initiation of the automated recall parameters. Click the button to run the recalls according to the configured parameters. |
| My Recalls Procedure Button | A notepad to type up procedures for quick reference. |
| Print Report Button | Click to print the Recall Breakdown Report. |
| Set up Recalls Button | this is the means to configure Recall Manager. Click to display the Recall Parameters screen. |
How Providers set the Recall Details
...
When Providers treat the patient and prepare to finalise the treatment, EXACT pops up amended Recalls Due suggestions.
...
VARIABLE recall default values
From EXACT v12.2 onwards the Provider can opt per patient for that patient to use either default recall values or recall values that the Provider customises for the patient.
...
(This should in most cases be checked already by default following an upgrade from pre-v12.2 to post-v12.2 EXACT)

From EXACT v12.2 recall defaults have been expanded to included variable recall defaults - See also:
...
When a Provider completes a treatment, EXACT prompts for confirmation of Recall details for that particular patient. The Provider can reject or edit suggestions before confirming the recall details.
Changes:
- From EXACT version 11, the Recall Prompt is constrained:
- Only Providers with the appropriate setting in the Recall Manager configuration see the Recall Prompt.
- Receptionists do not see the Recall Prompt.
- The Recall Prompt only displays when EXACT calculates that some patient recall parameter needs to change, in which case it identifies suggested changes in red text.
- From EXACT version 11.3 SP6, the recall prompt allows Providers to either reject EXACT suggested recall updates:
 , or re-instate them after rejection:
 :
:
To set the Recalls based on EXACT suggestions
- When Providers with the appropriate settings finalise a treatment, they are prompted for patient recalls.
For example:

The words in red text are suggestions from EXACT, following the treatment that the Provider is now completing.

There are three possible actions to perform with the screen:
- Edit the suggested changes by means of the blue hyperlinks.
- Reject the suggested changes by means of the button.
- When the recall details are correct, click the OK button.
- To reject these changes, select the button and then click OK. Note that once you reject the changes, the button toggles to , which you can click to reinstate the suggested changes that you rejected.
- To edit these recall details, click the blue Recall hyperlink/s, for an Edit Recall Detail screen, change the fields, then click the Update button:

- To accept these suggestions and / or any edits that you made, simply click OK.
The information will then be updated in the Recalls Due area in the Patient's Recalls Tab.
...
Variable Recall Default Values are an optional feature from EXACT v12.2 onwards. On upgrade your recalls will work exactly as before unless you reconfigure them.
...
Recall Manager historically had a single default appointment service, length and recall interval for each recall type, and this was applied to all New patients.
From EXACT v12.2 the recall defaults can be flexibly overridden so that the appointment service, length and recall interval vary depending on patient Age, Payor, and Provider.
...
Recall Manager historically had a single default appointment service, length and recall interval for each recall type, and this was applied to all New patients. For example an Examination service set at 20 minutes would apply to all patients, even though this appointment length may be more suited to an adult than a child. With this configuration, where a different recall was required, Providers would manually customise the default recall appointment length when they created the recall.
From EXACT v12.2 the recall defaults can be flexibly overridden so that the appointment service, length and recall interval vary depending on patient Age, Payor, and Provider.
...
For each group, specify the values that will override the system defaults: recall Service, appointment Length and recall Interval.
Order the groups carefully by means of the Up/Down arrows because EXACT identifies only the first group that a patient matches, working from the top of the list to the bottom.
EXACT then assigns to the patient the override Service, appointment Length and recall Interval as defined for that first applicable group.
...
However, because each patient file requires a "Use" or "Don't Use" default recall values setting after upgrade, EXACT follows this policy:
- Where patients use Provider-customised recall values, EXACT keeps the Use Default Recall Values checkbox unchecked, as before the upgrade.
- Where patients already use default recall values, on upgrade EXACT checks the new Use Default Recall Values checkbox:

- On upgrade EXACT also checks the Use Default Recall Values checkbox for the following types of patients:
- Where the patient's recall settings don't exist at all,
- Where the patient's recall settings are identical to the practice default values at the time of upgrade,
- Where the patient is set to do not recall.
- Future new patients.
...
When these patients' recalls are advanced, EXACT looks at the recall default settings and at the Overrides at that time, and changes the patients' recalls to match.
...
With the variable recall flag set, when a patient is due to advance their recall, EXACT compares the patient to all the override options and chooses the first match. If there is no match it uses the global default values.
...
Normally Providers can opt not to view the patient recall prompt during treatment.
However, EXACT will override this personal preference and display the recall prompt for any patients who have changed group, or for whom the group recall parameters have been changed.
...
Recall Manager provides automated, live, real time status information. The data in the graphical display is Live,so as you change recall dates in EXACT, it updates instantly, providing a visual snapshot of your recall effectiveness at any moment:
...
For example, the predominance of red in a screen would be worrying.
...
Colour | Representing | Good or bad indicator? | |
Dark green | Booked: Patients with recalls whose appointments have been booked. | Committed business. This is the best recall status. | |
Light green | Future: Patients with recalls in the future who do not haveappointments. | Still good. | |
Light blue | Completed: Patients who completed treatment. | Indicates work done. | |
Dark blue | Moved On: Patients with appointments that have been postponed. | Okay. | |
Grey | Inactive: patients who are permanently lost to the Practice. | Lost. | |
Dark red | Do not recall: whether due to a patient decision or a Provider decision. | Not lost just yet. | |
Red | Failures: Patients who failed to be recalled, with no further planned recalls or appointment bookings. | "The life blood of the Practice draining away". NOTE: The Recall Display should not show much red. If the Practice hasn't seen patients for a few years, or if they are |
...
Exporting the Recall Breakdown Report
EXACT provides the means to export reports in .CSV (comma-separated values) format, which is readable in common consumer, business, and scientific applications, including Microsoft Excel.
- Access the Recall Breakdown Report and select report parameters
- Click the Export button.

- If necessary, name the file when prompted, and save to a custom folder (by default exported files are saved in .CSV format to C:\EXACT Exported Reports).
You may see a popup explanation screen:

...
- From the Recalls Manager screen, click
 at bottom right.
- Type notes in the window and then click OK:

The window has a header Detailed Recalls Procedure for [practicename] where the practice name is defaulted by EXACT. The text field below it is a custom notes field.
- Click in the field and type, or edit the existing text, and then click OK.
...
In this example, Receptionists have been limited from editing the content:

From the Recall Manager screen:
...
IMPORTANT:
The button functions on this toolbar apply to just the data that displays on the screen. For example, if you apply a filter and then click the Email button to recall patients by email, EXACT will issue email recalls only to the patients represented in the filtered data on the screen (not to all recall patients).
Recall Manager will not attempt to contact INACTIVE patients.
...
It is possible to filter a list of patients for recall, and then to have EXACT print letters to all of them, with their correct recall details.
...
Patient Contacts tab lists letters
If EXDOC is installed these letter contacts are automatically stored on the patient’s Contacts tab and can be viewed and/or edited by double-clicking on the required letter.
NOTE: Without EXDOC the letter symbol will indicate the creation of a letter, but the actual letter itself will need to be either saved manually on one of the practice's computers or printed in duplicate and the copy held on file.
...
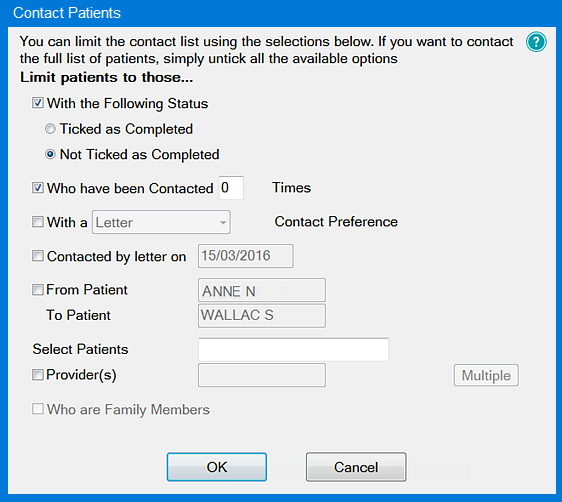
- Select the Create a Patient document button
 .
. - Complete details in the Contact by Letter screen:

Select the type of letter: Create either a single letter to the selected patient or multiple letters to patients within the contact list.
Select Group by Family if there are several members of the same family, and you want to send one letter for the family.
You have the checkbox option to Tick as complete when printed. If you check this box, EXACT will remove each patient from the contact list when the letter for that patient is printed, leaving only patients on the list with unprinted letters.
With this unchecked the patient is not marked as Complete on the contact list until further manual action is taken. In other words, leave the checkbox unchecked if you want a reminder to take further action.
- Select OK.
A Contact Multiple Patients window will appear:
- With these fields appropriately configured, select OK.
The Document Details window displays, as described below.
If you have Presentation Manager enabled, the Document Details window will have a preview window and slightly different fields.
The Document Details window enables you to write to the patient as well as create/modify the Letter Templates that are the basis of the individual letters written.
Letter Templates can include merge fields. These are placeholders for patient, provider, specialist, practice and other details that can be inserted directly into a letter from EXACT,which are replaced with actual data when the letter is processed.
Document Details window:

Complete the following fields (as appropriate) to create the document:
...
It is possible to filter a list of patients for recall, and then to have EXACT print letter labels with their correct recall details. You have the option to further filter this list by means of Query Templates:
...
Contact lists can be created and viewed from multiple areas of EXACT, such as:
- Administration > Contact Lists
- Multi Column appointment book Contact Lists tab
- Marketing Manager Contact Lists for promotions
- The Recalls window (Administration > Manage Recalls > Double-click on a recalls list) or
- The Contact Lists window (Administration > Contact Lists > Double-click on a list)
...
It is possible to filter a list of patients for recall, and then to have EXACT email these patients with recall details.
...
- Click the Email button
 at bottom right of the screen to open the Contact by Email screen:
Select Single or Multiple Emails.
Select Group by Family if there are several members of the same family, and you want to send one Email for the family.
You have the checkbox option to Tick as complete when sent. If you check this box, EXACT will remove each patient from the contact list when the letter for that patient is printed, leaving only patients on the list with unprinted letters.
With this unchecked the patient is not marked as Complete on the contact list until further manual action is taken. In other words, leave the checkbox unchecked if you want a reminder to take further action.
- Select OK.
- If you selected Multiple Emails, complete the standard Contact Patients screen, but as applicable for Email:
- With details specified, click OK to advance to the Email Details screen:

- Complete the appropriate fields.
- Choose an Email template by means of the selectors.
- Document attachment options are greyed out unless you first check the Attach Document checkbox. Click any document attachment to see a preview at right.
- Click OK to advance to the Create Email screen.
This will either be blank (if you did not specify an Email template), or it will contain the Email Template that you specified:
Blank:

With sample specified template:

- Optionally Attach any documents, image files (x-rays, photos, etc.) or other files.

When you select Finish, the attachment/s appear in the Create Email screen. You can right-click them to see further options:

To add a further attachment, click the +1 button.
To delete an attachment, select it then click the Delete button.
To save an attachment to another location, select it, click the Save button, and specify the location.
To open (view) an attachment, select it then click the Open button; this will open the attachment with the appropriate program.
- Complete the email as you require and then click the large Send button to have EXACT automatically send off the emails to the specified contacts.
- Check in the Patient file Contacts tab for records of contacts.
...
Exporting the Recall List
EXACT provides the means to export reports in .CSV (comma-separated values) format, which is readable in common consumer, business, and scientific applications, including Microsoft Excel.
...
Adding Recalls to Appointment Book slots
NOTE: This does not apply to automated recalls, for which appointments may be confirmed without user intervention.
- Double-click the Recall Date
 in the Recalls Tab to display details for the Recall:
This shows the duration of the appointment needed (taken by default from the services configuration), the service type, and the last seen Provider. Ideally your appointment should be to this same Provider for this duration. The service type may be important for booking if your Practice groups services by dates and times.
- Locate an available slot in the Appointment Book to match the Provider in the recall (Dentist or Hygienist). Note that EXACT won't let you add a Dentist booking to a Hygienist Provider, or vice versa.
...
Recalling Patients Automatically
EXACT can be configured to daily calculate which patient recalls are due and then automatically send recall notifications to those patients in multiple media (SMS, Email, EasyPost).
...
Manually running EXACT's automated recalls
The setup for EXACT's automated recalls includes
- WHEN to contact patients.
- The methods for HOW to contact patients, and which TEMPLATES to use for each method.
- The preferred ORDER of contact methods for patients who do not have a preferred method for contacts (for example, first try SMS, then Email, then posted letter).
- Specific templates for custom patient groups.
EXACT can run this set of recall parameters automatically every day, or a user can manually initiate these recall parameters at will.
...
Open Recall Manager > Click the Configure Recalls ![]() button > Click the Automation button > de-select (un-check) the
button > Click the Automation button > de-select (un-check) the ![]() Run Recalls automatically checkbox:
Run Recalls automatically checkbox:

To manually run EXACT's automated recall parameters
- Open Recall Manager either from Administration > Manage Recalls... or from a manually-created shortcut on your task bar:

- Click the Run Recalls button at bottom right of the screen:

- Take note of the popup message, identifying when last the recalls were run (another user may already have run them). Select Yes to continue:

EXACT then runs the configured recall parameters.
- (Optional) Locate the current month in the Recall Manager display and watch the statistics change in real time (Live) as EXACT processes the recalls:

- (Optional) double-click to open the month view and watch the status of recall notifications to individual patients. These will appear under the Prior Contacts column as icons representing the recall media:

You can click any icon for details of that particular patient recall.
...
From release 11, it is possible to configure automated recalls and then either 1) let EXACT continuously contact patients based on this automated recalls configuration or 2) manually initiate this automated recalls configuration.
...