EXACT has 2 different Perio functionalities. The basic/original Original Perio Charting and the advanced Single Screen Perio Charting.
Information on how to enable Single Screen Perio can be found here - Enable/Disable Single Screen Perio
...
Using the Pocket Depth and recession it will automatically work out the attachment score and highlight if over a certain figure. Finally, the clinician can add diagnosis and treatment plan information for a detailed perio report.
...
The main screen of Perio is displayed. The most recent perio chart is automatically displayed. The grid will be blank if the patient does not yet have any charts recorded. The view is read-only.
...
You can view older charts by clicking on their date in the left-hand panel. From the Perio workplace you can also add a new chart, or edit, print, email, or delete existing charts.
...
To Add a Perio Chart
1. Click the Add button in the Perio workspace area:
...
2. The Add Perio Chart window will display, overlaid on the Perio tab area:
...
Press the Tab key to tab to the pocket depth of the 1st section (section order is as defined in the tab order in the Configure Perio Chart Screen).
Enter the data with procedures indicated below: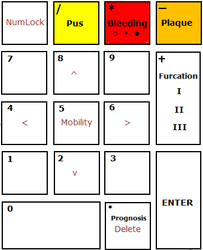
...
To enter a number on the Perio chart and move the cursor to the next box
Press a number key to enter a value (from 0-9) in the current box. This also moves the cursor on to the next box.
For Pocket depth holding the number down will cycle between the number and the number +10. Release the number key when the correct value is shown
For Recession holding the number down will cycle between the number, the number +10 and – the number then back to the number again. Eg 6, 16 , -6. Release the number key when the correct value is shown
...
To record plaque on or off at the current position Left-click in the Plaque field to cycle: plaque on > plaque off at that position. OR -
...
Press '-' to cycle: plaque on > plaque off.
...
To record the Mobility at the current positionLeft-click in the Mobility field to cycle: blank > 0 > 1 > 2 > 3 and then back to blank
OR
...
NMLK+5 cycles the Mobility field at the current position: blank > 0 > 1 > 2 > 3 and then back to blank.
NOTE: Blank is unrecorded, zero is 'No Mobility'
To record Furcation at the current positionLeft-click in the Furcation field to cycle: blank > I > II > III
OR
...
Press '+' to cycle the Furcation field at the current position: blank > I > II > III.
NOTE: On teeth where there are two furcation positions, if the cursor is in a 'middle' position, the key will cycle the left most leftmost field.
To delete the entry at the current cursor position, and keep the cursor in that position
Press NMLK+'.' to delete the entry in the current field and revert it to blank. The cursor will not move.
To Edit or delete a Perio Chart
1. Select To Edit Perio charting select a chart in the Perio workspace area and then click the Edit button :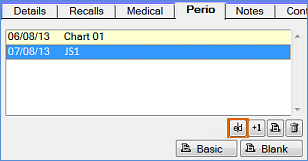
2or double click the entry. This opens the existing chart with data.
3. , Complete it as required and click OK to save it.
To Delete a Perio Chart
Use the Delete button to mark a selected perio chart as deleted:
...
Print or e-mail a completed Perio Chart
...