| Live Search | ||||
|---|---|---|---|---|
|
...
With the appropriate configuration, EXACT processes SMS replies, matches them to patient name and appointment times, and populates the Appointment Book with confirmed appointments, all without human intervention.
However, if the replies are ambiguous, EXACT cannot match them, and this automation is not possible. Practice personnel (normally Receptionists) should therefore routinely monitor the SMS Replies List for these ambiguous replies and manually match them (establish whom an SMS is from, what it relates to, and what actions should be taken).
...
The SMS Replies lists display all incoming SMSes that EXACT cannot confidently classify and act upon. These can include
...
Option to display all SMS Replies, including those that EXACT auto-matches:
The SMS Replies list has a Show Completed checkbox. When checked / ticked, all incoming SMS's display in the list.
...
It is possible to manually create SMSes and send them to Patients with keyword options. However, these will not result in automated EXACT responses; users will always need to manually process such messages in the SMS Replies lists.
...
The SMS Replies icon displays by default on the workbar from EXACT v11.3:
...
This icon includes an alert counter to show how many incoming SMS Replies are unmatched / uncompleted, and therefore require manual attention.
...
Patients normally reply with the appropriate SMS keyword, and EXACT then automatically confirms the appointment with the patient, and marks it as complete.
...
Instead of replying "YES" to confirm, a patient replies "YES but I'll be five minutes late because I'm dropping my child at the Preschool".
Instead of replying "NO" to cancel, a patient replies "No mate, not this time".
EXACT displays these ambiguous replies in a List for interpretation / manual processing by Practice personnel.
...
Click to select the SMS and then click the Match Reply button.

Match the SMS to the appropriate patient and appointment / contact list
Click the Confirm Appt button to confirm who this is, what it is for, and what to do.

Check (tick) the SMS Reply to mark it as completed. EXACT will then
Remove it from the SMS Replies Tab and from the Manage SMS Replies list
Decrease the SMS Replies Counter Alert by 1.
...
To create keywords using the EXACT conventions and limitations
...
Keywords maximum size is 25 characters.
Keyword minimum size is 1 character.
Keywords cannot contain spaces.
Keywords must be alphanumeric (special accented characters are OK).
Keywords cannot occur in a single keyword list twice.
The total length of all the keywords in a list cannot exceed 250 characters.
(IMPORTANT) A keyword cannot exist in any other active keyword list, whether for appointment reminders or contact lists (inactive contact lists are not counted).
For example, you cannot use YES as a keyword for a currently active contact list and for an appointment reminder.
If you need multiple options for YES and NO, variations could include YES1, YES2, Y1, Y2, OK, OK1, NO1, NO2, N1, N2, etc.
...
Monitoring and Matching SMS Replies
This section describes EXACT's two SMS Replies screens, lists circumstances when user intervention is required, and describes procedures for Appointment Confirmations and Cancellations with either of these screens:
...
It lists those SMS Replies (and other incoming SMSes) that do not meet configured keyword requirements, and therefore need human intervention to determine what they are and what to do with them.
...
EXACT populates the columns as best it can based on the incoming SMS Reply.
...
This screen lists all the SMS messages that were received by the practice that were either not automatically processed by EXACT, or were added to the SMS Replies list because the settings in EXACT directed them to be.
To open the Manage SMS replies screen
...
This is a near duplicate of the list in the SMS Replies Tab of the Appointment Book.
EXACT populates the columns as best it can based on the SMS Reply.
...
When SMS Replies Require User Intervention
Circumstances where SMS Replies require manual action:
Circumstance | Manual action required |
|---|---|
If you manually create SMS Reminders, EXACT will always send the consequent SMS Replies to the Manage Replies List and to the SMS Replies Tab, for you to manually confirm who this is from, what it relates to, and what actions to take. | Read the message, take appropriate action. |
The SMS was received by the practice and has nothing to do with appointment reminders. | Read the message, take appropriate action (such as contact the sender), then remove it from the list. |
The reply comes from a mobile phone number that matches a patient record, but the reply does not contain a valid keyword. | Read the message, take appropriate action (such as contact the sender), then remove it from the list. |
The reply contains a valid Confirmation keyword, but the appointment list option to add the reply to the Manage Replies list is ticked. | If you have chosen the configuration option to have the appointment automatically confirmed in the appointment book, or for the patient to be sent a 'confirmation of receipt' message, no further action is required. Once the details have been checked, click the entry to delete it from the Manage Replies list. |
The reply contains a valid 'cancellation' keyword, but the appointment list option to add the reply to the Manage Replies list is ticked. | In this case, you may wish to contact the patient to make an alternative appointment booking. |
The reply contains a valid keyword, but EXACT cannot match the reply to a particular patient record. This can happen if the number the text was sent from is different to one listed against the recipient, or if more than one patient has the same mobile number. | Read the message, take appropriate action, then remove it from the list. |
...
 | If SMS Replies functions as intended, there is no need for user intervention. EXACT automatically matches incoming SMS replies correctly to the patient and the appointment, these replies do not normally show in the SMS Replies lists, and Receptionists will simply see pending appointments being confirmed in the Appointment Book:  If you wish to also see these replies in the SMS Replies list, tick the Show Completed checkbox:  |
 | To identify ambiguous SMS Replies for manual matching Ambiguous SMS Replies cannot be matched, so they are listed in both the Manage SMS Replies screen and in the SMS Replies Tab. For example:  NOTE: Hover your mouse cursor over the Reply in the Reply column for a tooltip of the full text reply. |
 | To manually match an SMS Reply Confirmation to a patient name Manually match the SMS Reply (identify exactly who, what, when):   When you have matched the reply against a patient and their contact list or appointment, click the Continue button to return to the SMS Replies list. You will notice that the Confirm Appt button is then active, and you can select it. |
 | To confirm an appointment after manually matching an SMS Reply Confirmation to a patient name Confirm the Appointment after matching the SMS Reply, so that EXACT can confirm it in the Appointment Book (this is the same as EXACT automatically matching and confirming the appointment).  The appointment in the Appointment Book will then show a confirmation icon |
 |
 It will immediately disappear from both the Manage SMS Replies List and the SMS Replies Tab. (To view all "completed" (non-displayed) SMS Replies, simply check |
...
| If SMS Replies functions as intended, there is no need for user intervention when the user cancels. Receptionists will simply see pending appointments disappear from the Appointment Book and cancellations being listed in the Cancels Tab of the Appointment Book work area:  If you want the replies to also show in the SMS Replies list, tick the Show Completed checkbox:  |
| Ambiguous SMS Replies are listed in both the Manage SMS Replies screen and in the SMS Replies Tab. For example: NOTE: Hover your mouse cursor over the Reply in the Reply column for a tooltip of the full text reply. |
| To manually match an SMS Reply Cancellation to a patient Match the SMS Reply (identify exactly who, what, when): When you have matched the reply against a patient and their contact list or appointment, click the Continue button to return to the SMS Replies list. You will notice that the Cancel Appt buttons become active, and you can select it to Cancel. |
| To cancel an appointment after manually matching an SMS Reply Cancellation to a patient Cancel the Appointment after matching the SMS Reply (this is the same as EXACT automatically matching and cancelling the appointment):  EXACT cancels it in the Appointment Book and adds it to the Cancels Tab |
|
It will immediately disappear from both the Manage SMS Replies List and the SMS Replies Tab. (To view all "completed" (non-displayed) SMS Replies, simply check |
...
If a Patient receives an SMS from an existing Contact List and replies correctly, EXACT automatically matches the patient to the contact list and the appointment, and confirms or cancels the appointment in the Appointment Book. No user intervention is required.
However, if a Patient replies with ambiguous keywords (not specified on the Contact List), EXACT cannot match the SMS, so it cannot act upon it. EXACT users need to manually match ambiguous Contact List SMS Replies, to a patient and an active Contact List, and then Confirm Appointment or Cancel Appointment.
...
Contacts Lists can be managed from two other areas of EXACT:
From the Administration > Contact Lists.
In the Multi Column appointment book in the Contact Lists Tab.
...
Monitoring Patient SMS Follow-up Responses
From version 11.3 SP6 EXACT can automatically follow-up patient appointments with SMS messages and request patient keyword responses. This is typically used in surveys of patient appointments
...
SMS Follow-ups Report
From version 11.3 SP6 EXACT can automatically follow-up patient appointments with SMS messages and request patient keyword responses. This is typically used in surveys of patient appointments
...
Manually contacting Patients by SMS
IMPORTANT:
SMS Replies software is designed to function with automated reminders sent to Patients. The software links the pending appointment with the automated SMS Reminder, with the patient's SMS Reply.
...
It is possible to manually contact single or multiple patients by means of SMS reminders, but in this case EXACT has no automatic means to link your sent SMS Reminder and the patient's SMS Reply with a pending appointment.
So, if you manually create SMS Reminders, EXACT will always send the consequent SMS Replies to the Manage Replies List and to the SMS Replies Tab, for you to confirm who this is from, what it relates to, and what actions to take.
...
Select the SMS button

from either:
The Recalls window
(Administration > Manage Recalls > Double-click on a recalls list), orThe Contact Lists window
(Administration > Contact Lists > Double-click on a list)
The Contact by SMS window launches:
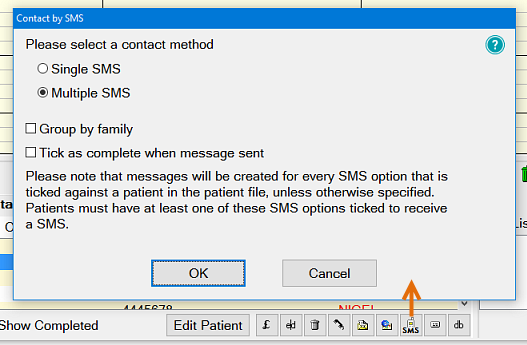
Select the

Single SMS option.
The
 Group by Family checkbox will apply to SMS as it does for letters, and allows email to family members to be sent together. It is greyed out and unavailable if the Single SMS option has been clicked.
The
Tick as complete when message sent checkbox will flag the recall procedure for the SMS recipient(s) as completed once the SMS is sent.Select OK to display the SMS Details window.

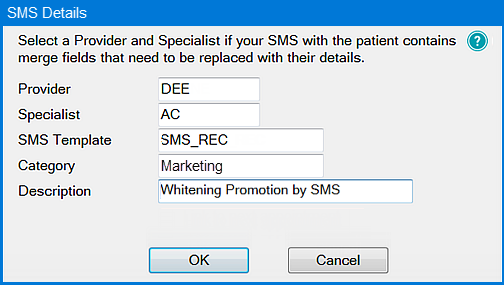
Select the Provider, Specialist and SMS templates (click in each field to activate the selection controls for that field).
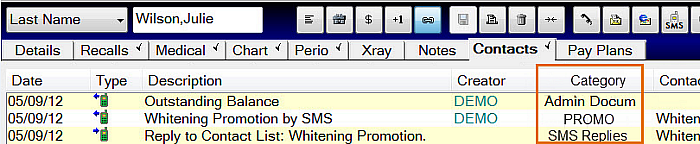
If you select a Category, it will be added against the SMS and displayed in the Category column in the Contacts tab as EXACT does for letters, as a quick reference to identify the purpose of the message.
Click the

button to open the Create SMS window, with the Description and Message fields defaulted (if you chose an SMS template), or the screen blank to enable you to enter your own details.
In the case of a defaulted message, you still have the option to edit the details (see below).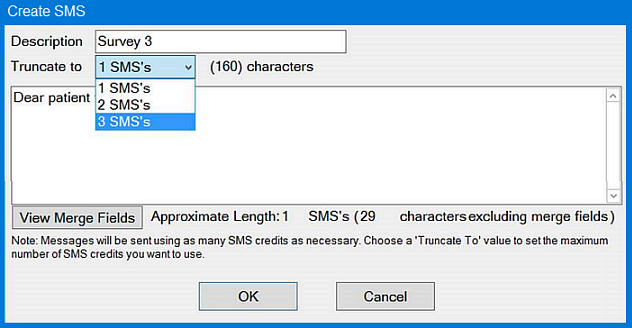
In this window, you can edit the Description ‑ which is used for the Contacts tab ‑ and can also edit the message to be sent.
If the message to be sent is a Flash message, tick the Flash checkbox, if it is not already ticked by default for the SMS Template (if one is used). Alternatively, if the template is for a Flash message, you can untick the checkbox to send it as an ordinary SMS if you wish.
(Flash Message: On some cellphones a Flash message will appear on the screen immediately upon arrival, without the need to press any buttons on the phone. This is a useful alternative to normal SMS to catch the recipient's attention. The recipient has the option of 'saving' the Flash SMS to their Inbox.)
As you enter text, the line under the message box will display the approximate character count (excluding merge fields), and how many 153-character SMS messages this represents, which will be charged against your SMS account credit.
If you wish to limit this, you can either delete text and/or merge fields (such as the patients name, or other details) to shorten the message, or click in the Truncate To field and select the maximum length of the message, in message unit multiples (1 to 9) of approximately 160 character length (1 SMS) or 153 characters for longer messages.Clicking the
button on this window will create the SMS messages for the selected patient in EXACT, and either send the SMS message or queue it to be sent, depending on your settings.
The contact list entry will be updated with the appropriate SMS status icon in the Type column.
For an SMS message, one of the following icons may appear, depending on the status:
SMS appointment reminder sent to recipient (delivered)

SMS message received by gateway (sent, but not yet delivered)

SMS delivery failed (where SOE is the SMS provider; password is wrong, insufficient credit, etc.)

Reply received (for SMS reminder sent to patient)

SMS status is now available

SMS status unknown (TXTConnecxions / Icetrak / 4Production)

SMS failed or not sent to gateway

SMS status unavailable (other SMS providers)
There is also a tooltip displayed when you hover your mouse cursor over each of the icons.
The SMS message will also appear in the Email Outbox until it is sent, when it will be removed and will appear in the Sent tab.
It will have the appropriate icon in the Status column.
Only email replies will appear in the Email Inbox.
If staggered recall settings are in effect, the column marked with a clock icon
 will have a corresponding icon for any items in the Outbox which are subject to the settings.
If you hover your mouse cursor over the icon, a tooltip will tell you when the SMS is due to be sent, as in this example:

...
Select the SMS button
:
The Contact by SMS window launches:
Select the either Single SMS or Multiple SMS.
The
Group by Family checkbox will apply to SMS as it does for letters, and allows email to family members to be sent together. It is greyed out and unavailable if the Single SMS option has been clicked.The
Tick as complete when message sent checkbox will flag the recall procedure for the SMS recipient(s) as completed once the SMS is sent.
With this unchecked the patient is not marked as Complete on the contact list until further manual action is taken. In other words, leave the checkbox unchecked if you want a reminder to take further action.Single SMS option: Click OK to display the SMS Details screen as shown below.
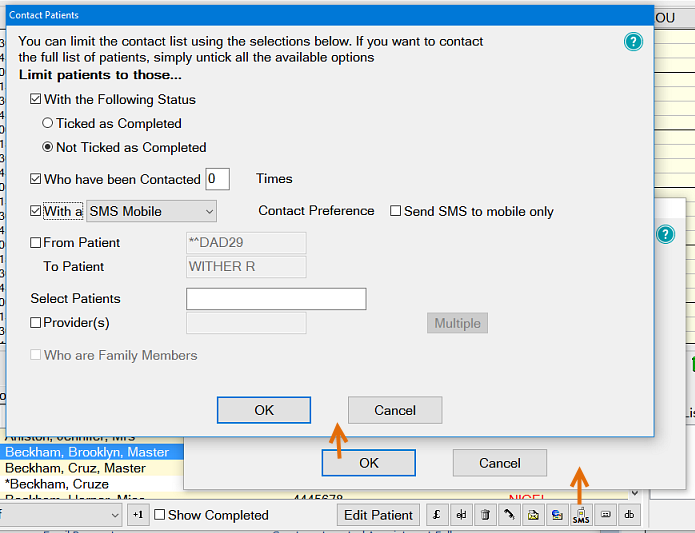
Multiple SMS option: Click OK to display the Contact Patients window. You can either uncheck all options to include everyone on the recall / contact list, or select options according to your preferences.
Once you have selected your list of patients and clicked OK you will be presented with the following screen, if you have set up staggered recalls in your email configuration:

At this point, you can either:
Click the Send all SMS straight away to send the SMS messages.
Accept the staggered SMS settings, as listed.
Change any of the delivery times by clicking on a line, and then delete the line using the

Delete button.
A new delivery time can then be added via the
Add button.
Accept the delivery times, but change the delivery frequency.
To edit the Stagger SMS sending option:
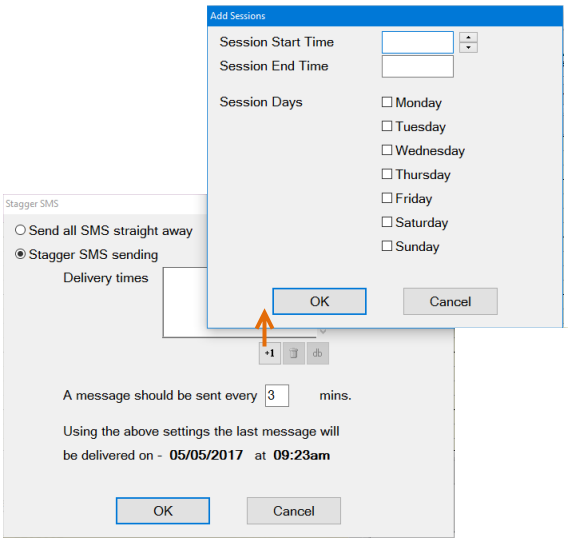
Once you have reviewed (and edited the staggered settings, if required), click the OK button.
The SMS Details window is now displayed, to enable you to enter Provider and/or Specialist codes, if there are pertinent merge fields that need to be included in the SMS:
If you wish to also send an SMS to a specialist, select their code in the Specialist field, then tick
Email the Selected Specialist checkbox.You can also choose an SMS template if you wish to use a preset message as a basis for the SMS.
If you do so, the Description field is automatically filled, but may be edited if required.
Similarly, the Category field is usually defaulted but can be changed or deleted if you wish.The Category becomes important in the Patient Contacts Tab, where we can sort by Category column to see what kind of contacts have been made with the patient:
Click the OK button; the Create SMS window will now display, as for the single SMS option.
If you have selected an SMS template, the text from the template will be displayed, but you may still edit the details of this if you wish, by clicking in the field.

Note the following:
The Flash box is checked for Flash SMS messages; do not delete the FLASH inserted at the beginning of the message - this tells the SMS provider to send this as a Flash message.
The text in the box is counted in the Character count field below it, to let you know how long the message is.
This will not be accurate if any merge fields are present, so you will have to estimate how long each merge field is likely to be, based on what it represents.
Clicking the OK button in this window will create the SMS messages for the selected patients in EXACT, and either send the SMS messages or queue them to be sent, depending on your settings.
The contact list entries will be updated with the appropriate SMS status icon in the Type column.
For an SMS message, one of the following icons may appear, depending on the status:
SMS appointment reminder sent to recipient (delivered)
SMS message received by gateway (sent, but not yet delivered)
SMS delivery failed (where SOE is the SMS provider; password is wrong, insufficient credit, etc.)
Reply received (for SMS reminder sent to patient)
SMS status is now available
SMS status unknown (TXTConnecxions / Icetrak / 4Production)
SMS failed or not sent to gateway
SMS status unavailable (other SMS providers)
A tooltip displays when you hover your mouse cursor over each of the icons.
The SMS messages will also appear in the Email Outbox until they are sent, when they will be removed and will appear in the Sent tab.
In each case they will have the appropriate icon in the Status column.
Only email replies will appear in the Email Inbox.
If staggered recall settings are in effect, the column marked with a clock icon
will have a corresponding icon for any items in the Outbox that are subject to the settings.If you hover your mouse cursor over the icon, a tooltip will tell you when the SMS is due to be sent, as in this example:
Check in the Patient file Contacts tab for records of contacts.
...
As an automated facility in EXACT, SMS Replies relies on multiple configuration requirements in three integrated areas:
Configuring Email Parameters.
Configuring Automatic Appointment Reminders.
Configuring Keywords for SMS Replies.
IMPORTANT:
|
...
TIP: Use the Checklist as a starting point. It provides an overview of the configuration tasks and includes hyperlinks to specific task procedures.
Checklist
![]() Check that you complete each of these configuration requirements, or that they have already been correctly configured elsewhere in EXACT. Each requirement has a hyperlink to the appropriate instructions:
Check that you complete each of these configuration requirements, or that they have already been correctly configured elsewhere in EXACT. Each requirement has a hyperlink to the appropriate instructions:
Configuration requirement / task | Links | |
|---|---|---|
Prerequisites: | ||
 | The EXDOCe Email module is registered in Practice Information. | |
| For EXDOCe you have either an Internet connection through a local area network (LAN), or an account with an Internet Service Provider (ISP). | |
| For EXDOCe your practice server requires both hardware and software to automatically connect to the Internet. | |
| Patients who are to receive Emails as both Email and as SMS messages on their cell phones have the appropriate SMS checkboxes selected | |
| The Patient Contact Lists for appointment reminders have been set up and are being maintained. | |
In Email Setup, correctly configure and Test all parameters. | ||
In Automatic Appointment Reminders, correctly configure the following reminders and parameters: | ||
| Create an automated email for New patients. | |
| Select / create a template for automatically sending to each patient as the patient's appointment is booked. | |
| Create an email signature for adding to an email template. | |
| Configure EXACT to automatically generate and send appointment reminders to patients by Email, SMS or both. Because the Email and SMS settings are independent for each, optionally setup Email and SMS reminders to complement each other. For example, send a reminder email two weeks before the appointment, then follow it up with an SMS message a few days prior to the appointment time, and a second SMS a few hours beforehand. | |
Specify Keywords that patients need to use in SMS replies to trigger automated EXACT responses. | ||
| Be aware of the important Guidelines for using Keywords, without which your SMS replies strategy will not function. | |
| Set up Confirmation Keywords for patients to use in confirming appointments. | |
| Set up Cancellation Keywords for patients to use in cancelling appointments. | |
| Once the Keywords are set up, manage them per Contact List. this includes checking that they are up to date. | |
| When necessary, free up Keywords for use in other configurations. |
Email and SMS Parameters
IMPORTANT! IT information required: Before you begin the procedure below, check through the settings and ask your IT Systems Administrator or your ISP for any details that you may require.
...
Practice Email Address | This is the full practice email address. |
User Name | This is usually the user name used to access the internet connection. |
Password | This is usually the password used to access the internet connection. If you have a domain registered with a company other than your internet provider, the user names and passwords for internet access and for email may be different. Check with SOE Support or your domain/internet provider(s) if you are unsure. |
Incoming Mail Server Port | This is the address of the mail server used to receive incoming mail. It can be specified by name (e.g. pop3.hotmail.com for a dialup setting, or server name for a LAN setting), or by numeric IP address (e.g. 190.167.250.112) For a LAN you will also need to specify the port number in the appropriate field. IMAP option: If you opt to use IMAP, edit the address to read imap where it otherwise reads pop3, and change the default port. Also tick the Use IMAP checkbox, as described below...
EXACT historically used the POP protocol for Email, but from v12.7 the IMAP protocol is optional for incoming Email. POP is a simple protocol that generally allows the downloading of original messages (not copies) from an Inbox to a local computer, and has few other features. The Internet Message Access Protocol (IMAP) is a more feature-rich mail protocol used for accessing email on a remote web server from a local client. It stores email messages on the mail server, but allows the end user to view and manipulate the messages as though they were stored locally on the end user's computing devices. Copies of messages and attachments are transferred to an email client only on request, but the originals always reside on the mail server. If you check this box you also need to change the above Incoming Mail Server Port. |
Outgoing Mail Server Port | This is the address of the mail server used to send outgoing mail. It can be specified by name (e.g. smtp.hotmail.com for a dialup setting, or server name for a LAN setting), or by numeric IP address (e.g. 190.167.250.112) For a LAN you will also need to specify the port number in the appropriate field. Specify if The STARTTLS checkbox is only enabled if it is on port 25, otherwise its status will be determined automatically, whether needed or not. When the wizard is being configured, the STARTTLS tick-box is enabled or disabled according to the outgoing port being used. Some ports (such as 587, which is a common port) specifically use STARTTLS, causing the tick-box to be greyed out (disabled)). |
| Tick this checkbox if your ISP requires authentication for outgoing email. |
| By default this is un-checked, and you are required to complete all fields in the Account Details screen, and then successfully Test Credentials before the Wizard Next> button is enabled. You can check this Allow Email setup without account details to entirely bypass the Account Details screen setup. In this case all screen fields are greyed out and the Next> button is enabled. |
Test Credentials | Click this button to check your connection and details. The Test is only compulsory on the initial setup. You will see a progress indicator, and the test may take up to 5 minutes to complete.  EXACT will immediately display an error message if there is a test failure. For example:   In this test EXACT runs a series of checks: If any check fails you will see an immediate failure message with instructions. No email will be sent during this check.
You cannot continue to the Next screen until either  |
...
| With this checkbox un-checked Either
With this checkbox checked  IMPORTANT: Ensure that scheduled network backup times don't coincide with these specified periods. Within these periods your email server can check every __ minutes, and / or it can check at specific configured times:  |
| By default this setting is OFF (un-checked). Internet Service Providers (ISPs) have automated ways of identifying clients who are spamming via their service. This includes measuring the volume and rate of client outgoing emails. So if your ISP red-flags your practice for "spamming", you have the option to choke the rate of your email passing through the ISP facility. This is by adding a delay between each outgoing email - tick the checkbox and then specify the maximum number of outgoing emails per minute, with the default being 40. Minimum figure is 1. If you specify a very large number the software will send as many emails as it can within each minute. This setting is deliberately presented as a per-minute figure because this way it is easier to comprehend the rate of sending than it would be with a seconds-delay figure.  NOTES: |
...
You understand it.
You can confirm that your anti-virus program has the capability to scan email attachments before they are opened.
Your practice will regularly update the anti-virus program.
Important notes to avoid virus infection of your practice:
If your anti-virus program cannot scan emails before saving, you risk virus infection by selecting this option.
Keep your anti-virus program updated, or it may fail to recognise and deal with new viruses.
...
SMS Provider
| Select Software of Excellence to use SMS reminder messages. |
| Select None if reminder text messages are not going to be sent. The Finish button will then immediately become available:  |
Practice ID [ ] | With Software of Excellence selected above, enter the appropriate Practice ID (if not already defaulted from the Practice Information screen) as supplied by Software of Excellence. Once entered and your settings successfully tested (see below), the Practice ID will be "greyed out" and cannot be changed, as it is used in several places in EXACT for various functions. |
Practice ID Password [ ] | Enter the password that is associated with your Practice ID. |
Test | The Test button becomes available once the two fields above have been completed. It will test the SMS settings and functionality and if successful will display a message like the example below, which will tell you how many SMS credits you have left.  If the Test button fails, check that you have entered your details correctly. If you have, and your practice uses a proxy server for connection to the internet, then you may need to check the configuration of your SMS services. |
...
Create Automated Appointment Reminders
These are best created as an overall strategy using available communications media (SMS, Email, Easypost).
Create Automated Appointment Follow-ups
From version 11.3 SP6 EXACT can automatically follow-up patient appointments with SMS messages and request patient keyword responses.
...
Create Automated Patient Surveys by SMS
From version 11.3 SP6 EXACT can automatically follow-up patient appointments with SMS messages and request patient keyword responses.
...
Keywords are critical to the function of the SMS Replies feature, as they are used to match a reply with the appropriate contact list or automatic appointment reminder.
EXACT can recognise multiple codes as a valid client reply. For example, you could configure EXACT to recognise all of these options as valid for a Confirmation SMS: YES, YIP, Y, YEAH, YAH, OK.
...
Click the List button

(or press the

key) to access the Manage Keywords dialog:

Use the two buttons at the lower right of the entry pane to add keywords

and remove keywords

from the Contact List.
To create a New keyword, click the
button to display the Add Keyword dialog:

Click in the entry field, and start typing the new keyword; EXACT will immediately start evaluating what you type. It will compare it to existing keywords and keyword validation rules - as you type, a message is displayed, according to validity
Keyword is valid:

...or otherwise (for example A keyword cannot be blank):

Message examples:
A Keyword cannot be blank
This is displayed (and the button is inactive) until some valid characters are typed in.
You have already added that keyword; keywords are case-insensitive
There is already another active contact list or appointment reminder list using that word. Also, when comparing keywords, EXACT treats upper- and lower-case letters as equivalent. You can change the keyword (if it is less than 25 characters) by adding more letters or numbers to it to make it unique. Alternatively, if the existing keyword is no longer required in the contact or reminder list that uses it, delete it from there, or mark the other list as inactive.
A Keyword cant contain spaces
Remove any spaces in the keyword.
A Keyword can only contain letters and numbers
You have typed in a non-alphanumeric character; delete it or substitute another character.Once you have typed a valid keyword, click the
button to add it to the list.


Repeat the above steps to add more words, then click
again to return to the Appointment Reminder Reply dialog. The Keywords field will now show the changes you have made to the list of keywords.
Click in the checkbox next to any of the options you wish to apply:
Display in Manage Replies list
This will cause any SMS reply with a valid keyword to be added to the Manage Replies list for viewing (in addition to the auto-confirmation in the Appointment Book).
We do not recommend that you use this option, except for testing or monitoring purposes, as it will create extra work for you.
Note that per user you can tick the Show Completed checkbox in the above screen to achieve the same display.
Show as confirmed in the Appointment Book
A received keyword will automatically confirm the patients appointment by showing the handset icon in the appointment. Send patient automatic confirmation of receipt
An SMS reply will be sent to the patient acknowledging receipt of their SMS. To do this, you will have to click in the Template field, and Use the button to select an existing template set up for this purpose, or create one.NOTE: These additional SMSes that incur the standard SMS charges.
To select a Template for the SMS:

...
When the patient replies with a cancellation keyword that matches the reminder SMS template (for example "No"), EXACT automatically removes that appointment from the Appointment Book and it won't be visible under the SMS Replies Tab unless you check the Show completed checkbox.
...
The keywords used must be unique to that list or reminder; they must not appear on any other active list.
Keywords cannot occur in a keyword list more than once.
EXACT automatically cross-checks to ensure that when you create a new keyword or edit a keyword it is not already in use elsewhere.
EXACT has facilities for editing or removing redundant keywords.
Keywords should reflect the word, text or number the practice requires the patient to return in the SMS reply.
Provide Keyword options for confirming an appointment or cancelling/not accepting.
Each keyword can have up to 25 alphanumeric characters.
Keywords cannot contain spaces (trailing and preceding spaces are trimmed in the 'Add Keywords' dialog and so are disregarded).
The total length of all the keywords in a list cannot exceed 250 characters.
...
Managing Keywords for a Contact List
When you have ensured EXACT is configured as in the previous sections, you can manage the keywords as follows:
Select 'Manage Contact Lists' from the 'Administration menu.
Highlight the contact list you wish to set up SMS Replies keywords for, and click the

button in the bottom right-hand corner of the screen.
The "Information About Contact List" dialog will open, like the following example:

In the 'Keywords' field, click on the 'List' button
(or press the
key) to access the 'Manage Keywords' dialog:

The two buttons at the lower right of the entry pane are used to add keywords
and remove keywords
from the Contact List. Click the
button to add a new keyword, and the 'Add Keyword' dialog is displayed:

Click in the entry field, and start typing the new keyword; EXACT will immediately start evaluating what you type. It will compare it to existing keywords and keyword validation rules - as you type, a message is displayed, according to validity ('Keyword is valid') or otherwise:
'A Keyword cannot be blank'
This is displayed (and thebutton is inactive) until some valid characters are typed in.
'You have already added that keyword; keywords are case-insensitive'
There is already another active contact list or appointment reminder list using that word. Also, when comparing keywords, EXACT treats upper- and lower-case letters as equivalent. You can change the keyword (if it is less than 25 characters) by adding more letters or numbers to it to make it unique. Alternatively, if the existing keyword is no longer required in the contact or reminder list that uses it, delete it from there, or mark the other list as inactive.
'A Keyword can't contain spaces'
Remove any spaces in the keyword.
'A Keyword can only contain letters and numbers'
You have typed in a non-alphanumeric character; delete it or substitute another character.Once you have typed a valid keyword, click the
button to add it to the list.
Repeat steps 5 to 7 above to add more words, then click
again to return to the "Information About Contact List" dialog. The Keywords field will now show the changes you have made to the list of keywords.
...
Selecting or Creating an SMS Template
NOTE: The interface and procedure for creating Email templates differs to that for creating SMS templates.
Click in a field to see the selector controls for that field.
Either click the Up/Down arrows to scroll through options, or click the List icon to view the SMS Templates list, from which you can select a template:

Assign Keywords
(This step is explained in the Keywords for SMS Replies section, which includes Guidelines for using keywords, Managing Keywords for a Contact List, and Freeing Up Keywords.)Click OK.
...