| Table of Contents | ||
|---|---|---|
|
Configuring the Recall Parameters Screen
Recalls allow patient retention so its important Recall Management is configured to manage these patients and ensure they come back regularly for dental checkups and hygiene appointments.
Open the Recall Manager.
Click the Configure Recalls button:
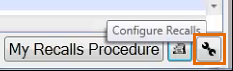

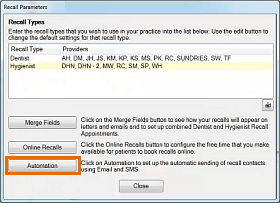
The Recall Parameters Screen displays:


NOTE: Each time that you upgrade the EXACT software, existing settings will propagate into the upgraded Recall Manager.
Configure the different Recall Parameters as indicated below:
Recall Types | Dentist and Hygienist, with Providers listed for each. TIP: You can manually override the default assignment of Providers to Dentist / Hygienist Recall Type. For example, you can re-assign Therapists to the Hygienist Recall Type for practical recall reasons, as they are not permitted to do diagnostics. |
Merge Fields | Click to open a Merge Fields Window. From here you can see how the merge fields will appear in patient communications. This includes:
IMPORTANT: This screen provides a means of specifying whether Dentist and Hygienist recall appointments should be booked separately or in combination, which affects how Receptionists book recalls in the Appointment Book. |
Online Recalls | Click this button to open a screen for configuring the times during which patients can book recalls online. |
Automation | Configure EXACT to automatically send recalls by available means such as SMS, Email and EasyPost. |
Edit Recall Type for Dentist and Hygienist
Open the Recall Manager.
Click the Configure Recalls button:

The Recall Parameters Screen displays:

On the Recall parameters screen, click either the Dentist or Hygienist Recall Type, to display the Edit Recall Type screen. For example (Dentist):


Show on recall letter as | Select the kind of service for which the recall is initiated. |
Default booking service | This is for new patients, and can be changed. Select the service from the selection controls. |
Default length | This is editable if Co-duties are set to OFF. If co-duties are active the value is greyed out and read-only |
Overrides button | If you intend using variable recall defaults, select the Overrides button to open the Recall Booking Service Overrides window where you can configure Override groups. Patients who meet group criteria do not use the default recall service, appointment length or recall interval, but use parameters that have been customised for the group. |
Default interval | This is for new patients. Select from the controls. Any customised interval for a patient will be carried forward. |
Providers assigned to this recall type | The Providers involved |
Advancing the recall date: | How the recall will be moved on into the future, after charting appointments: |
| This is an informal arrangement. The Provider simply wants to see patients at regular intervals after treatments. So if a patient has a course of treatments ranging across a month, the final recall date will be set after the last treatment. |
| This is where you set a recall date, the patient comes in, and when they have the appointment, the recall date gets moved on. If they have further treatment, it doesn't get moved on because the recall date is not yet overdue. This maintains the regular, interval-based recall cycle, even if patients have further treatment within that cycle. The period (such as 30 days) acts as a buffer during which recall considerations are ignored. The 30 days allows some flexibility, depending on the scheme being run in the Practice. See "To Edit Recall Type Advanced Settings", below. |
| (Selectable from the controls)   With this option, a recall is only created when one of a specified number of services has been completed (you can have multiple other appointments with no recalls triggered). For example, you want to do exams every 6 months regardless of other treatments, so you set recalls based on a list of possible services at those exams only. |
...
In the Edit Recall Type screen , click Advanced Settings ![]() .
.
...
The Edit Recall Type Advanced Settings screen displays:
...
Recalls Ahead of the Recall Date | You can change the settings all the way down to 0 days, in which case the Edit Recall Type screen option changes from  |
to |
 |
and the recall is activated only when overdue. | |
Automatically set patients to No Recall | You can simply specify all patients for no recall, or you may have a reason to identify specific patients for no recall. For example, your Practice performs specialist services based on referrals from other Practices, and there are to be no patient recalls following these referrals, because these patients are recalled only by their referring Practices. The trick is to identify just those patients that are referrals. This is done by means of a Query. Click in the text box to see controls for identifying and |
Adding and Removing Providers from the Recall Type
Open the Configure Recall Parameters screen.

Click either Dentist or Hygienist Recall Type, depending on which Provider type you want to add. The Edit Recall Type screen displays:

Click the Add button
 :
:


Select a Provider, and then click OK.
You will be prompted for whether this Provider is to see Recall Prompts. Click either Yes or No.
If YES, when this Provider saves a treatment, they will be prompted to specify Recall parameters for the patient.
Only Providers with this setting will see the Recall Prompt. Receptionists will not see the Recall Prompt.

To remove a Provider from Dentist or Hygienist Recall Type
Open the Configure Recalls screen.
Click either Dentist or Hygienist Recall Type, depending on which Provider type you want to remove.
The Edit Recall Type screen displays.
Click the Provider name to be removed under Providers Assigned to this Recall Type, and then click the Remove button


.
You will be prompted "
Remove this Recall Type Provider?".

Click Yes.
Re-assigning Providers to Recall Type
Before EXACT version 11, a Dentist Provider was locked into the Dentist recall type. Therapists were identified as Dentist Providers and had to be defined as Dentist Recalls.
...
In the Recall Manager configuration, under the Dentist Recall Type, click the Provider name under Providers Assigned to this Recall Type, and then click the Remove button
.
You will be prompted "
Remove this Recall Type Provider?":
Click Yes.
Go to the Configure Hygienist Recall Type window and add this Provider to the Hygienist Recall Type list.
...
Open the Recall Parameters screen and click the Merge Fields button


to display the Merge Fields window:


Type the text that will display for the [recall.type] merge field for a Dentist plus Hygienist appointment.
Type the text that will display for the [recall.type] merge field for a Family appointment.
Click in the Combined Dentist and Hygienist Service text box to display selector controls, and use these to select the appropriate service.
Click OK.
Automating Recalls
Overview
EXACT can be configured to automatically send recalls by SMS, Email and / or EasyPost.
You can either send a default recall template to all patients or customise recall templates to match custom groups of patients.
You can configure EXACT to automatically run recalls every day, or specify that recalls will only be run manually from the Manage Recalls screen.
...
Open the Recall Manager.
Click the Configure Recalls button:

From the Recall Parameters Screen, click the Automation button.
To configure EXACT to automatically run recalls every day
...
To configure EXACT so that recalls can only be run manually from the Manage Recalls screen
...
To configure EXACT to either include or exclude Hygienists in automated recalls
...
Specify WHEN to contact patients.
Specify the methods for HOW to contact patients, and which TEMPLATES to use for each method.
For patients who do not have a preferred method for contacts, specify the preferred ORDER of contact methods (for example, first try SMS, then Email, then posted letter).
Optionally add custom patient groups if you want specific people to be recalled by means of specific templates (for example, use a teen template for an Under 19s group).
Configuration options - standard or variable defaults
...
This default could be customised per patient in the patient file Recalls tab:
...
Either:
Use these standard default recall values (this remains the default so no further configuration is required), or
Use variable default recall values - a more flexible solution where the default values vary depending on the patient's age, dentist and payor, and can also be associated with the patient's changing membership in groups.
...
Open Recall Manager either from Administration > Manage Recalls... or from a manually-created shortcut on your task bar:


Click the Configure Recalls button at the bottom right of the Recall Manager screen:

Click the Automation button in the Recall Parameters screen:

The Recall Automation screen displays:
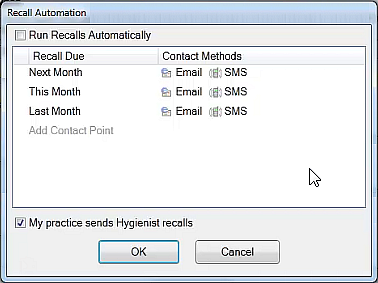

The purpose of this screen is to specify whom to contact, when, how frequently, and what communications to send (SMS, Email, EasyPost). It only applies to patients who are due for recalls; it does not send to Patients who have booked.
Start by checking (ticking) the
 Run Recalls automatically checkbox.
You can setup multiple sequential custom recall actions. For example:
Next Month recalls all those due appointments next month,
This Month recalls all those who evaded recall last month, and are due appointments this month,
Last Month recalls all those who evaded recall in the first two actions action, and were due appointments last month.
6 Months Ago recalls all those who evaded recall in all of the above actions, and were due an appointment 6 months ago.
12 months ago is not a recall but a notification that the Practice will stop issuing recalls.
Specify WHEN:
Start by selecting when you will contact patients based on when their recalls become due.
The above screenshot displays Contact Points for Next Month, This Month and Last Month. However, you can easily create further Contact Points.
To create a Contact Point:
Click the Add Contact Point hyperlink:


.
Complete the details in the Contact Point Detail screen, and then click OK:


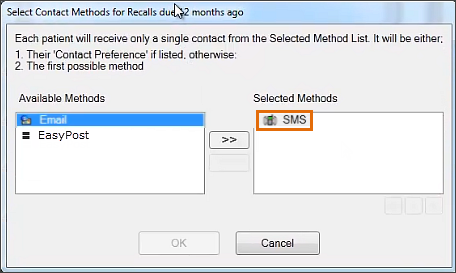
You will see a Select Contact Methods screen, for adding methods to the Contact Point (how EXACT will contact a patient):


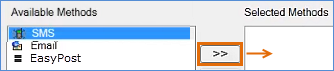
Specify HOW:
Click a Contact Method on the left and click the >> button. For example, SMS:

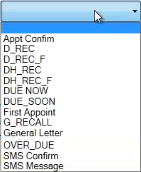
A Select Templates screen immediately displays, from which you can specify which templates to send for single patient or for family:


(In the above example we are working with the default All Patients group, for which we will be adding templates. However, what if you want to use different templates for some people within that grouping? Or what if you want to use a custom template per Provider?
In this case you need to Add patient groups, and specify the particular templates per group. When EXACT then sends recalls it will first try the custom group before trying the All Patients group.Specify templates for the Contact Method:
Any dropdown option that you leave blank will simply be ignored by EXACT.
As you highlight a dropdown, a selector appears next to it:


You then have the option to select a template from the dropdown menu or by clicking the selector


and opening the View Templates window:
or


Select appropriate templates, until you have identified the templates that you require (leave boxes blank where you do not need templates):


Click OK to return to the Select Contact Methods screen, with your Method now correctly positioned at right:

Repeat this procedure for further Contact Methods.
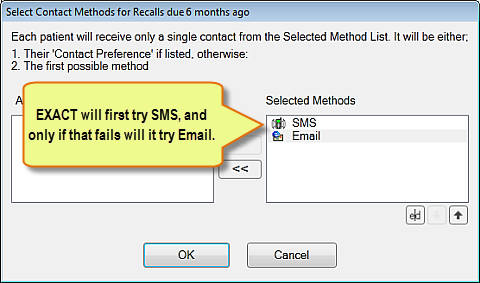
Check the ordering of your Contact Methods:
When recalling, EXACT will attempt contacts in the specified order of Contact Methods, unless the Patient has a preference registered in the Patient File, in which case EXACT will use that preferred contact method.
For a Patient without any registered preference, EXACT will try to contact a patient by means of the first method, and if this fails, it will try the next, and then the next if necessary:

To re-order the Automated recall Contact Methods
...
You can also edit by clicking a contact method from the Recall Automation screen:
...
Configuring Variable Recall Default Values
For either Dentist or Hygienist, open the Edit Recall Type window:
Open the Manage Recalls desktop.
Select the Configure (spanner) button.
In the Recall Parameters screen, double-click either Dentist or Hygienist Recall Type (in this example it is Dentist) to open the Edit Recall Type window:


In the Edit Recall Type window, set the standard default recall values for Service, Length and Interval:


Note that the Length value in minutes is an override of the length that is configured for the service in the Service Setup.
How this window relates to Recall options:
By default patients will be recalled by means of the standard default values set in this window (if ticked or new).
However, from v12.2 onwards you can also set Overrides (see steps below), and where an override supersedes the above standard values, patients are by default recalled by means of the override parameters.
Providers can also opt to manually disable the standard defaults and the override defaults for individual patients whom they treat, and manually set recall parameters for recalling those specific patients.
If you intend using variable recall defaults, select the Overrides button (in the above Edit Recall Type window) to open the Recall Booking Service Overrides window where you can configure Override groups:


Patients who meet group criteria do not use the default recall service, appointment length or recall interval, but use parameters that have been customised for the group.
On upgrade this list is empty and all default recalls function as they were before the upgrade.
Add entries to it by choosing the age, payor, provider, and (in Australia) Healthfund of the patients to be recalled.
Then set the Service, length and recall interval that this kind of patient should receive by default.
Take note of the instruction in the top of this window.
Patients will be recalled by means of the first override/category in this list that applies to them (you can re-order the list).
If no overrides/categories apply to them, they will be recalled by means of the default values for service, length and interval, as set in Edit Recall Type window (in the previous step in this procedure).
When treating specific patients, Providers still have the option to disable both of the above defaults (standard and overrides) and customise recall values in the patient file Recalls tab:


To create an Override:
From the Edit Recall Type window, for either Dentist or Hygienist...
Select the Overrides button.
In the Recall Booking Service Override window, select the +1 button to launch the Add Recall Booking Service and length Override window:


Populate the fields in the window:
Populate the Patient Group fields to identify a unique subset of patients (this must be different to other groups that you've created).
The Age drop down consists of two parts. The first part is a drop down with a choice of All, Over, Under, and Equal to. For any choice except All, an age must be selected in the second box.
The Payor drop down is a choice of all the practices active payors, with the addition of All and Private (no payor). All matches to any payor (including none), and None only matches where the payor has not been set.
The Provider dropdown is a choice of all the practice’s active providers, with the addition of All, and None. All matches to any provider (including none), and None only matches where the provider has not been set.
(Australia) The Healthfund dropdown lists all of the practices current Healthfund suppliers, with the additional All and none. All matches to any healthfund (including none), and None only matches where the healthfund has not been set. This list is updated by the use of the HICAPS terminal, and will reflect whatever was returned last time it was used.
Populate the Recall Override Values fields to identify a recall Service, appointment Length and recall Interval in months. Each of these fields must be completed.As with the default set, you can select any Service - either type it or click to select from the list.
The Length field cannot be zero. The selected services length will be used by default, but if this is zero, or is not the length you want, you can change it directly on the dialogue without editing the service. The length can be set anywhere from 5 mins to 8 hrs.
The Interval can be any number of months between 1 and 99.
Select OK.
Back in the Recall Booking Service Overrides window, select this new Override in the list and use the Up and Down arrows to order it appropriately, remembering that patients will be recalled based on the first override in the list that applies to them, moving from top to bottom.
In other words, if a patient qualifies for more than one of the overrides the first matching override is used, so by changing the order you control priority.
If a patient doesn't match any of these overrides, they fall back to be recalled by the standard defaults.
Providers can in turn override any default settings during treatment and set custom recall values for patients.
...
Open Recall Manager either from Administration > Manage Recalls... or from a manually-created shortcut on your task bar:

Click the Configure Recalls button at the bottom right of the Recall Manager screen:

Click the Automation button in the Recall Parameters screen:

The Recall Automation screen displays. All fields in this screen are hyperlinks.
Click one of the Contact Methods for which you want to customise templates for a group:


Then select one of the Contact Methods from the Select Contact Methods screen:


The current Select Templates screen displays:

Your aim is to Add another patient group, and specify different templates for that group.
Note: The group must already exist.
Click the Add another patient group hyperlink


.
Select a patient Group using either the Up/Down arrows or the selector box, and then click OK:


In the Select Templates screen you will then see a new section, and you may notice that the default group All Patients has now changed to All Other Patients.
Add template/s where appropriate, keeping in mind that whatever is blank will be ignored:
 How EX
How EXACT
dealsdeals with multiple groups / multiple templates:
EX
ACT searchesACT searches from the top down and acts only upon
the firstthe first instance of a template type (Dentist, Hygienist, Dentist & Hygienist) that it discovers per Patient.


If the Patient belongs to more than one group, it will not send multiples of one template type (it will not for example send two dentist templates; it will only send
the firstthe first valid dentist template it discovers when moving down the list).
Examples, following the above screen:
For a Dentist recall, EX
ACT doesACT does not match Belinda, aged 45, in the Under 19s group, but picks up the appropriate DENT-REC1 recall remplate for her in the All Other Patients Group.
For a Dentist recall, EX
ACT picksACT picks up the DENT-REC1-U19 recall template for Tim, aged 16, in the Under 19s Group, and looks no further for Dentist recall templates.
Repeat the above configuration procedure to add as many patient groups as you require. You may eventually have multiple patient groups:


The ordering of these Patient Groups is very important in determining which templates patients receive.
To sort these Patient Groups, select a group and then click the Arrow buttons


in the small toolbar that appears:


To delete a Patient Group, select a group and then click the Bin button


in the small toolbar:

Simplified Automation - Dentists only
...
Automation setup is much simplified if you de-select the Hygienist option:
...
With Hygienist recalls: | Without Hygienist recalls: |

 |

 |