Search these help files
Practice Locations for Online Booking
Overview
From v12.8 EXACT enables a dental business with a single server and multiple practice locations (premises) to create a separate online booking website for each configured Location.
Example:
ShinyTeeth has a single central server for practices in three different suburbs.
Before EXACT v12.8 ShinyTeeth had no elegant means for patients to book appointments online for just their local suburban practice.
However, from v12.8 the practice is able to split out three different websites / locations, so that a patient can book online for an appointment in just one of those locations.
ShinyTeeth sets this up in the online booking Web Setup, with either customised appearance for each location/booking website, or with a common corporate appearance across locations/booking websites.
The Online Booking site for each location is configured with its own address, phone number and description, but the practice Email address is the same across all Locations.
Within patient communications EXACT is able to generate patient recall URLs, planned Online Booking links and Marketing URLs for these specific Locations.
Characteristics of Online Booking Locations
- Online Booking Locations is an optional feature for practices that use Locations.
- In Web Setup a practice can configure unique information for each Location: logo, colour, information for the patient (parking, map etc), and Google Tracking Code.
- Configured Locations affect Practitioner Login, Provider setup, Patient setup and Bookings.
- When practitioners Log In to EXACT they are prompted to select a Location:

- Providers are assigned to a Location and their availability for bookings is associated with that Location (if a Provider works in multiple locations, rooms and rosters must be used for that Provider). Providers must have Free Time available for bookings to be successful.
- Both Patients and Providers can be configured with a Preferred Location, and EXACT uses this in preference to any other location.
- For communication with patients, the practice can use merge fields for patient Preferred Location, in Easypost Letters, SMS and Email.
- EXACT determines the location for Recall URLs , Planned appointment URLs and Marketing Campaigns URLs based on a logic where the first option is patient preferred location.
- When practitioners Log In to EXACT they are prompted to select a Location:
- Automated communications: Within patient communications EXACT is able to generate patient recall URLs, planned Online Booking links and Marketing URLs for specific Locations.
Prerequisites for Location support in Online Booking
- EXACT v12.8 or later.
- The practice is configured for Online Booking, with booking functionality.
- Practice Locations are enabled:
(Configure - > Practice Settings >
 Enable Locations)
 - Once Practice Location is enabled (above), it becomes possible to enable online appointments Enable Locations as follows:
Configure > Online Appointments > Web Setup window >
Enable Location - The practice must be configured for multiple Locations, where EXACT then treats each Location as a separate "practice" for patient booking purposes and for Provider free time available for bookings.
- Online booking Free Time must be uploaded to activate each Location as a new practice.
This is only possible if Providers are configured for a Preferred Location (in the Provider File), so that their free time is available in the new Location.
If provider Preferred Location is not specified, EXACT assumes the practice Default Location as the Provider's preferred location, and the free time will only upload to the practice default location. - Recommended: Patents are configured for a Preferred Location (in the Patient File Details tab). If not specified, EXACT assumes the practice default Location as the patient's preferred location.
On upgrade to EXACT v12.8
Practices with multiple existing Locations will have those locations listed in the Web Setup, but without being configured or enabled.
Each Location is an Online Booking blank slate:
![]()
Once they tick to Enable Locations, the pre-configured Locations appear in the Enable Locations dropdown list:

Location field in the Edit Appointment window
Each Edit Appointment window has the Location field situated just above the Planned Treatment window:

Patient Preferred Location merge fields for SMS, Email and Easypost Letters
«patient.PreferredLocationName»
«patient.PreferredLocationAddress1»
«patient.PreferredLocationAddress2»
«patient.PreferredLocationAddress3»
«patient.PreferredLocationPostCode»
«patient.PreferredLocationPhone»
EXACT logic in using Preferred Locations
EXACT applies the following logic in using Preferred Locations versus other locations:
IMPORTANT: To use locations effectively, Providers and Patients should have Preferred Locations specified, and practitioners should habitually record Preferred Locations for new patients.
Online Booking Providers | The Provider Details tab has a Pref Location field.
|
Patients who book online | The Patient Details tab has a Pref Location field.
|
Combined Recalls | For Combined Recalls, EXACT uses location options in this order:
|
Family Recalls | For family recall, EXACT uses the main contact patient's location in this order:
|
Marketing Campaign | For marketing campaigns EXACT uses locations in this order:
|
Appointment Workflow
From EXACT v12.9 practitioners who log in to a Location and use the Appointment Workflow will see only that Location's patients on the Departure Task List (Exit Workflow). Patients who are booked for a different Location will not display.
Merge Fields for Preferred Location
From EXACT v12.9 EXACT has merge fields specifically for using the Preferred Location in patient correspondence.
Merge fields for patient Preferred Location
The patient's preferred location has been added as a merge field, enabling sites with multiple locations to auto-generate patient recalls per Location.
These merge fields can be used in Email, SMS and EasyPost Letters.
To set Preferred Location merge fields
- In the Configure > Practice Settings window, check (tick) the Enable Locations checkbox:

- To control user access to locations, also check the Enable User Accessibility checkbox (if you leave this unchecked, all users will have access to all locations).
- Check the Use patient preferred location details for communications checkbox.
This functions as a "switch" to switch as follows:

Patient Preferred Location merge fields
(From EXACT v12.10)
«patient.PreferredLocationName»
«patient.PreferredLocationAddress1»
«patient.PreferredLocationAddress2»
«patient.PreferredLocationAddress3»
«patient.PreferredLocationPostCode»
«patient.PreferredLocationPhone»
Preferred Location, specified per patient
Each patient's Preferred Location can be specified in the Patient File Details tab:

In patient correspondence templates for Easypost Letter, Email and SMS, you can then use merge fields to automatically include Preferred Location in the correspondence.
Easypost example

Email example

SMS example

Matching Reasons to Providers in Online Booking
Historical
Prior to EXACT v12.3 the EXACT online booking system had two primary setup areas: Providers and booking Reasons.
These were treated separately, with no cross-matching of providers to reasons (the booking reason could map only to All Dentists or All Hygienists so there was no way to book Provider B for Reason 5).
For example, a practice has many Providers, only one of whom is an Implant Specialist. When their patients booked an Implant Consultation the only option was to book with any of the Providers; they couldn't specifically book with the Implant Specialist.
From EXACT v12.3 onwards:
From v12.3 Providers can be pre-associated with Booking Reasons within EXACT.
The configuration allows for a generic option for all Providers, but also allows for the complex options that are necessary for customers who are not taking up online booking.
Features
- Each online booking Reason can be assigned to one or more Providers.
For example, a patient booking an Implant Consultation online can be assigned to either Provider B or Provider C, both of whom specialise in implants.
- Each Provider can have a custom appointment duration per Reason.
For example, for an implant consultation a patient may be assigned to Provider B for a 10 minute consult or Provider C for a 15 minute consult.
- Each Provider can have a custom appointment availability per Reason.
For example, for implant consultations Provider B can be booked for Mondays and Tuesdays, and Provider C for Wednesdays and Thursdays.
- Existing practice reasons / times configuration is not lost on upgrade.
- Patients booking online can select a Reason and see which Providers are associated with it.
- Specific Providers can be associated with Reasons related to Marketing Campaigns.
Benefits
- Practices can book specific groups of customers with the correct Provider.
- Increases the use and reliance on the online booking system.
- Expands the use of online booking to more patients as the reasons are more refined and better meet patient needs.
- Increases the likelihood that patients will pay online for prices / deposits.
Patient use of the Booking Website
- Go to the booking website for the dental practice.
- Select from the on-screen options:

If you are a CURRENT patient, the software will recognise you through the unique link and set your Patient Type as Existing.
If you are a NEW patient, you will be presented with a questionnaire that includes First Name, Last Name, Date of Birth, Phone Number, Mobile Number, Email address, Date of last dentist visit, Last dentist location, and Information about your immediate dental needs. Some of these fields are compulsory, and will be indicated as such on the page.
- Create an appointment as shown above.
- When you select a time slot you will be asked to select the Enter patient information button to continue.
- Once you have entered all patient information you will then be asked to Please review your booking.
- Some dental practices will require a deposit. The booking and deposit payment process is simple to follow.
- Confirmation depends on you receiving an Email or SMS code, and then typing it into a screen location.
You will see a 'Please Wait' message while the Email or SMS is being sent.
Once sent to you (the patient), you will see a verification code screen online:

- Type in the code that you received.
If the code is correct, the Deposit and Book now screen appears:

- Click the Deposit and Book Now button to start the deposit payment:

- Complete the payment details in this screen and then click the Pay button.
You will briefly see an acknowledgement of payment:

While the software adds your appointment to the dental practice Appointment Book you will see a submission notice: 'Your appointment is submitted, but not confirmed'.

- Wait as long as a few minutes.
When the appointment has been successfully scheduled in the practice Appointment Book you will see the scheduled message: "Your appointment is scheduled. We look forward to seeing you."

See also: The patient booking has various consequences in the dental practice
Procedures in the practice
EXACT automatically does the following with an online booking by a patient:
Patient File
EXACT creates a patient file for any New online patients.
Appointment
Online Bookings appear in the appropriate place in the appointment book, where practitioners can open them to see all booking details, and online bookings also appear in the Online Bookings tab in the Appointment Book:

Patient Transaction
Practitioners can open the patient file's Patient Transaction details to view payments, including the Authorisation IDs for online payments:

In the View Transactions window patient payments have the prefix "OLB" in the Particulars column, followed by the Authorisation ID (AuthID):

Double-click the payment to view details of the Authorisation ID in the Comment field. Double-click the payment to view details of the Authorisation ID in the Comment field. This Authorisation Code matches records in the Stripe banking software for the practice.

IMPORTANT: The amounts stated in EXACT are before service charges by the third party banking, so these amounts are not exactly the same as those going into your bank account.
Emailed Online Payment Receipt
EXACT automatically creates an emailable payment receipt.
View the email from File > Email... : Outbox tab

NOTE: This Receipt is based on an editable Email Template: .OLB_RECEIPT_EMAIL.
Viewing online payments in Patient Transactions screen
View patient online payments in the View Transactions window for that patient, with the prefix "OLB" in the Particulars column, followed by the Authorisation ID (AuthID):
Double-click the payment to view details of the Authorisation ID in the Comment field. This Authorisation Code matches records in the Stripe banking software for the practice.
Viewing Online Appointment Bookings in the Appointment Book
Online Booking icons display in the top right corner of the appointment:

| New Patient online booking |
| Existing patient online booking |
| Recall Appointment online booking |
| Planned Treatment online booking |
Using New Patient Online Booking
![]() New Patients are not yet registered within EXACT. They access the booking website from various sources including online search, word of mouth and marketing information.
New Patients are not yet registered within EXACT. They access the booking website from various sources including online search, word of mouth and marketing information.
On the booking website new patients can book into the appointment gaps per Provider that have been made available for this purpose by means of the New Patient online bookings setup.
Data sent to EXACT Patient File
When a NEW patient successfully books an appointment on the portal, the software sends the following information to populate a new Patient File in EXACT:
Data | Mandatory? | Field in EXACT |
First name | Yes | First Name |
Last Name | Yes | Family Name |
Date Of Birth | Yes | Birth date |
Land line number | No | Hm Ph |
Mobile number | Yes | Mobile |
email address | Yes | |
When last visited the dentist | No | Appointment notes |
Where last seen | No | Appointment notes |
Information about your immediate dental needs | No | Appointment notes |
Receptionists can see the new patient booking
Receptionists can see ![]() new patient bookings in the appointment book and in the Online Appointments tab.
new patient bookings in the appointment book and in the Online Appointments tab.
Appointment Book:

Statistics are tracked in the Feature Usage Report
New Patient booking statistics are tracked in in the Feature Usage Report:

Using Existing Patient Online Booking
![]() Existing Patients are already registered within EXACT. The booking website is a convenient means for them to self-book appointments.
Existing Patients are already registered within EXACT. The booking website is a convenient means for them to self-book appointments.
On the booking website existing patients can book into the appointment gaps per Provider that have been made available for this purpose by means of the Existing Patient online booking configuration.
Receptionists can see the existing patient booking
Receptionists can see ![]() Existing Patient bookings in the appointment book and in the Online Appointments tab.
Existing Patient bookings in the appointment book and in the Online Appointments tab.

Existing Patients recording new information
What happens when existing patients enter information that contradicts records (such as a changed Email address)?
The new details don't automatically overwrite current details, but are stored in the "Notes about this appointment" area, accessible when you Edit the appointment.
Using Recall Patient Online Booking
![]() Recall patients are recalled by means of EXACT automation, and the recall includes a link to the booking website.
Recall patients are recalled by means of EXACT automation, and the recall includes a link to the booking website.
Overview of the process
The Recall Patient online booking functions as follows:
- Each day EXACT identifies patients due for recall appointments, according to criteria that have been customised by the Practice.
- EXACT sends an appointment recall message (SMS, email, or both) to patients due for a recall appointment. This contains a merge field link with the web address for a Practice-branded online (Internet) booking service.
- The recalled patients log into the Internet booking site (even outside of clinic hours) and select an appointment time that suits them, from available appointment time blocks that the Practice has specified as available for the Providers at the practice.
- The booking software confirms the booking with the Practice (EXACT) in real time, updating the Appointment Book.
- EXACT sends an automated SMS reply or email message to the Patient confirming the appointment. This message can be customised with information such as a map, parking instructions, dentist photo, and even further special offers.
Receptionists can see the recall patient booking
Receptionists can see ![]() recall patient bookings in the appointment book and in the Online Appointments tab.
recall patient bookings in the appointment book and in the Online Appointments tab.
Appointment book:
Apart from the appointment time search by the patient, the whole process can be performed automatically, freeing practice personnel from these administrative tasks.
Statistics are tracked in the Feature Usage Report
Recall Patient online booking statistics are tracked in in the Feature Usage Report:

Manually recalling patients
Your Practice may not necessarily be fully automated for recalls, in which case you need to manually recall patients.
To manually recall Patients
- Go to Administration > Manage Recalls.
EXACT will automatically detect if there is an outstanding list to run, and display the list for you.
A message will display for each of the months in the specified period, informing you how many patients met the recall parameters.
The main screen displays figures and a colour graphical display per month:

- (Optional, if instructions have been typed) Click the My Recalls Procedure button to view custom instructions on what to do next:

Example of a 'My Recalls Procedure':

- Double-click a line (month) in the Recall Lists screen to display its entries and Contact options:

The Month View displays the details of its recall patients.
! You can optionally filter the list and then perform bulk actions on the resulting patients.

This screen has all of the tools that you need to contact the listed patients.
Hyperlinks
Note: all line entries in this screen are hyperlinks. The functionality is the same as for the Appointment Book Recalls Tab.
Month Selector
Use this to change the month.
Column headers
The default sort order is Last Name, alphabetical.
Click a column header to sort the list by that parameter.
First Name / Last Name
Click a First or Last name to open the Patient Information tab.
You can then edit any Patient fields that need updating.
Dates

These are the Recall dates.
Coloured icons represent the same colour recall statuses as for the Effectiveness Tooltip display.
Click any of these dates for editable information for the recall.

If you edit these fields and click Update, it will immediately update the display.

Prior contacts with patients are recorded as icons in the Prior Contacts Column.
Click a Prior Contact icon to display details of the contact.

Click any of these hyperlinks to display a contact screen from which to contact the patient. A small star behind the icon indicates the preferred method of contact.
 Home Address. Recall is by letter
 Business phone
 Home phone
 Home phone, SMS
 Mobile phone
 Mobile phone, SMS
 Email
Email - You can manually contact patients by any of the means described above or simply use the recall list as a phone list and contact the patient by phone. Alternatively, you can utilise EXACT's significant automation capabilities and have your software perform all recall communications and bookings.
To send ONLY a hygienist recall link to a patient
Workaround: This is a workaround for an issue where a practice tries to send a patient an online booking URL for just a Hygienist booking, but the patient receives a URL for Hygienist plus Dentist booking.
PLEASE NOTE:
- The eMail/SMS Template must contain the [Recall.URL] Merge field.
- You cannot use Administration>Manage Recalls - this list will always send a URL for booking DENTIST and HYG Recall appointment if there are dates set in both fields on the Patients Recall Tab.
To send ONLY a Hygienists Recall URL link to a Patient for booking an appointment via the Online Recalls system
- Open Administration > Contact Lists.
- Click the Create List Button to display the Create Contact List screen:

- From the Select Patients List, choose Recall List HYG.
- Type a description for the List. For example, HYG-Only Recalls.
- Tick Use list for appointment booking.

- Click OK to display the Patient Query screen, where you can specify the parameters for: Without an Appointment within x period, and the Recall Period:

- Click OK, then click YES to confirm:

- Then Tick “Hygiene Recall ONLY and click OK:

- On the Next screen you have an option to choose whether or not to update patient recalls on the Recall List as they are marked as Complete. If (like most practices) you are setting your Recall Dates in surgery following the patients appointment, leave this Un-checked:

- Click OK to run the List, and then you’ll see the Result Screen:

- Click OK to see the List of Patients who fit the Criteria.
- From the list of patients, either generate a Single eMail/SMS message for the Patient you have highlighted, or choose Multiple eMails/SMS's.
Multiple eMails/SMS reminders are then generated to be sent to All Patients on the list. These include only a Hygiene Recall URL Link within the message, for patients to book their Appointment via the Online Recall System - Even if they have both a Dentist and a Hygienist Recall set in their Patient File.
To send an Email directly from the Patient File
If you send an eMail directly from the Patient File you will see this Screen:

You can then again choose either Dentist Recall, Hygiene Recall, or both.
PLEASE NOTE:
- The eMail/SMS Template must contain the [Recall.URL] Merge field.
- You cannot use Administration>Manage Recalls - this list will always send a URL for booking DENTIST and HYG Recall appointment if there are dates set in both fields on the Patients Recall Tab.
Using Planned Treatment Online Booking
A patient can book ![]() planned treatment online if that patient's Provider has been appropriately configured.
planned treatment online if that patient's Provider has been appropriately configured.

Receptionists can see the planned treatment patient booking
Receptionists can see ![]() planned treatment patient bookings in the appointment book and in the Online Appointments tab.
planned treatment patient bookings in the appointment book and in the Online Appointments tab.
Appointment Book:
Requirements for planned treatment online booking
- The practice must have Appointment Workflow configured because a Planned Treatment Online Booking link can only be sent from its Departure Task List at the point of Patient checkout. There is no other way to send it.
- A Patient requires an Appointment for Today’s Date.
- The Patient requires a Treatment Plan on the Chart Tab, and a minimum of one appointment Planned, with time specified for the Service.

- Only Patient planned appointments on the Chart Tab that are marked as To Be Booked will show in the Departure Task List, so Providers must know to tick this checkbox. They must also ensure that the planned treatment has an estimated time (duration). EXACT calculates the sum of the planned services per appointment, and this displays in the Edit Appointment screen Expected Time field:

To use the Planned Treatment Online Booking (procedure)
![]() PROVIDER procedure
PROVIDER procedure
- When charting, the Provider needs to specify to Book this Appointment:

A) Double-click the Appointment to open the Edit Appointment window.
B) Check (tick) the Book this Appointment checkbox and complete all other details in the screen.
C) Check that the appointment has an Expected Time (duration), calculated automatically as the sum of the services' Estimated Times.
D) Click OK.
 RECEPTIONIST procedure
 - When the patient departs through reception the Receptionist attempts to book the planned treatment appointment manually in the appointment book.
If the patient cannot or will not commit to a booking, the Receptionist opts to send the planned treatment booking URL... - If the patient has no Email and/or SMS contacts recorded, the Receptionist will first need to record them:

NOTE: EXACT will pop up a warning if the Receptionist clicks the online bookings button without having these contacts recorded:

In this case the Receptionist can either open the Patient File to record the details, or click the Collect Email and Mobile prompt in the Departure Task List:

TIP: When both the Collect prompt and the online bookings button both appear, first collect the contact details:

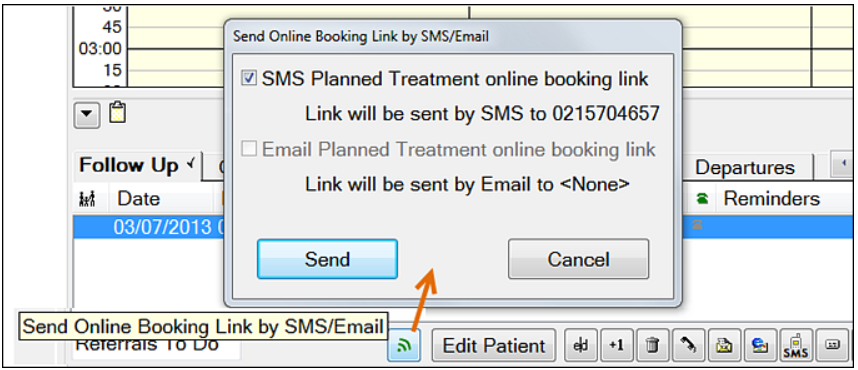
- With contacts recorded, the Receptionist clicks the online bookings button
 to open the Send Online Booking Link by SMS/Email window:
- The Receptionist checks (ticks) any combination of these checkboxes and then clicks Send.
The following processes then occur:
- The SMS/Email with the booking URL is sent to the patient.
- The online bookings prompt disappears from the Departure Task List:

- The patient details display in the Follow Up tab under the category OLB Link Sent:

The booking URL is populated with details of the planned treatment booking requirement, ready for patient booking.
 PATIENT procedure
 - When the patient selects an appointment gap, the software displays a Confirmation page with Provider details.
Once the patient confirms, the software prompts the patient to check for a confirmation message.
RECEPTIONIST monitoring - The following processes then occur, that the Receptionist can optionally monitor:
- The booking is made in the appointment book, and displays an online booking icon:
You can mouseover the icon for appointment details:
- The patient is removed from the Follow Up tab:

- The patient displays in the Online Appointments tab:

(If you cannot locate this tab, it may need to be enabled. See Enabling the Online Appointments tab in the Appointment Book) - Note that you can filter the Online Appointments tab by means of Planned Treatment Bookings:

- The booking becomes a statistic in the Feature Usage Report:

- The booking is made in the appointment book, and displays an online booking icon:
Using the EXACT Online Appointments Tab
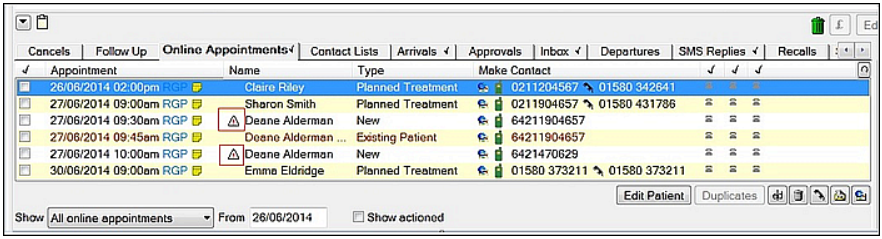
The Online Appointments Tab displays all patient online bookings, and provides a means for Practice users to manage these bookings.
Can you see the Online Appointments tab?
This tab only appears for a user when
- The Practice has registered the Online Appointments module, and
- The Online Appointments tab has been enabled in the Appointment book for that user.
Content in this tab
Online bookings will remain in this list until the appointment date/time has been reached.
The content in some the columns is hyperlinked, as explained below.
Once in use the tab will look similar to this:

Column: Tick Box | A tick box to indicate that the actions for dealing with the appointment have been carried out. |
Column: Appointment | Appointment Date / Time / Provider code / Click Date-Time to display the Edit Appointment window. Click the |
Column: Name |
CALL ME indicator: If the patient has indicated that they want a call back the row appears in Red and the word CALL ME displays next to the patient name. Click the Name to display the Edit Patient window (so long as there is no possibility of a duplicate record.) If there is a possible duplicate, follow the procedure for Creating New Patient Records from online appointments. |
Column: Type | This is the type of appointment generated by a patient. New: New Patient (not registered at the Practice) requesting an appointment. Existing: A registered patient making an unplanned appointment. Recall: Patient using the recall link Planned treatment: Treatment has been planned by a clinician. |
Column: Make Contact |
|
Show (drop down) |
Optionally filter by choosing one of the Show options and the From date. The list will always sort by date and time |
| Select (tick) to display completed bookings. |

Dealing with possible duplicate patient records
Override of the minimum mandatory fields setting
The EXACT software has a mechanism for defining the minimum mandatory patient fields that must be recorded for a patient record.
EXACT ignores this setting when creating a New patient from an online booking.
Existing Patients recording new information
What happens when existing patients enter information that contradicts records (such as a changed Email address)?
The new details don't automatically overwrite current details, but are stored in the "Notes about this appointment" area, accessible when you Edit the appointment.
Possible duplicate patient records
There is a possibility that the newly created record may belong to a patient that already has a record with the practice.
To avoid any duplications, the system checks for matches at the time the new record is created:
Matching First Name AND Last Name
and/or
Matching Date of birth
and/or
Matching Mobile number
and/or
Matching email address
If any of these conditions are met, the duplicate record warning displays in the Online Appointments Tab, and the matching records display in red text:

See further down this page for a list of details that are merged.
To locate and merge a possible duplicate record that has been indicated
- Highlight / select the row in the Online Appointments Tab:

You will see the Duplicates button become available:

- Click the Duplicates button or click the
 Possible Duplicate Record icon to display the Duplicate Patients dialogue:
The top portion of the screen displays the new patient details and the bottom portion of the screen displays the existing records that could possibly be the same patient.
Specific fields in the existing record that match the new record display in red text.
- Decide - is this a duplicate or a New patient?
(Optionally click the View Patient button to view the patient file).
- If this is not the same patient, click the Continue button to return to the Possible Duplicates window.
- If this is the same patient, click the Merge button

... to display the Merge Patient Details:

(To cancel the merge and return to the Possible Duplicate Patient screen, click the Cancel button).
- To merge the existing patient and the new online bookings patient, click the OK button.
You will see a request for confirmation, with a warning that the operation is irreversible:

Selecting Yes causes the following system to do the following:
- Merge the two records.
- Associate the appointment to the existing patient record and retain it in the appointment tab.
- Erase the now redundant new record.
- Add a pop up NOTE to the destination Patient.
This note includes any details which could not be successfully merge into the Patients file, so that the user can make an informed decision and enter these extra details if they are applicable.
For example, here the Mobile phone number needs to be manually checked:

- Use the pop up note guideline and check that the two records have merged successfully.
NOTE ON MANUALLY MERGING TWO PATIENTS:
When EXACT merges an online booking Patient with an existing Patient record, the new record is automatically deleted.
However, if a practitioner manually merges two patients by means of the Merge button in the Patients File, the source patient file is NOT deleted, so in this case the practitioner needs to manually mark the source patient file as ‘Inactive’.
The following details are merged
Patient fields:
- First name
- Second name
- Last name
- Prefix (Holland only)
- Title
- Also known as (Holland only - creates it if it is not present)
- Initials
- Sex
- Date of birth
- Home address and post code
- Work address and post code
- Home, mobile, and work phone and work phone contact
- Alternative phone number and contact
- Fax number, pager number
- Email addresses
Patient records:
- Patient x-rays and video
- Contacts
- Patient notes and dated notes
- Charting
- Appointments
- Perio WHO and BPE (not sure if this includes new Holland perio)
- Transactions and associated invoice lines
- Waitlist entries
- Denplan OHS
- Pathology
- Medical History (just integrated medical history only?)
- Prescriptions
- Recalls
- Smile Surveys
- NHS Pilot Information
- Examine-Pro
- 3rd party link records (but not the actual third party data, which isn't held in our database)
- Custom tabs
Re-send a Patient their Online Booking Link
Once the online booking link has been sent from the Appointment Workflow departure task list, it is also made available from the Follow Up tab, for re-sending the link to the patient as a reminder.
Simply select the patient and click the button:
Receptionists can see ![]() planned treatment patient bookings which have been made, in the appointment book and in the Online Appointments tab:
planned treatment patient bookings which have been made, in the appointment book and in the Online Appointments tab: