Open Recall Manager either from Administration > Manage Recalls...
...or from a manually-created shortcut on your task bar:

This opens the Manage Recalls screen and populates it with historical recall records.
The Manage Recalls screen is the main management interface for monitoring and managing recalls.

It displays a month summary per line, with an Effectiveness summary bar chart in colours that represent the Recall-health of the Practice:

The current month is displayed with bold text.
There is no red displayed in the future:

The display is real time (Live), so you can see these figures changing when recalls are being issued to patients.
At bottom right is a toolbar:

| Run Recalls Button | This appears if you have configured for manual initiation of the automated recall parameters. Click the button to run the recalls according to the configured parameters. |
| My Recalls Procedure Button | A notepad to type up procedures for quick reference. |
| Print Report Button | Click to print the Recall Breakdown Report. |
| Set up Recalls Button | this is the means to configure Recall Manager. Click to display the Recall Parameters screen. |
Each patient has a Recalls tab in the Patients screen.
On this tab is a summary of Recalls Due for both Dentist and Hygienist.

When Providers treat the patient and prepare to finalise the treatment, EXACT pops up amended Recalls Due suggestions.
Providers accept or edit this suggested information, which then becomes the new Recalls Due information on the Patient's Recalls tab.

Choose not to view the popups
Providers can opt not to view this popup, which is logical if patients use default practice recall values.
However, in some circumstances they will display anyway, as a means of informing the Provider that the recall has changed due to an automated process.
VARIABLE recall default values
From EXACT v12.2 onwards the Provider can opt per patient for that patient to use either default recall values or recall values that the Provider customises for the patient.
To customise recall values per patient
Un-check the Use Default Values checkbox and then edit the values:

To set patient recall values as the defaults for the practice
Check the Use Default Values checkbox.
(This should in most cases be checked already by default following an upgrade from pre-v12.2 to post-v12.2 EXACT)

From EXACT v12.2 recall defaults have been expanded to included variable recall defaults - See also:
The Recalls tab of the Patient File shows a number of appointment-related areas:

| Patient’s Recalls Due status for both the Dentist and Hygienist |
| Patient Appointment Preferences |
| Past appointments and modifications to appointments |
| Information to help you track patient referrals to other practitioners and specialists |
When a Provider completes a treatment, EXACT prompts for confirmation of Recall details for that particular patient. The Provider can reject or edit suggestions before confirming the recall details.
Changes:

To set the Recalls based on EXACT suggestions
For example:

The words in red text are suggestions from EXACT, following the treatment that the Provider is now completing.
There are three possible actions to perform with the screen:

The information will then be updated in the Recalls Due area in the Patient's Recalls Tab.
Other:
If you set the recall to Do not recall patient...

... then the recall details screen will include both toggle buttons, enabling you to either reject suggestions or reinstate the previous suggestions:

Variable Recall Default Values are an optional feature from EXACT v12.2 onwards. On upgrade your recalls will work exactly as before unless you reconfigure them.
Recall Manager historically had a single default appointment service, length and recall interval for each recall type, and this was applied to all New patients.
From EXACT v12.2 the recall defaults can be flexibly overridden so that the appointment service, length and recall interval vary depending on patient Age, Payor, and Provider.
This is achieved by means of Overrides - unique patient groups with custom recall parameters that override the default recall values.
This feature enables flexible recall settings, greater automation, and easy recall changes by group rather than individual patient
Recall Manager historically had a single default appointment service, length and recall interval for each recall type, and this was applied to all New patients. For example an Examination service set at 20 minutes would apply to all patients, even though this appointment length may be more suited to an adult than a child. With this configuration, where a different recall was required, Providers would manually customise the default recall appointment length when they created the recall.
From EXACT v12.2 the recall defaults can be flexibly overridden so that the appointment service, length and recall interval vary depending on patient Age, Payor, and Provider.
For example an EX20 examination service default length of 20 minutes can be overridden as
The mechanism to enable this flexibility in v12.2 and later is the Override Patient Group:

The settings in these Groups take priority over the standard default recall settings.
Define as many Override Patient Groups as required.
Each group must be a unique combination of Age, Payor and Provider (and, in Australia, Healthfund).
NOTE: A combination of the ALL groups is not allowed because this is already covered by the default values set for the recall type: All (Ages), All (Payors), and All (Providers) - if you try to set this combination you will see an error message: 
For patients who are configured to use the default settings...
For each group, specify the values that will override the system defaults: recall Service, appointment Length and recall Interval.
Order the groups carefully by means of the Up/Down arrows because EXACT identifies only the first group that a patient matches, working from the top of the list to the bottom.
EXACT then assigns to the patient the override Service, appointment Length and recall Interval as defined for that first applicable group.
For example, recall settings can now automatically change when patient parameters change, such as when patients turn 18 or when they are assigned to a different Provider.
NOTE: Variable appointment lengths don't apply if co-duties are set as On (in Configure > Appointment Book...), in which case the appointment length will be fixed to the service length and shape, as before the v12.2 upgrade.
Upgrading from v12.1 or earlier
The upgrade preserves any default recalls configuration in the practice, so if the practice makes no changes on upgrade the recalls will continue as before the upgrade. And where patients use Provider-customised recall values, these will continue as before the upgrade.
However, because each patient file requires a "Use" or "Don't Use" default recall values setting after upgrade, EXACT follows this policy:

Consequently, on upgrade, all of the above patient types with the checked box become subject to any updates that the practice later makes to its default recall settings.
When these patients' recalls are advanced, EXACT looks at the recall default settings and at the Overrides at that time, and changes the patients' recalls to match.
When recall changes are activated for patients, Providers are notified at time of treatment that the patient recall is changing, and are able to view the new recall settings.
Practitioners may notice these visible changes to recall configurations:


Patients are recalled by the first recall guidelines that apply to them in this prioritisation:

|
Recall values can be set by Providers during treatment for specific patients in those patient's Recalls tab:
|
|
...who are checked to Use Default Recall Values
...but to whom Overrides apply... Are recalled by the first Override that applies to them in the ordered list of default recall Overrides.
|
|
...who are checked to Use Default Recall Values
...and to whom no Override applies... Are recalled by the standard default recall values, as set from the Manage Recalls > Recall Parameters window: Edit Recall Type. This includes the service, the length of the service and the recall interval:
|
Providers can set patients to either use Recall Defaults or not.
If they are not set to variable recall, then the patients previous recall settings will be used as before.
With the variable recall flag set, when a patient is due to advance their recall, EXACT compares the patient to all the override options and chooses the first match. If there is no match it uses the global default values.
Recall Prompt auto-displays to Providers when patient recall default settings change
(This is in order for Providers to be made aware of automated recall changes to patients)

Normally Providers can opt not to view the patient recall prompt during treatment.
However, EXACT will override this personal preference and display the recall prompt for any patients who have changed group, or for whom the group recall parameters have been changed.
This is so that Providers are made aware of recall changes that applied automatically to the patient as a result of group membership change.
Example of a compulsory recall popup, with red text identifying the change:

The Note on the recall prompt (and in the in the recall history audit) states that the patient uses default settings.


This is a Live, real time display, so if you change a recall date, the list updates immediately.
You can double-click any month for a detailed Month View
The main screen displays figures and a colour graphical display per month:
From v11.3 SP5 the display includes Success percentages:
How these column figures are calculated:
- (minus) + (plus) / (divided by)
Patients | If a patient has more than one recall, the recall is counted as one |
Total Recalls | Total - Inactive - Do Not Recall |
Total Success | Booked + Completed |
Total Success % | Total Success / Total Recalls |
Dentist | Dentist Total - Dentist Inactive - Dentist Do Not Recall |
Dentist Success | Dentist Booked + Dentist Completed |
Dentist Success % | Dentist Success / Dentist |
Hygienist | Hygienist Total - Hygienist Inactive - Hygienist Do Not Recall |
Hygienist Success | Hygienist Booked + Hygienist Completed |
Hygienist Success % | Hygienist Success / Hygienist |
Therapist Recalls | These could constitute part of either the Dentist or the Hygienist figures, depending how you have configured the Recall Manager. |
The Effectiveness graphic display has a colour code, and you can mouseover (hover your mouse cursor over) any line to see a detailed tooltip breakdown of recall types.
Recall Manager provides automated, live, real time status information. The data in the graphical display is Live, so as you change recall dates in EXACT, it updates instantly, providing a visual snapshot of your recall effectiveness at any moment:
Because recalls are a critical element to the success of most dental practices, this display can be used as an instant snapshot of business health. Over time you can use it as a dynamic barometer to gauge the effectiveness of your recall policies.
For example, the predominance of red in a screen would be worrying.

Roll over any graph area for tooltip Effectiveness statistics display:

Colour | Representing | Good or bad indicator? | |
Dark green | Booked: Patients with recalls whose appointments have been booked. | Committed business. This is the best recall status. | |
Light green | Future: Patients with recalls in the future who do not have appointments. | Still good. | |
Light blue | Completed: Patients who completed treatment. | Indicates work done. | |
Dark blue | Moved On: Patients with appointments that have been postponed. | Okay. | |
Grey | Inactive: patients who are permanently lost to the Practice. | Lost. | |
Dark red | Do not recall: whether due to a patient decision or a Provider decision. | Not lost just yet. | |
Red | Failures: Patients who failed to be recalled, with no further planned recalls or appointment bookings. | "The life blood of the Practice draining away". NOTE: The Recall Display should not show much red. If the Practice hasn't seen patients for a few years, or if they are |
When you edit / advance a recall, the result depends on the nature of that recall.
So,
If you recall this booking ![]() (failed to be recalled) for 6 months later, the result is
(failed to be recalled) for 6 months later, the result is ![]() .
.
If you recall this booking ![]() (a recall in the future) for 6 months later, the result is
(a recall in the future) for 6 months later, the result is ![]() .
.
The difference? One starts from a failed recall in the past (red icon) and the other starts from a possible future recall (green icon).
Edit Recall: | Result: |
Starting from a Failed Recall (in the past, red icon):
|
Because it started in the past, we record the fact that this patient did not come in, and we have moved the patient on to a new date. There is a change of recall status, so the colour changes. |
Starting from a Future Recall (green icon):
|
We don't count this as a "Moved On" because the change in recall date is not an |
The Recall Breakdown Report is accessible from the Recall Manager interface.
This report gives a breakdown per Provider/s per month of every patient.
It follows the same logic as the display summary, but by Provider/s:

To access the Recall Breakdown Report:
Main screen: 

Optionally select Multiple Providers:

The Recall Breakdown Report is configured for printing in Configure > Printing Setup...

If required fields are missing you may be prompted when you attempt to pint this report.


The Contact by Email screen displays:

NOTE: You need to specify Provider and Specialist if your email template has these as merge fields.

EXACT provides the means to export reports in .CSV (comma-separated values) format, which is readable in common consumer, business, and scientific applications, including Microsoft Excel.

You may see a popup explanation screen:

The Manage Recalls screen has a "Notepad" in which you can type reminders and procedures.
For example, document how your recalls are normally set up so that you can reference this information if you ever need it (before ringing Support in the event you have problems with your recalls).


The window has a header Detailed Recalls Procedure for [practicename] where the practice name is defaulted by EXACT. The text field below it is a custom notes field.
A security setting is enabled by default for this Notepad, but if it is disabled, a user will see only a read only copy of this window.
Recommendation: Once your recall procedure is documented, use this security setting to limit the number people who can change the screen.
Set permissions by security group from Configure > Security > Administration > Manage Recalls > Edit My Recalls Procedure.
In this example, Receptionists have been limited from editing the content:

From the Recall Manager screen:

Double-click a month (line) in the Effectiveness display screen:
![]()
The Month View displays the details of its recall patients.

Hyperlinks | Note: all line entries in this screen are hyperlinks. the functionality is the same as for the Appointment Book Recalls Tab. |
Month Selector | Use this to change the month:
|
Column headers | The default sort order is Last Name, alphabetical. Click a column header to sort the list by that parameter. |
First Name / Last Name | Click a First or Last name to open the Patient Information tab. You can then edit any Patient fields that need updating. |
Dates
| These are the Recall dates. Coloured icons represent the same colour recall statuses as for the Effectiveness Tooltip display. Click any of these dates for editable information for the recall.
If you edit these fields and click Update, it will immediately update the display. |
| Prior contacts with patients are recorded as icons in the Prior Contacts Column. Click a Prior Contact icon to display details of the contact. |
| Click any of these hyperlinks to display a contact screen. A small star behind the icon indicates the preferred method of contact. |
| |
| |
| |
| |
| |
| |
|
To view Recall History for a patient Month View
![]()
The Month View displays the details of its recall patients.
To view prior contacts made with a patient
Click an icon in the Prior Contacts column:

By default the month view displays with all information for both dentists and hygienists.
But the month view has a Filter mechanism that you can use to isolate more specific information on the screen. This is located on the month view toolbar at bottom right of the month view screen:

IMPORTANT:
The button functions on this toolbar apply to just the data that displays on the screen. For example, if you apply a filter and then click the Email button to recall patients by email, EXACT will issue email recalls only to the patients represented in the filtered data on the screen (not to all recall patients).
Recall Manager will not attempt to contact INACTIVE patients.
Default filter selection
When you first click the filter it displays with the default selection:

Includes Overdue (red) and Future (green) listings on the screen.
Patients with a contact preference
Select which preferences. For example:

This will result in a display where each patient has one contact preference (indicated by a subtle star behind the icon):


The icons in the Month View screen are interactive, so you can at any time click a contact method for a particular patient.
Example: Printing a recall letter for one patient:
To print a recall letter for one patient from the month view screen
Click the Print Letter icon for that patient, complete fields for the Letter tab and the Label tab:

Optionally Display before clicking the Print button.
You can at any time check the Prior Contacts column to confirm that a letter was printed:
Example: Phoning one patient
To phone a single patient from the Month View screen

It is possible to filter a list of patients for recall, and then to have EXACT print letters to all of them, with their correct recall details.
Besides the recall filter, you can also further filter by means of Query Templates:
To filter the month view screen with Query Templates
To further filter the patient recalls displayed in the month view screen, select a Query Template, which will be applied to the list on the screen as a second-level filter.
Either scroll up and down to locate a Query Template...

... or select from a pop-up screen:

To print recall letters for multiple patients
[Overview of this procedure:
By means of the Month View screen, filter/define which patients to recall,
Then by means of the Document Details screen, specify a print template, and print to your printer.]
Access the month view screen and optionally apply a month view filter.
![]()
Create from multiple locations
Patient letters can be created from multiple locations such as the patient file, recalls or contact lists by clicking on the Create a Patient document button wherever it is visible.
Patient Contacts tab lists letters
If EXDOC is installed these letter contacts are automatically stored on the patient’s Contacts tab and can be viewed and/or edited by double-clicking on the required letter.
NOTE: Without EXDOC the letter symbol will indicate the creation of a letter, but the actual letter itself will need to be either saved manually on one of the practice's computers or printed in duplicate and the copy held on file.
Letter templates
Letter Templates are used when writing letters. These templates contain the standard layout and wording common to all letters of the same purpose, and merge fields that are automatically resolved with actual data when the letter is processed. For example, all referral letters will contain merge fields for basic information about the patient such as name and date of birth, and may begin with a first sentence of ‘Thank you for seeing…’
See also: ![]()
![]() Portal blog and video: Creating letter templates
Portal blog and video: Creating letter templates ![]()
To contact by Letter

Select the type of letter: Create either a single letter to the selected patient or multiple letters to patients within the contact list.
Select Group by Family if there are several members of the same family, and you want to send one letter for the family.
You have the checkbox option to Tick as complete when printed. If you check this box, EXACT will remove each patient from the contact list when the letter for that patient is printed, leaving only patients on the list with unprinted letters.
With this unchecked the patient is not marked as Complete on the contact list until further manual action is taken. In other words, leave the checkbox unchecked if you want a reminder to take further action.
A Contact Multiple Patients window will appear:
The Document Details window displays, as described below.
If you have Presentation Manager enabled, the Document Details window will have a preview window and slightly different fields.
The Document Details window enables you to write to the patient as well as create/modify the Letter Templates that are the basis of the individual letters written.
Letter Templates can include merge fields. These are placeholders for patient, provider, specialist, practice and other details that can be inserted directly into a letter from EXACT, which are replaced with actual data when the letter is processed.
Document Details window:

Complete the following fields (as appropriate) to create the document:
| Provider: Click in the field and use the selectors to select a Provider under whose name the document will be written. Note: If you are logged in as a Provider, your Provider Code will appear here by default, and if the patient has a Provider assigned, that Provider will display by default. |
| Specialist: Click in the field and use the selectors to select a Specialist under whose name the document will be written. |
| Category: This defaults to Admin Document but you can select an alternative type from the list.
There is no limit to the number of Categories that you can create. These Categories are significant in the Patient File Contacts tab (as indicated below), where contacts can be displayed/sorted by the Category. Note also how the template Description field is shown under the Description column:
|
| Description: Type a description for the document content. This will be displayed in the list of contacts. |
| Document Templates pane:
|
| Templates: These can be Standard (delivered with the software), created/customised and/or imported. EasyPost templates display the EasyPost icon: Arrange templates by dragging them into folders templates into folders. Edit button |
| Categories: Use these as a means of rationally arranging templates (drag templates into folders). Create any number of Categories. Hover your mouse cursor over a category to display a Delete button. Add categories from three locations in the Document Details screen - see You can also select and add Categories from the Create Template screen. |
| Preview of the selected template. |
| Add new category button:
|
| +1 button opens the Create Template window. See Creating a New Template. |
| Print: Print the selected letter template for this patient. |
| EasyPost: Click to send the template to EasyPost (populated with the selected patient's details) for third party printing, addressing and posting (requires the EasyPost module and Presentation Manager). |
| Preview: Without Presentation Manager this will pop up the template document for viewing. With Presentation Manager, this displays the document preview at right, with merge fields populated with sample patient details:
|
| Cancel button: Cancel the document details and close the window. |
It is possible to filter a list of patients for recall, and then to have EXACT print letter labels with their correct recall details. You have the option to further filter this list by means of Query Templates:
To further filter the month view screen with Query Templates
To further filter the patient recalls displayed in the month view screen, select a Query Template, which will be applied to the list on the screen as a second-level filter.
Either scroll up and down to locate a Query Template...
... or select from a pop-up screen:
Access the month view screen and optionally apply a month view filter.
![]()
Contact lists can be created and viewed from multiple areas of EXACT, such as:
To print letter labels for multiple contacts

Select Group by Family if there are several members of the same family in the list, and you want to print one label for the family.
Tick as complete when printed: If printing the labels completes the printing process, you have the option at this time to mark all entries in the list Complete as the labels print, as an alternative to marking them off manually at a later stage, perhaps when the patient responds.
With this unchecked the patient is not marked as Complete on the contact list until further manual action is taken. In other words, leave the checkbox unchecked if you want a reminder to take further action.
Single Label option
The Single label option will launch the Label Details window.
Multiple Label option
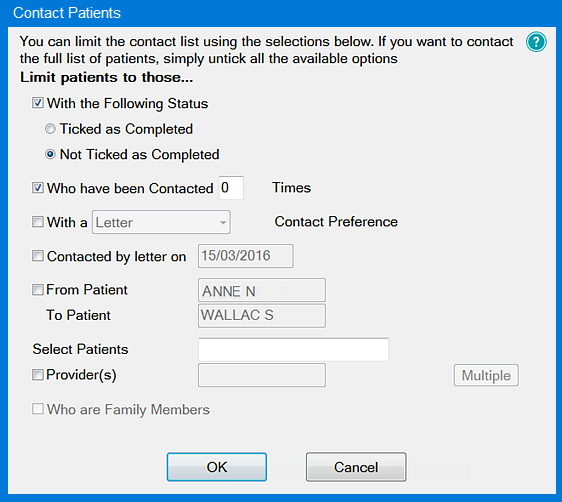
If the multiple label option is selected, you will be presented with the Contact Patients window with the contact preference defaulted to Letter:
This window will allow you to print labels based on a date using the Contacted by letter on option.
The date field will be defaulted to today’s date.
Once you have selected your list of patients and clicked OK, the Label Details window will launch, allowing you to complete the label printing process for the selected patients. The OK button on the Label Details window will instead read Print if multiple labels are selected.
It is possible to filter a list of patients for recall, and then to have EXACT email these patients with recall details.
[Overview of this procedure: By means of the Month View screen, filter/define which patients to recall, then by means of the Email Details screen, specify details of the email such as provider and email template, and finally, by means of the Create Email screen, create and send the email.]
Access the month view screen and optionally apply a month view filter.
![]()
To contact by Email

Select Single or Multiple Emails.
Select Group by Family if there are several members of the same family, and you want to send one Email for the family.
You have the checkbox option to Tick as complete when sent. If you check this box, EXACT will remove each patient from the contact list when the letter for that patient is printed, leaving only patients on the list with unprinted letters.
With this unchecked the patient is not marked as Complete on the contact list until further manual action is taken. In other words, leave the checkbox unchecked if you want a reminder to take further action.

This will either be blank (if you did not specify an Email template), or it will contain the Email Template that you specified:
Blank:

With sample specified template:


When you select Finish, the attachment/s appear in the Create Email screen. You can right-click them to see further options:

To add a further attachment, click the +1 button.
To delete an attachment, select it then click the Delete button.
To save an attachment to another location, select it, click the Save button, and specify the location.
To open (view) an attachment, select it then click the Open button; this will open the attachment with the appropriate program.
To further filter the month view screen with Query Templates
To further filter the patient recalls displayed in the month view screen, select a Query Template, which will be applied to the list on the screen, as a second-level filter.
Either scroll up and down to locate a Query Template...
... or select from a pop-up screen:
It is possible to print, preview, email or export the recall list as displayed in the month view.
To Access the Recall List Print screen displayed in the Month View window
![]()
The Print Recall List window displays:

Recall List printing configuration:
The Recall List is configured for printing in Configure > Printing Setup...

If required fields are missing you may be prompted when you attempt to pint this list.
To Print the Recall List


The Contact by Email screen displays:


EXACT provides the means to export reports in .CSV (comma-separated values) format, which is readable in common consumer, business, and scientific applications, including Microsoft Excel.
To Export the Recall List in .CSV format

You may see a popup explanation screen:
The primary means of managing Recalls is likely to be the Appointment Book Recalls Tab.
This is a tab in the Activity Bar that displays identical recalls information as the Month View.
 Select the Appointments interface.
When enabled, the Recalls tab displays at the bottom of the screen:


![]()

You will see a screen with this message:

In the Select Tabs screen, move Recalls from the Available Tabs column to the Selected Tabs column, and then arrange the tab order with the Up/Down arrows:

The Recalls tab appears in the Activity Bar, in Month View:

NOTE: This does not apply to automated recalls, for which appointments may be confirmed without user intervention.

This shows the duration of the appointment needed (taken by default from the services configuration), the service type, and the last seen Provider. Ideally your appointment should be to this same Provider for this duration. The service type may be important for booking if your Practice groups services by dates and times.
3. Drag the recall date from either the Dentist or Hygienist column in the Recalls Tab, and drop it in the slot. | > | The Patient details will show in the appointment booking, and the recall will show as "Booked" in the Recalls Tab: |
| > |
|
A Recall that you have booked as an appointment shows an occupied appointment slot, and a "Booked" status in the Recalls Tab:
|
![]()


The appointment slot again becomes available, and the Recall reverts to its previous status in the Recalls Tab:

(Note how in this example the Recall has reverted from "Booked" (green) status back to "Failed" (red) status. This happens when an appointment date is missed and the appointment is not moved on. A Booked status only applies when it assists in the future. )
EXACT can be configured to daily calculate which patient recalls are due and then automatically send recall notifications to those patients in multiple media (SMS, Email, EasyPost).
The options for automation include automatically sending acknowledgements when patients reply, and configuring custom templates for particular groups of patients.
The setup for EXACT's automated recalls includes
EXACT can run this set of recall parameters automatically every day, or a user can manually initiate these recall parameters at will.
Configuration required for manual operation:
Open Recall Manager > Click the Configure Recalls ![]() button > Click the Automation button > de-select (un-check) the
button > Click the Automation button > de-select (un-check) the ![]() Run Recalls automatically checkbox:
Run Recalls automatically checkbox:

To manually run EXACT's automated recall parameters


EXACT then runs the configured recall parameters.


You can click any icon for details of that particular patient recall.
From release 11, it is possible to configure automated recalls and then either 1) let EXACT continuously contact patients based on this automated recalls configuration or 2) manually initiate this automated recalls configuration.
Or you can manually contact patients in relation to their recalls, either singly or in multiples...
The Recalls List is duplicated across two locations:
Contact either from the hyperlinks or from the buttons:

![]()
This section applies to the Recalls list in both the Month View and the Appointment Book Recalls Tab.
| Click any of these hyperlinks to display a contact screen. A small star behind the icon indicates the preferred method of contact. |
| |
| |
| |
| |
|
NOTE: A small star ![]() behind the icon identifies the patient's preferred means of contact.
behind the icon identifies the patient's preferred means of contact.
This section applies to the Recalls list in both the Month View and the Appointment Book Recalls Tab.
To deal with multiple recalls
![]()

Prebooking is when a patient recall is booked before the patient leaves the Practice.
Prebooking is indicated by means of a dark green graphical bar:
![]()
The light green represents patients who should potentially be prebooked, but for some reason are not.
A high level of prebooking is a health-indicator for a Practice, so the more dark green the better.

The Appointment Workflow is a patient retention utility that facilitates prebooking.
Recall information deriving from Recall Manager can be listed as a booking task on the Receptionist's departure task list for each patient. This task list integrates with appointment books, and lists the tasks for the Receptionist to complete during a patient's departure.

For example, here the Receptionist is viewing a task to issue a brochure:


