ENHANCE
Search these help files
The EXHANCE module allows x-rays to be scanned into EXACT. This is done through an additional tab in the Patient File called Xray.
Scanning Xrays
- Click on the Patient File and select a patient in the Details tab.
- Click in the ‘Xray’ tab; the following window will appear:

- Click on the
 button to open the ‘Xray Scanning window as shown below:
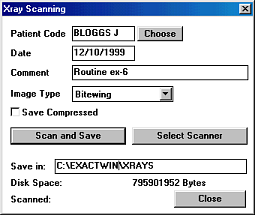
- The ‘Date’ field will default to Today’s date or can be changed to reflect the date the Xray was taken.
- Enter an appropriate description in the ‘Comment’ field, e.g.: ‘Routine ex-6’
- Select the relevant type of Xray using the drop down arrow.
Options available are: Bitewing, Periapical (PA), Panoramic (OPG), and Other. - If lack of disk space is a problem, check the ‘Save Compressed’ box.
The ‘Disk Space’ line indicates how much space is available on the Hard Disk Drive to assist with determining this.
Note, however, that compressed Xrays cannot be displayed in Graphical Estimates. - The ‘Select Scanner’ button allows you to select an alternative scanner if more than one is attached.
- Click on the ‘Scan and Save’ button, then refer to your selected Scanning Software instructions to scan the file into EXACT.
- Once the image has been saved, the ‘Scanned’ area of the window will will appear similar to the following example:

Importing Xrays
- Click on the Patient File and select a patient in the Details tab.
- Click the ‘Xrays’ tab and a window similar to the following example will appear:
- Click on the
 button. The following file selection window will appear:
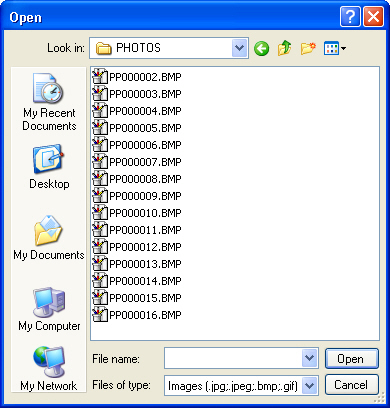
- Choose an x-ray file by clicking on it to highlight it, or browse for it and select it.
- Click the
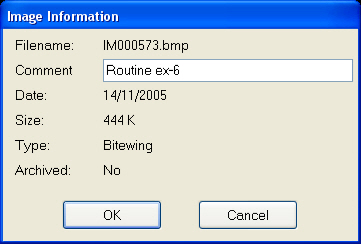
 button. The following dialog box will appear:
- The ‘Patient’ field will default to the name of the selected patient, but can be changed by clicking in it and using the
 button.
 - The ‘Date’ field will default to the current date, but can be changed by clicking in it and using the
 button.
 - The ‘Date’ field will default to Today’s date or can be changed to reflect the date the Xray was taken.
- Enter an appropriate description in the ‘Comment’ field, e.g.: ‘Latest Lower Front’.
- Click the
 button to import the Xray. On completion to ‘Xrays’ tab will look similar to the following:
Viewing Scanned or Imported Xrays
- Click on the Patient file and select a patient in the Details tab.
- Click the ‘Xrays’ tab; a window similar to the following will appear:

- The ‘Xrays’ tab has the following controls for viewing ‘Xrays’
|
|
|
The ‘Brightness’ slide bar brightens or darkens the selected image. When sliding the bar the amount of added or subtracted brightness is displayed:
|
Similarly the ‘Contrast’ and ‘Depth’ bard control other aspects of the image’s appearance. |
|
|
|
|
|
|


Mouse Options:
- Left mouse button. Each click will zoom in on the image making it larger.
- Right mouse button. Each click will zoom out on the image making it smaller.
- Right mouse button drag. Clicking and dragging using the right mouse button will measure the distance between the start and end point. The measurement is displayed when the mouse button is released.
- Holding down the right button and dragging the mouse will draw lines on the image:

The Frame Menu:

- Holding the left mouse button down, drag the mouse cursor over an area of the image and release the mouse button to display a drop down menu with the following options:
- Zoom options – changes the size of the image
- EXHANCE – increases the definition to the selected area.

- Copy to Clipboard – the selected area can be copied to the clipboard, which allows the image to be incorporated into other applications, e.g. Microsoft Word. If you have used the EXHANCE feature (available from the same menu) the enhanced image can be copied to the clipboard.
©2023 Henry Schein One International. All rights reserved.