Search these help files
...
There are no user procedures; the process is automated by reputation.com. EXACT communicates completed treatment patient details with reputation.com, who then email the patient details of a survey.
You have the option of opting individual patients out of reputation.com emails.
Opting Patients out of Email Surveys
Patients may want to individually opt out of reputation.com email surveys.
You also have the option of halting ALL reputation.com email surveys.
To halt ALL reputation.com email surveys
Go to Configure > Practice Settings.
Select the configuration button for Enable Reputation Management.
Un-check the Email Surveys checkbox.
Click OK.

To halt reputation.com email surveys for ONE patient at a time
Patient contact preferences and consent
To facilitate dental practice regulatory compliance for business communications, including marketing activities, EXACT can record, track and report on recorded patient contact preferences and consent for communications.
Patient contact preference recorded statuses
...
EXACT has the means for practitioners to record three states of patient Preferences that can be applied to communications.
For each communication type Patients can explicitly choose to Opt In or Opt Out:
Where they have not made an explicit choice they remain in an Unknown preference status (without contact preferences / without recorded consent) for business communications:
These three states are variables for creating Contact Consent Queries and Contact Lists for marketing campaigns.
...
Patient preferences and consent for receiving business communications can be recorded by multiple means:
Reception Kiosk
Although patients can individually opt out of Email Surveys from reputation.com, there is no such opt out for the kiosk.
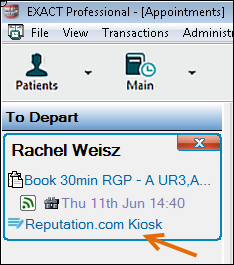
So long as reputation.com Kiosk is enabled, a Departure Task List hyperlink will prompt the receptionist to ask the patient to complete a kiosk survey, and the completion statistics will be reported in the Appointment Workflow Compliance Report.
At patient departure, click the Reputation.com Kiosk task in the Departure Task List
You will be prompted as follows:
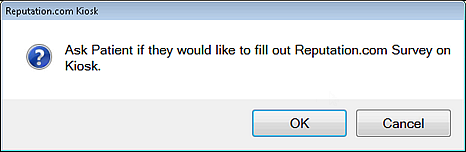
If you click OK the prompt is removed from the Departure Task List. If you click Cancel, the prompt remains on the Departure Task List.
Ask the patient if they would like to fill out the Reputation.com Survey on the Kiosk.
If the patient answers "NO", click OK and continue with the departure process. The prompt will be removed from the Departure Task List.
If the patient answers "YES", click OK and issue the kiosk device to the patient for survey completion. The prompt will be removed from the Departure Task List.
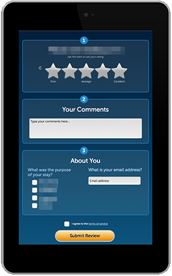
When the patient completes the survey the kiosk software handles all communication.
...
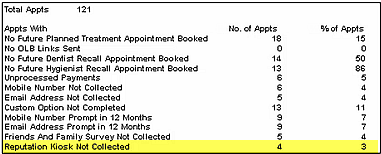
Number of appointments where the Reputation Kiosk was not collected, and the percentage that this represents of the whole.
Appointments with failed workflows that include the Reputation Kiosk.
...
Configuring
Register
Go to Configure > Practice Information and click the Register button at top right.
Register the feature in the normal way.

Once registered, restart EXACT.
Check that the feature is now registered by going to Configure > Practice Settings and checking that you can see a new checkbox for Enable Reputation Management:

The integration does not automatically function on registration; it has to be enabled and configured.
Integrate Email Surveys from reputation.com
Reputation.com Email Survey prerequisites:
Sign up with reputation.com
From your reputation.com configuration, make a note of 1) your API Key 2) the name of the a default template that you will use.
Register the reputation.com module in EXACT and and restart EXACT.
To configure Email Surveys for Reputation.com
Go to Configure > Practice Settings and
...
...
Configure
...
The Reputation Management Configuration screen displays:
...
...
Only enable Reputation surveys at the end of the treatment
Check if you want to configure Reputation Manager to only send a survey to patients whose treatment has been TCed.
With this configuration the following will apply:
- For the daily sending reputation survey schedule, only patients who have been TCed on the day will be sent the email survey.
- The departure workflow will include the reputation kiosk hyperlink only for appointments with a TCed treatment.
- Patients who had no treatments and patients who had no TCed treatment will not be issued the reputation survey.
...
...
Email Surveys
...
Check if you wish to enable Email surveys. There is no need to check this if you opt only for 'kiosk' patient surveys in reception.
...
...
Practice Email Address
...
The Practice Email Address field cannot be configured here, but elsewhere, such as in the Configure > Practice Information screen.
The red warning fields are required - they must all have a valid entry to proceed.
Each field has rules:
...
The OK button remains greyed out until fields are correctly populated, meeting the rules.
...
Check (tick) the Email Surveys checkbox.
There is no need to check this if you opt only for 'kiosk' patient surveys in reception.
...
To view fields that do not meet the requirements, hover your mouse cursor over the greyed out OK button:
...
Example of all fields completed:
...
Populate all fields as described below.
NOTE: When EXACT calculates all fields as validly populated, the OK button will no longer be greyed out.
Populate all fields as described below.
NOTE: When EXACT calculates all fields as validly populated, the OK button will no longer be greyed out.
...
...
Email Surveys checkbox
...
Check to enable automated email surveys from reputation.com.
No need to check this if you opt only for 'kiosk' patient surveys in reception.
...
...
Practice Email Address
...
This is an un-editable field but you can check here whether the practice has a configured default Email address.
If not, as in the image above, you can optionally set an email address from Configure > Practice Information.
...
...
Min Patient Age
...
The minimum age for a patient to receive reputation.com communications. This field cannot be empty, and must have a positive number from 1-100.
...
...
API Key
...
A maximum of 36 hexadecimal characters with no spaces. Obtain this key from your setup on the reputation.com website.
...
...
Default Location Code
...
A maximum of 30 alphanumeric characters, spaces allowed. Obtain this from your setup on the reputation.com website.
If the practice has multiple locations, see procedures in Configuring multiple Locations and Templates.
...
...
Default Template
...
A maximum of 30 alphanumeric characters, spaces allowed. Obtain this from your setup on the reputation.com website.
If the practice has multiple Locations, each Location requires an associated Template - see procedures in Configuring multiple Locations and Templates.
...
...
OK button
...
This is greyed out if any required field is blank or does not meet the validation rules.
If greyed out, hover your mouse cursor over it to see a list of invalid items.
When complete, click the Test button.
EXACT communicates with reputation.com and provides a result of either Test failed or Test succeeded:
...

...
If Test failed, check all fields and test again. If it continues to fail, please contact the Support Desk.
Configure Multiple Locations and Templates
...
Practices that set up multiple Locations in reputation.com need to create the equivalent Locations (and associated Templates) in EXACT.
They do this by means of the Locations File.
To configure multiple reputation.com Locations (and reputation.com Templates) in the EXACT Locations File
Select File > Locations to display the Location File
If you see no Locations option in the File menu, first enable Locations from the Practice Settings window (procedure described above).
A blank Location File appears:

Select the +1 button to add a new Location:

Complete the fields and the select OK.
| Code | The Code field can be any alphanumeric. |
| Reputation Location Code | If you wish to use the default Reputation Location Code, leave the field blank.
|
Reputation Template Name | If you wish to use the default Reputation Template Name, leave the field blank. |
...
Sign up with reputation.com and inform them that you want the Kiosk option. They should then provide a 'kiosk', probably in the form of a pre-configured iPad.
Register the reputation.com module in EXACT and and restart EXACT.
To configure the kiosk option for Reputation.com
Go to Configure > Practice Settings and check (tick) the Enable Reputation Management checkbox

Click the Configure button for Enable Appointment Workflow.
In the Departure Details window, check (tick) the Reputation.com Kiosk checkbox.
Click Next> to proceed through the wizard to conclusion.
EXACT will then add a kiosk reputation survey prompt to the Departure Task List for patients.
...