Using Marketing Manager
- sarah.whiteacre (Unlicensed)
- Cam Smith (Deactivated)
Search these help files
Marketing Manager Terminology
Campaign types
One-off campaign | Limited offer campaign with a defined start and end date. The Contact List is created as a one-off. |
Continuous campaign | No defined end date. The campaign can be paused and re-started, but is intended as a rolling strategy. The Contact List evolves continuously. For example:
|
Automated campaign | The design and sending of media is automated, including patient marketing opt-outs. |
Manual campaign | Practitioners design and send campaign media themselves. |
Campaign reason and automated patient exclusion periods based on Patient Resent Interval
Campaign Reason | Campaigns are categorised by Campaign Reason:
|
Patient Reset Interval | From v12.1 this is an optional setting (you can set it to zero months). This is an automated campaign exclusion period (in months) for patients, as customised by the practice. During this Interval a patient doesn't qualify for the contact list on which the campaign is based, and is therefore not included in the campaign. How this works: Following a campaign contact or a completed appointment resulting from a campaign contact, patients are rested from similar purpose campaigning for this Patient Reset Interval. "Similar" is defined as similar in reason (purpose) for the campaign - see the Campaign Reason list above. So if a patient is sent any campaign material by reason of Newsletters, then that patient is rested from further Newsletter campaigning for the duration of the Patient Reset Interval. |
Patients and services
Term | Explanation | Example |
|---|---|---|
Campaign period | The period from start to end of a campaign | The one-week Whitening special offer campaign runs from 1 July to 7 July. |
Direct campaign patients | Direct-marketing patients who are included on a campaign contact list | Patients who at some point expressed an interest in Whitening, so have been listed as recipients of a Whitening special offer pamphlet |
Indirect campaign patients | Indirect-marketing patients who are not included on a campaign contact list | Patients who don't seem likely candidates for the Whitening special offer campaign, so have not been included on the special offer list |
Primary Services | Services that relate to a campaign | A Whitening service during a Whitening special offer period |
Secondary Services | Services that do not relate to a campaign but nevertheless occur during the campaign period | A scale and polish during a Whitening special offer perio |
Combining the above options, for the campaign we are interested in the following patients/treatment, with regards to appointments booked and Return on Investment:
Term | Colour | Explanation | Example |
|---|---|---|---|
Direct Primary | Campaign-listed patients with campaign services | The patient was sent a Whitening special offer pamphlet and came in for Whitening | |
Indirect Primary | Non campaign-listed patients with campaign services | The patient was not sent a Whitening special offer pamphlet but came in for Whitening during the special offer period. | |
Direct Secondary | Campaign-listed patients taking advantage of primary campaign services who also had non campaign (secondary) services during the campaign-appointment. | !) The patient was sent a Whitening special offer pamphlet and came in for Whitening, but also had a scale and polish. | |
2) The Patient was sent a crown discount pamphlet and came in for an exam and xrays as part of the crown treatment, with the crown being invoiced last. The exam and xrays are counted as secondary treatments associated with the campaign. | |||
(Not applicable) | If campaign-listed patients book appointments for non-campaign services they are not considered to have responded to the campaign, and don't count in the campaign appointment booking figures. | The patient was sent a Whitening special offer pamphlet but never responded to it. |
Campaign Statuses

Preferences to contact patient
Patient contact preferences and consent
To facilitate dental practice regulatory compliance for business communications, including marketing activities, EXACT can record, track and report on recorded patient contact preferences and consent for communications.
Patient contact preference recorded statuses

EXACT has the means for practitioners to record three states of patient Preferences that can be applied to communications.
For each communication type Patients can explicitly choose to Opt In or Opt Out:
Where they have not made an explicit choice they remain in an Unknown preference status (without contact preferences / without recorded consent) for business communications:
These three states are variables for creating Contact Consent Queries and Contact Lists for marketing campaigns.
Record contact consent preferences from multiple points in the appointment workflow
Patient preferences and consent for receiving business communications can be recorded by multiple means:
Appointment Workflow Arrivals Task List:

Appointment Workflow Departure Task List:

Clinipad - Contact Consent:

NOTE: When patients sign for Contact Consent they automatically check (tick) all Opt-Ins on the Permission to Contact Patient screen.
Patient Details tab:
The Contact Preferences (opt-in / opt-out / opt-unknown) functionality is located in the Patient File Details tab, alongside the Contact Preference selection.

Recording, tracking and reporting Contact Preferences
Contact Preferences Audit (Administrator-level users only):
EXACT tracks practitioner Contact Preferences actions in the Preferences to Contact Patient window > Contact Preferences Audit tab.

Practitioner actions around Contact Preferences are tracked in the Appointment Workflow Compliance Report
See The Appointment Workflow Compliance Report for the Collect Contact Consent line.

Contact Preferences prompt for Receptionists
When Receptionists deal with with New Patient details, EXACT prompts them to complete any missing information that the practice views as important. The prompts can be either:
- Mandatory (Receptionists must type this information into the fields), or
- Optional (Receptionists must check but do not have to complete the optional fields).
Both mandatory and optional prompts are configured in the Mandatory Fields window.
Contact Preferences is a prompted field (not mandatory for Receptionists to complete it) that is controlled by a setting in this window. When the setting is checked (enabled), practitioners creating a New patient in the Patient File are prompted to obtain the patient's preferences for business communications:

This is the default configuration, where EXACT will prompt Receptionists.
However, if your practice finds that the prompt is intrusive and a nuisance, you can disable it by un-checking the setting in the Mandatory Fields window.
Opting Out / Unsubscribing from business communications
Patients can request that practitioners unsubscribe them from any or all business communications that require their preference Opt-in.
Patient Campaign Email unsubscribe:
When Patients receive automated campaign emails, they can click the Unsubscribe hyperlink in the Email to unsubscribe from that ommunication Type:
- Product & Service Information of Promotion
- Newsletters
- Important Notifications
Integration in the Appointment Workflow
Contact Consent is integrated into the Appointment Workflow, where Receptionists can be prompted to collect Contact Consent at two points:
Arrivals Task List:

Departure Task List:

Contact Consent can be conveniently captured via Clinipad, where a single patient signature checks (ticks) all Opt-in boxes in the Preferences to Contact Patient screen.

To include "patients without recorded consent" in marketing communications
Ensure that this checkbox in Configure > Practice Settings is checked:

"Without recorded consent" refers to settings for which the patient has made no explicit choice.
To stop sending communications to patients "without recorded consent"
Go to Configure > Practice Settings and uncheck the Market to patients without recorded consent checkbox, then click OK:

Editing the Receptionist prompt for Contact Preferences
- Select Configure > Patient File.
- Select the Mandatory Fields button to open the Mandatory Fields window.
- Check or un-check the Contact Preferences checkbox:

- Select OK to return to the Patient File configuration window.
- Click OK when you see the Patient File Parameters notification:

- Restart EXACT as required.
Excluding Unknown-status patients from business communications
Background:
EXACT classifies three patient statuses as regards business communications:
Unknown "without contact preferences" "without recorded consent" | The patient has not explicitly opted in or opted out. On upgrade from earlier versions EXACT assigns this status to all patients who have made no explicit choice. This is also the default status for all New patients until such time as they make an explicit choice. Patients with this Unknown status by default receive business communications unless the practice deliberately excludes this status from communications. |
Opted In | The patient has explicitly opted in and will receive business communications. |
Opted Out | The patient has explicitly opted out of receiving business communications. |
By default EXACT sends business communications to both Unknown and Opted In status patients.
However, if this is inappropriate for your dental practice you can exclude the Unknown-status patients, as described below...
To stop sending business communications to patients "without recorded consent" (Permissions status Unknown)
- Go to Configure > Practice Settings.
- Uncheck the Market to patients without recorded consent checkbox:
- Select OK.
Creating a Contact Consent Query Template
(This relates to Contact Preferences for business communications)
For creating patient lists EXACT has a Contacts who gave consent condition that enables you to create a Query Template to identify those Contacts who gave consent or to identify those who did not give consent for the practice business communications.
Use this when you create contact lists for business communications. Each list can be based on multiple variables as shown below.
To set up a Contact Consent Query Template
- Select Configure > Patient Query Templates to open the Query Templates desktop:


- Select the +1 button to open the Add Query Template window.
- Type a Description name for this Query Template (for example Contacts who gave consent).
- Click the Insert... selector.
- Scroll down and select Contact Preferences.
- Select OK to open the Edit Patient Selection window:

- Select either Patients with or Patients without.

- Optionally check (tick) Prompt for Entries. If checked, EXACT will prompt you to add patients when you construct your Contact List, and you can opt not to.
- Select an option: Product and Service Information or Promotion, or All Other Communications.
- Check (tick) the options under Contact Preferences.
- Select OK to view your new Query Template in the Add Query Template window:

- Select OK to return to the Query Templates desktop, where you should see your new Query Template listed:

When you Create Lists you will then have your Query Template as an option:

Excluding Unknown-status patients from business communications
EXACT classifies three patient statuses as regards business communications:
Unknown "without contact preferences" "without recorded consent" | The patient has not explicitly opted in or opted out. On upgrade from earlier versions EXACT assigns this status to all patients who have made no explicit choice. This is also the default status for all New patients until such time as they make an explicit choice. Patients with this Unknown status by default receive business communications unless the practice deliberately excludes this status from communications. | |
Opted In | The patient has explicitly opted in and will receive business communications. | |
Opted Out | The patient has explicitly opted out of receiving business communications. |
(See also: Contact preferences for business communications)
By default EXACT sends business communications to both Unknown and Opted In status patients.
However, if this is inappropriate for your dental practice you can exclude the Unknown-status patients, as described below...
To stop sending business communications to patients "without recorded consent" (Permissions status Unknown)
- Go to Configure > Practice Settings.
- Uncheck the Market to patients without recorded consent checkbox:

- Select OK.
Excluding patients who have has a campaign service invoiced
Practices that use different Service vs Appointment codes sometimes inadvertently re-market to patients who have already met the criteria for a campaign.
To prevent this, from v12.5 EXACT checks patient invoicing to exclude patients who have had a campaign service invoiced during the campaign.
For example:

In the above campaign, each time that EXACT re-runs the automation task for campaigns it implements the following:
- Any patients who have had a DRELS campaign service completed between the Campaign Start and Campaign End times are marked as completed on the campaign list, and will therefore not receive further marketing communications.
- EXACT adds a record to the History tab to the effect "Excluded due to completing a campaign service today".
Primary areas of Marketing Manager
New Campaign windows
Use these windows to define parameters for a new campaign.

Select OK...

Desktop
This is a campaign management area.
It lists the current campaigns and you can optionally also list completed campaigns by ticking the Show Completed checkbox.
From this desktop you can display a detailed graphical dashboard for a campaign.
You can create new campaigns and act on current campaigns by pausing, re-starting, editing, stopping or deleting them.
The desktop is accessible from Administration > Marketing Manager, or by clicking the Marketing Manager button in the toolbar, as indicated in the above image (requires toolbar customisation).

Dashboard
The dashboard is a comprehensive graphical and text based tool for tracking campaign progress and effectiveness.
Access it by double-clicking any campaign listed in the Marketing Manager Desktop, or by mouseover of a campaign in that desktop to display its buttons, and then selecting the [i] button.

Adding an icon to the Workspace Bar
This is an optional configuration per user, enabling convenient access to the Marketing Manager from anywhere in the EXACT desktop:

This icon also functions as an Alert:
![]()
To add a Marketing icon to the Workspace Bar
(For the current logged-in user only)
- Right-click the Workspace Bar and select Customise...

- In the Customise Workspace window do the following:

- Select the Marketing icon in the left pane.
- Select the >> button to move the icon to the right pane.
- Select OK.
The icon will then appear on the Workspace Bar
To remove the Marketing icon from the Workspace Bar
Repeat the above procedure in reverse - move the icon from right pane to left pane.
Marketing Manager Alert
The Marketing icon in the workspace bar functions as an Alert:
![]()
(This requires that you have added the Marketing icon to the workspace bar per user)
To use the Marketing Manager Alert
When you see the red exclamation on the icon, hover your mouse cursor over the icon to view the alert message:

These messages are possible:
One or more of your automated campaigns are paused
> Open the Marketing Manager Desktop to investigate.
There has been a recent problem sending automated campaign information (Campaign Automation only)
This can only happen with an automated campaign.
> First check if this is due to an infrastructural issue such as a lost Internet connection or a network error. If you cannot resolve the issue please contact the Support Desk.
Creating a new Campaign
Preparation
- Ensure that you have sufficient access rights to create a campaign
- A campaign based on existing patients will require a Contacts List that has been pre-created separately from Marketing Manager (no Contacts List is necessary for a campaign based on prospective new patients)
Overview
- Define the parameters for a new campaign (unique Campaign Name, start and end dates, design and set-up costs and unique Contacts List (if it is a campaign aimed at patients in the database).
- Specify the services that apply to the campaign (e.g. oral exam, teeth whitening)
- Specify one or multiple Campaign Media using media that are valid for your dental practice (e.g. Letters, Email).
To create a new Campaign
|


Booking Reasons
You can also configure Booking Reasons and associate them with a service from the Create Campaign window
Purpose of Booking Reasons:
- Patients can go to the booking site, select a Reason (which is linked to a service), select from available Providers offering that service, and then book an appointment.
Because each Reason is associated with a service and a a treatment duration, EXACT creates an appropriate booking.
- Each Booking Reason can be specified as either Dentist or Hygienist:

- Booking Reasons can apply to specific services.
- Booking Reasons ensure that EXACT is no longer limited to a single service applying for both New and Existing patient booking, set per dentist.
- Besides the improved booking functionality, this also enhances the accuracy of bookings. For example, where patients previously booked a generic EXAM for 10 minutes, they can now book a specific Implant Consultation (IMPCONS) for 45 minutes, to the benefit of both patient and practice.
- Marketing Manager needs to handle multiple service/booking reason combinations in order to properly manage, track and report on campaign appointments. Booking Reasons allow the creation of Marketing Manager online booking URL links that are sent out to patients per campaign, where each URL link is unique to the single Booking Reason for a campaign.
Purpose of campaign-specific URL Links:
We don't want campaign respondents going directly to the bookings page and arbitrarily selecting reasons for their booking; we want to rather have a means of reliably identifying the campaign to which they are responding.
The campaign-specific URL is a mechanism for EXACT to identify the campaign reason for patients entering the booking portal.
This functions as follows: EXACT provides the URL during online booking setup, at the point of creating a Media Type. The practice issues the URL to patients. Patients link to the booking portal page by means of that URL, where they are flagged as responding to the specific campaign.
EXACT generates these URL links at the point of creating a Media Type, for both automated campaigns and EXACT manual campaigns.
The patient viewpoint:

When creating an online appointment both New and Existing patients may be required to select a Booking Reason.
If a patient responds to a marketing campaign they will see multiple booking reasons for selection, depending on the offerings in the campaign, and the way they have been set up when Creating a new Campaign.
Configuration:
(You can also configure Booking Reasons and associate them with a service from the Create Campaign window)
Configure from an Add Booking Reason window:

This window opens in two configuration circumstances:
- When you select the Web Setup button in the Online Booking configuration screen:

... it opens a Web Setup - Online Booking window, which includes Campaign Services pane.
Here you can check to specify a default service / booking reason, and you can configure each service with a booking reason.

CAUTIONS:
- The fields configured in Booking Reasons will override the equivalent fields in EXACT configuration, such as appointment durations.
- If you do not customise Booking Reasons for your practice, your website will show a default list of reasons that are generic with the online booking software.
Options for configuring Booking Reasons:
From the Add Booking Reason configuration window you can add Booking Reasons to
- Both New and Existing Patients with equivalent settings,
- Both New and Existing patients but with different settings,
- New patients only,
- Existing patients only.

Note that if your practice has configured online booking payments the Booking Reason window will include a Deposit field where you can specify a deposit amount (less than the Price) to be paid online:

Campaign-specific URLs in Marketing Emails
A Marketing olb template incorporates the Merge Field for the Campaign URL: [patient.campaignURL]
To view the Campaign URL merge field:

- Go to the Campaign Setup, edit a campaign to open it, and open the campaign Contact List.
- Select any patient and click the Email button to open the Email Details window.
- In the Email Details window, click the Email Template selector to open the View Email Templates window.
- In the View Email Templates window locate and open (edit) the Marketing.olb template.
- In the Edit Email Template window you will see the patient.campaignURL merge field.
Creating an Automated Campaign
User Portal Videos:
Editing a Campaign Letter
Creating a One Off Treatment Campaign
Creating a Continuous Campaign
Adding Multiple Stages in a Campaign
Marketing Manager and Automated Campaigns
Requirements for setting up automated campaigns
- Minimum of EXACT v12, but features have been added in multiple versions since v12.
- Marketing Automation is registered.
- The dental practice has a Name, Address and Email address in the Practice Information screen (Configure > Practice Information).
- Internet access (although displayed within an EXACT screen, the setup for automated campaigns is via an Internet connection to a website).
- The campaign target population needs to be targetted via EXACT Contact List. You can either create and save a Contact List before campaign creation, or do this while creating the campaign.
To create an automated campaign
|


Automated Campaigns grouped by Family
From EXACT v12.8 it is possible to market automated campaigns to Families, based on a Group by Family checkbox in the Campaign setup:

Characteristics:
Applies to automated campaigns only.
As for use of Contact Lists in campaigns, this checkbox can only be enabled up until the point that the campaign starts - thereafter it is not editable.
Communications are directed at the Head of Family (HoF)
This person is calculated based on age (gender is ignored). There is no upper or lower age limitation, so a child below 15 years of age or an adult above 65 years of age can be considered as HoF if they are the eldest in the family.
The following rules apply:
- If the Head of Family is marked as completed, communications will be to the next Head of Family candidate, until all family members are marketed.
- If the Head of Family has unsubscribed / opted out, communications will be to the next Head of Family candidate, until all family members are unsubscribed / opted out.
- If there are multiple Head of Family candidates (for example, with the same birth date), EXACT selects one of the members as the Head of Family.
- If none of the family members have a birth date, one of the members will be selected as the Head of Family.
- Patients are reset after a recurrence interval, so campaign communications are re-sent to the Head of Family.
- Contact points are only added to the Head of Family; not to all family members.
- Family Letters Addressing does not apply because communications are only to the Head of Family.
- EXACT does not send through the family merge fields (family.addressee, family.names, family.addresseetitle, family.addresseefirstname, family.addresseelastname, family.addresseeinitials)
Circumstances in which the Head of Family is marked as Completed in EXACT:
- A practitioner ticks the check box against the Head of Family patient in the contact list.
- A Head of Family appointment or a family appointment is booked with the campaign service.
- A Provider charts and completes a campaign service with the Head of Family.
- The Head of Family no longer satisfies the query.
- The Head of Family opts out by means of Patient File > Details tab > Permissions.
- The Head of Family unsubscribes via the Unsubscribe link in the email communication.
Configuring Campaign Design Email Templates
Requires a registered Marketing Manager Automation module:

If your practice has registered the Marketing Manager Automation module, you can access advanced Email Template software in order to fully customise professional Email templates for campaigns.
The procedure is to create an Email template for a specific Campaign, then add it to the Campaign Media for use during that campaign.
These templates are accessible from the Campaign Design button.

Portal blog/video: Marketing Made Easy with Marketing Manager and Campaign Design Email Editor
Overview - Configuring Campaign Design Email Templates
To configure Campaign Design Email Templates
The goal is to create an Email template for a specific Campaign, then add it to the Campaign Media for use during the campaign.
Select the Campaign Design button in the Configure Campaign window:
This opens the Campaign Items window, listing the items that relate to the Campaign.
Select the Edit button in the Email overview, or the Add Item button to add a new item:

You will see a Details window:

In the Details window, Name the campaign item and select the Type as Email.
Specify the Day of the campaign on which to send out this Email.
NOTE: There is no limit to the number of items that you can create, and you can send them out on any campaign day.
Click Save to save the Details.
Campaign Design saves a copy of this new template within the Campaign items.
Click the Edit button to edit the Email template:

The Edit Design window displays. For example:

The Design consists primarily of Image blocks, Text blocks and Backgrounds, and within each of these are editable objects such as text paragraphs, buttons and images.
Background selectors in the Main Style tab:

External background is behind the entire Email content.
Background colour is the colour of the email "page" on which the text and images are located.
Hex codes and Colour Picker:


Selected and unselected blocks:
The template is laid out in selectable blocks:

The Content and Style tabs apply to the currently selected block:

Editor tools
Click a screen element to enable multiple toolsets for that element:
- Editor tools display around it on the screen, and
- Click the Toolbox button to display the Style and Content tabs to see further applicable editorial tools.

Example: Logo editor:


Example: Image plus Text box editor:


Undo / Redo functions:
These enable you to experiment flexibly:
![]()
Saving and Testing the template:
Click the Save button (top right) at any time.

You then have the opportunity to enter an Email Subject:

A powerful feature of the Email Subject is Tags (Merge Fields). Type the @ sign to pop up a list of Tags from which to select:


(Notice how this personalises the patient Email - patients will feel that they hey have been personally contacted by a practitioner.)
Finalising the template:
When the template is complete, scroll to the bottom of the page to view the button options:

It is advisable to Test Email - send it to your practice Email, and then thoroughly preview it.
Click Cancel at any time to return to the editing.
When you Approve you will see the template listed as an Item in the Campaign items:

- Check the template (you will see that it has an "Approved" icon).
- Click the Save Changes button.
- Click Close.
You will return to the Campaign creation screen in EXACT, where the Email template is listed under Campaign Media:

Editing Image Blocks in Campaign Design Email Templates
Requires a registered Marketing Manager Automation module
To edit an image in a Campaign Design Email Template
- Click to select the image and display the context tools on the screen.

- Click the on-screen Bin icon to delete the on-screen image.
Notice that the Upload icon now replaces the Bin icon:

- Click the Toolbox button to display the Content and Style tabs, then click the Content tab.
Either
- Upload an image using the Upload icon at the deleted image location.

- or -
- From the Content tab, enter a URL to link to an image.

- or -
- From the Content tab, select an image from your Company Profile (branding) collection:

- Upload an image using the Upload icon at the deleted image location.
- Use the Undo and Redo buttons at any point:

- Optionally move the block by dragging or by using the Up / Down keys:


- To change the position and size of the block, either
- Select the Switch Block Variant key:

- or -
- Select an option in the the Content tab Image Size drop down:

- Select the Switch Block Variant key:
- To create a duplicate of the block below the current block (perhaps for experimentation), select the Duplicate key:

- Click the Save button at top right.

This displays a Preview of the template:

- Click the Cancel button to exit Preview and return to the Editor:

- To delete the block click the Delete key:

Main image Content tab:

Alternative text - This is text that displays either while the image is loading, or if the image is unable to load. Non-sighted users who rely on a page-reader will have this text read to them as an alternative to viewing.
Set images have been assigned to your company profile (for example, variations of your logo).

Main Image Style tab:

Editing Text Blocks in Campaign Design Email Templates
Requires a registered Marketing Manager Automation module
- Click the Text block to display the on-screen tools:

- Select text to enable the Edit bar:

The selected text block automatically resizes when you change Font Family and Font Size.
- Use the Edit bar functions to customize your content:

- Optionally use the Style tab PARAGRAPH tools.

For example, paragraph colour:

The paragraph colour applies globally to the paragraph, except where you colour specifically selected text with the on-screen editor.
- For background colour and external background colour either select from the on-screen edit bar, or select from the Style tab MAIN STYLE:

- Aligning Text (Left, Centre, Right, Justify):

- Inserting Tags (Merge Fields).
Simply select a Tag to insert it into the text:

Tags function as for Merge Fields within EXACT, enabling you to autromate and personalise Emails.
For example, "Dear [##Patient FirstName##]"
IMPORTANT: Don't edit the inserted Tag in any way.
- Inserting a Link:

- Editing a button
Editing Buttons in Campaign Design Email Templates
Requires a registered Marketing Manager Automation module
Buttons can be located in many positions within an Email.
This example is from a 3-column block:

Configure the appearance of all buttons in the email from the following global settings:


Editing a 3-column Block in Campaign Design Email Templates
Requires a registered Marketing Manager Automation module
To edit a 3-column block in Campaign Design Email Templates

3 Columns Block images:

3 Columns Block text boxes:


3 Columns Block configurable buttons (a global setting for ALL buttons):
Configure the appearance of all buttons in the email from the following global settings:
Marketing Manager Desktop
The Marketing desktop enables practitioners to track and manage campaigns.


To view the Marketing Manager Desktop and Campaign List
Either
- Select Administration > Marketing Manager

- or -
- Select the Marketing icon in the workspace bar (this needs to be configured per user by means of right-clicking the bar > Customise...)
The Marketing Manager desktop displays the campaign list:

Column headers | Optionally re-sort the list by clicking column headers. |
|---|---|
Name | A campaign name, which has to be unique for reporting. Campaign names are best created descriptively so that they can be understood wherever they are referenced. For example, in the Patient Contacts tab the campaign contacts are Described using campaign names. |
Start Date | When you create a campaign by default the Start Date is the next day. Optionally pause and re-start campaigns by means of the campaign buttons. Mouseover the campaign name / line to view the buttons, as shown in the image above. |
End Date | The date remains editable during the campaign, so you can opt to extend or reduce the campaign while it is in progress. For those regions with Channel Track integration, if EXACT won't allow you to extend the End Date, it may be because the phone number associated with this campaign has already been pre-booked for another campaign over that extended period. Note that the End Date is not necessarily the date that the marketing offer ends... Once the marketing offer (such as "whitening special") ends you are likely to still be reporting on that offer for some time. For example, the offer is for the month of July, August and September and patients book during this period, but their appointments are primarily after September, so reporting (including invoicing) is set to run right through to January. So when estimating an End Date think in terms of how long you will be tracking and reporting the outcomes of the marketing offer. Example:
The default reporting End Date is 3 calendar months. The End Date becomes read-only after it has passed. For Marketing Automation integration this date determines when EXACT stops using automated Contact Lists. |
Targeted Patients | A figure in this column represents the number of patient results from your Contacts List. For campaigns aimed at prospective (new) patients you will not see a Targeted Patients figure because you don't yet have the patients registered for the practice, so you cannot run a Contacts List. |
Campaign action buttons | Mouseover any campaign to view action buttons associated with that type of campaign, Automated Campaign buttons:
Manual Campaign buttons:
|
Integrations | Icons in this column represent external software with which the campaign is integrated. For example Marketing Automation and / or Channel Track (UK). Mouseover an icon to see a description.
|
Show Completed checkbox | EXACT automatically ticks campaigns as Complete once the campaign end date has been reached, and these campaigns are by default then hidden from view. To display them in the campaigns list, check (tick) the Show completed checkbox.
|
Status | Each listed campaign in the desktop has a status that is identifiable by colour and icon. Manual campaign statuses with sample description:
Automated campaign statuses with sample description: Automated campaigns are identifiable by the 'gear' icon.
See also the Campaign Statuses diagram below... |


Campaign Statuses (colour-coded)
Campaign progression and user permissions
(Users require appropriate access rights)
Campaigns progress through statuses in their life cycle:
Permissions:
Permissions are in relation to the campaign status:
- Users can edit up to the Campaign offer start date, after which the Campaign is Read Only except for campaign treatment end date and the cost fields.
- Users can remove Campaign Media types during the campaign.
- Users can delete campaigns at Planned

 and Awaiting Start
  statuses.
 - A superuser can also delete a Stopped
 campaign.
 - Users can start automated campaigns at Awaiting Start and Paused
 statuses.
 - Only the Support Desk can delete Completed

 campaigns.
Actions with Automated Campaigns
Requires Marketing Automation module.
Users require appropriate access rights.
Convenient controls for Automated Campaigns:


To Start an automated campaign
Users can edit up to the Campaign offer start date, after which the Campaign is Read Only except for campaign treatment end date and the cost fields.
- Mouseover the campaign to see the controls, as shown above.
- Select the Start button.
If this is a new campaign you will be prompted with a Start Campaign popup window:

- Optionally change the Start Date.
- Select OK.
To Pause an automated campaign
- Mouseover the campaign to see the controls, as shown above.
- Select the Pause button.
- Select OK when you see the prompt:

(Click Start when you wish to resume the campaign)
To Edit an automated campaign
Users can edit up to the campaign offer Start date, after which the campaign is Read Only except for campaign treatment End Date and the cost fields.
- Mouseover the campaign to view buttons and then click the Edit button:

In the Edit Campaign window these are the areas where you can edit an active campaign:

- The Reporting End Date - change this to shorten or extend the campaign.
If EXACT won't allow you to extend the date, it may be because the phone number associated with this campaign has already been pre-booked for another campaign over that extension period.
- The Design & Set-up Costs. These are added to the Total Costs for the campaign and affect the ROI reported in the Dashboard.
- Edit Campaign Media - Actual Cost, which often changes during a campaign. This is calculated towards the Total Cost and affects the ROI reported in the Dashboard.
NOTE: All fields in the Edit Campaign Media window are editable up until campaign start.
To Stop an automated campaign
- Mouseover the campaign to view buttons and then click the Stop button (as shown in the image above)
- Take careful note of the popup window that appears:

- Select Yes only if you are certain that you do not need the campaign to be restarted.
Note that a superuser can also delete a Stopped campaign.
To Delete an automated campaign
Users can delete campaigns at Planned ![]()
![]() and Awaiting Start
and Awaiting Start ![]() statuses.
statuses.
A superuser can also delete a Stopped ![]() automated campaign.
automated campaign.
Only the Support Desk can delete Completed ![]()
![]() campaigns.
campaigns.
- In the Marketing Manager desktop, mouseover the campaign to display buttons.
- Select the Delete (Bin) button.

- When the confirmation popup window displays click Yes.
Matching Calls to Patients
(Applies only if you use the optional Channel Track module)
Auto-matched calls
When a patient phones in from a phone number that is recorded in a patient file, EXACT matches the call as being from that patient.
Unmatched calls
When a patient phones in from a phone number that is not recorded in a patient file, EXACT cannot match the call to a patient.
When multiple registered patients phone in on a single phone number (for example, family members using a single phone), the software records the calls simply as Contacts rather than as calls from those specific patients.
Manually-matched calls (by practitioner)
It is possible to manually match patient phone calls to patient files so that those calls are captured by Channel Track, as described below.
To manually match a patient call to that patient's file for Channel Track purposes
- Listen to a call and identify the patient (probably by asking).
- Copy or write down the number of the incoming call.
- Open the patient file Details tab and
- Paste or type the phone number into the appropriate field
- Select Save.

- EXACT will then match this call to this patient at the next pass (likely one day later), and the data will be available to Channel Track.
Marketing Manager Dashboard
The Dashboard enables a practice to track campaign progress and return on investment figures from a single convenient location.

What? | How to |
|---|---|
Launch the Dashboard |
|
Dashboard Layout |
NOTE: Channel Track is only available in some regions, where it is an optional module. For users without the Channel Track module the Calls data displays with 0 values. Layout with no data:
To view Lists / Reports from the Dashboard: Click a hyperlink to open the List or Report.
|
Return On Investment Display | The Return On Investment gauge is the most visible measure on the Dashboard, enabling you to track the campaign success at a glance.
|


Campaign Invoiced Treatment
To view the Invoiced Treatment
- Launch the Marketing Manager Dashboard
The Invoiced Treatment figure is a key measurement that drives the Return On Investment and the Total Earnings:

- Select the Invoiced Treatment hyperlink in the Calls area to display the Campaign Invoiced Treatment List:

Campaign Invoices Report
Overview
The Campaign Invoices Report displays information on Invoices that are associated with the campaign, including the following:
- Direct marketing invoiced treatment total
- Indirect marketing invoiced treatment total
- Secondary marketing invoiced treatment total
- Total invoiced amount for invoices with no media type
- Total Adjustments
- How many patients were invoiced
- How many invoices
- Campaign total invoiced amount
- Campaign total cost
To view, print or email the Campaign Invoices Report
- Select Administration > Marketing Manager to open the Marketing Manager Campaign List
- Double-click a listed Campaign to open the Campaign Dashboard.
- Select the Invoiced Treatment hyperlink in the Calls area to open the Campaign Invoiced Treatment window:
- Select the Print button, select the print parameters in the print dialogue and Print, Preview or Email the report:

Patients Targeted List
- Launch the Marketing Manager Dashboard
- Select the Patients Targeted hyperlink to list the patients:

Note the standard function buttons across the bottom of the screen.
Patient information displayed in the Contact List window:
| A tick in the box to the left of the patients name completes the patient on the list. |
Name | The patient’s name is displayed in the following order: Surname, First Name and Title. |
Contacts | While the patient is on the list, this column will display whether they have been contacted, and by what means: A phone call will display as a A letter will display as a An email as a Each time the patient is contacted another icon appears in the row. To display details of the contacts, double-click on the patient OR highlight the patient and click on the
Details of all contacts for the patient can also be viewed from the Patient File, Contacts tab. Select the Edit button to open the selected patient's file. |
Phone | The patient’s home, work and alternate phone number are displayed. If the complete information cannot be displayed in the space available, dots will be displayed at the end of the line(s) indicating that further details are available. |
Dentist and Hygienist | The patient’s normal dentist and hygienist are shown. |
Preference icon | The patient’s contact preference is displayed as an icon. |
|

Campaign Calls
The Calls information only displays if you have the optional Channel Track software.
The calls are picked up from Channel Track daily, so the campaign dashboard call data may be up to 24hrs old (the other data on the dashboard will be valid for the time at which the dashboard was launched).
The Campaign Calls List shows all calls received against the campaign phone numbers during the campaign period.
To view the Campaign Calls from the Marketing Manager Dashboard
- Launch the Marketing Manager Dashboard
- The Calls display provides a snapshot of calls matched to patient versus calls unmatched to patient.
In this example 82 calls have been matched, versus 0 calls unmatched:

- Select the Total Calls hyperlink in the Calls area to display the Campaign Calls List:

The number of calls in this list could be more than are displayed on the graph, as the graph will only show unique calls.
This lists all of the calls received against the campaign phone numbers during the campaign period.
Click any patient name to open that patient file at the Details tab.
Further details of the selected call are displayed at right, where you can click the hyperlink and listen to the call.
Patient Name
Optionally click a name to open the patient file.
Note that in the Patient File you can open the Contacts tab to view this Contact.
If you have Channel Track you can also open the Contact by means of the [i] button and then click to replay the call.
Call Status
Unanswered, Engaged or Successful
Call Time
Date and Time of the call
Media Name
Campaign Media Name - the medium by which the caller obtained the unique static phone number for this call, named in the Media setup.
Caller's number
Phone number
Service Number
The fixed number for the campaign, through which respondents called the practice.
Click to Listen
Listen to the recorded call.
- (Optional) Click any patient name to open that patient file at the Details tab.
- (Optional) Select the Click to Listen hyperlink to replay the call recording.
- (Optional) Select the Print button to print the Campaign Calls Report.
Campaign Calls Report
The Calls information is only available if you have the optional Channel Track software.
Overview
The Campaign Calls Report displays information on all calls received against the campaign phone numbers during the campaign period.
To view, print or email the Campaign Calls Report
- Select Administration > Marketing Manager to open the Marketing Manager Campaign List
- Double-click a listed Campaign to open the Campaign Dashboard.
- Select the Total Calls hyperlink in the Calls area:
- Select the Print button in the Campaign Calls List:

- Select print parameters.
- Select a button to Print, Preview or Email the Report.
Example with Channel Track (abbreviated):

Listening to recorded Campaign Calls
Requires the Channel Track module.
IMPORTANT FOR PCI COMPLIANCE: If proper procedure has been followed during the Live call, the recorded call may be missing confidential information. The reason: To meet PCI compliance with Channel Track, if you are taking sensitive data such as bank details or confidential information over the telephone, always press 00 to mute the call recording, and when that part of the conversation is complete, press any key to restart recording. This will not cause any disruption to the call itself. By taking the card details or confidential information out of the call recording, you take the call recordings out of scope for PCI compliance.
To listen to a recorded Campaign Call from the Dashboard
- Launch the Marketing Manager Dashboard
- Select the Total Calls hyperlink:
- Locate and select the required call in the Campaign Calls window, and click the Click to listen hyperlink:
To listen to a recorded Campaign Call from the patient file

- Open the appropriate patient file Contacts tab.
- Locate the appropriate call in the contacts list and select it.
- Click the [i] button to open the Contact Information window.
- Select the Click to listen hyperlink.
Campaign Appointments
This lists the appointments that have been made as a result of the campaign.
To view the campaign appointments that have been made
- Launch the Marketing Manager Dashboard
- The Appointments area graphic compares Booked and Completed appointments:

- Select the Total Appointments hyperlink in the Appointments area to display the Campaign Appointments List:

Click any patient name to open that patient file at the Details tab.
Patient Name
Optionally click a name to open the patient file
Booked On
Date that the booking was made
Booked For
Date of the appointment
Status
Booked or Completed
Media Name
Campaign Media Name - the medium by which the caller obtained the unique static phone number for this call, named in the Media setup.
- Optionally select the Print button to print, preview or Email the Campaign Appointments Report.
Campaign Appointments Report
Overview
This report shows information on Appointments booked through Direct and Indirect marketing, and whether those appointments are booked or already completed.
To view, print or email the Campaign Appointments Report
- Select Administration > Marketing Manager to open the Marketing Manager Campaign List
- Double-click a listed Campaign to open the Campaign Dashboard.
- Select the Campaign Appointments hyperlink in the Calls area:
- Select the Print button in the Campaign Appointments List:

- Select print parameters.
- Select a button to Print, Preview or Email the Report.
Example Campaign Appointments Report (abbreviated):

Viewing the Campaign Conversion Graph
To view the Campaign Conversion graph from the Marketing Manager Dashboard
Launch the Marketing Manager Dashboard for a specific campaign and then click the the Campaign Conversion tab:
This graph shows the number of Direct and Indirect converted patients by Calls, Appointments and Completed Appointments.
Direct Appointments Direct-marketing patients who are included on a campaign contact list. For example, Patients who at some point expressed an interest in Whitening, so have been listed as recipients of a Whitening special offer pamphlet. | |
Indirect Appointments Indirect-marketing patients who are not included on a campaign contact list. For example, Patients who don't seem likely candidates for the Whitening special offer campaign, so have not been included on the special offer list. | |
Unmatched Calls Not matched to a registered patient. When a patient phones in from a phone number that is not recorded in a patient file, EXACT cannot match the call to a patient. When multiple registered patients phone in on a single phone number (for example, family members using a single phone), the software records the calls simply as Contacts rather than as calls from those specific patients. |
Campaign Booking Trends Graph
To view the Booking Trends graph from the Marketing Manager Dashboard
Launch the Marketing Manager Dashboard for a specific campaign and then click the the Booking Trends tab:

The measurement criterion is the date that a patient books the appointment.
This graph displays the historical trend in the number of appointments booked from Direct and Indirect marketing.
The graph enables a practice to consider how the campaign progresses, at what point it picks up and at what point it tails off.
Direct campaign patients Direct-marketing patients who are included on a campaign contact list. For example, Patients who at some point expressed an interest in Whitening, so have been listed as recipients of a Whitening special offer pamphlet. | |
Indirect campaign patients Indirect-marketing patients who are not included on a campaign contact list. |
Campaign Invoices Graph
To view the Invoices graph from the Marketing Manager Dashboard
Launch the Marketing Manager Dashboard for a specific campaign and click the the Invoices tab:

The data starts with a base line period (showing indirect invoiced services) prior to the campaign start date, then from the campaign start date up to today's date or the end of the treatment calculations, whichever is earliest in time.
Direct The amount invoiced from direct-marketing patients who are included on a campaign contact list and purchased the campaign services or products. | |
Indirect The amount invoiced from indirect-marketing patients who are not included on a campaign contact list but nevertheless purchased the campaign services or products. | |
Secondary The amount invoiced from secondary services that do not relate to a campaign but nevertheless occur during the campaign |
Viewing the Appointments Graph
To view the Appointments graph from the Marketing Manager Dashboard
Launch the Marketing Manager Dashboard for a specific campaign and click the the Appointments tab:

Reset View - Click this button to refresh the statistics and the display.
The graph shows the trend for four types of appointments over time:
Direct booked The appointment was booked on a date during the campaign period. It is booked for a campaign service for a patient who is included on the campaign contact list. | |
Direct completed The appointment was completed on a date during the campaign period. It is completed for a campaign service for a patient who is included on the campaign contact list. | |
Indirect booked The appointment was booked on a date during the campaign period. It is booked for a campaign service for a patient who is NOT on the campaign contact list. | |
Indirect completed |
Campaign Costs Chart
To view the Costs Chart from the Marketing Manager Dashboard
Launch the Marketing Manager Dashboard for a specific campaign and click the Costs tab:

IMPORTANT: You may sometimes need to scroll to see all media types:

Manual vs Automated campaigns
The tab layout differs between manual campaigns and automated campaigns.
Both campaigns have Actual costs (manually entered in the campaign setup, and used to calculate ROI), but the automated campaigns also have Budgeted costs derived from the Marketing Manager Automation integration.


Campaign History
The Campaign History tab is accessible from EXACT v12.1 onwards.
Secure access
It is accessible for all users with this security setting enabled: Configure > Security : Administration - Marketing .

The History tab

TIP: Mouseover the records to see tooltip descriptions.
![]()


To search by Name:

Contact Lists for Marketing Campaigns
Create a unique Contact List per Campaign
For reporting purposes it is necessary that each campaign is mapped to a uniquely-named Contact List.
Contact Lists therefore cannot be re-used across campaigns. To use a Contact List in a further campaign you need to duplicate it with a different name for dedicated use in each campaign.
Create a Query Template from the Contact Preferences condition, and use this Query Template in Contact Lists
To optimise the patient Contact Preferences functionality, EXACT has a Contact Preferences condition that enables you to create a Query Template to identify those Contacts who are Opted In or Opted Out of direct marketing communications.
Use this Query Template when you create contact lists for direct marketing.
This relates to Preferences to contact patient
To set up a Contact Preferences Query Template for Contacts who gave consent
- Select Configure > Patient Query Templates to open the Query Templates desktop.
- Select the +1 button to open the Add Query Template window.
- Type a descriptive name for this Query Template (for example Contacts who gave consent).
- Click the Insert... selector.
- Scroll down and select Contact Preferences.
- Select OK to open the Edit Patient Selection window:
- Select either Patients with or Patients without.
- Optionally check (tick) Prompt for Entries. If checked, EXACT will prompt you to add patients when you construct your Contact List, and you can opt not to.
- Select an option:
- Product & Service Information or Promotion
- All other communications
- Check (tick) any of the options under Contact Preferences.
- Opted In
- Opted Out
- Undecided
- Select OK to view your new Query Template in the Add Query Template window:
- Select OK to return to the Query Templates desktop, where you should see your new Query Template listed:
To use the Contacts who gave consent (contacts who opted in) in Contact Lists
(Refers to the above procedure output)
When you create Contact Lists (Administration > Contact Lists) you will then have your Query Template as an option:
Contacting patients from the contact list tool bar
Buttons and controls displayed on the tool bar along the bottom of the Contact List window:

| Export List: Select this button in order to export the patient list to a file that can be imported by other programs such as Microsoft Word or Excel for further manipulation.
| |
| Show Completed checkbox: Normally, completed contacts in the list (identified by the
| |
| Edit Patient: Opens the selected patient’s file with access to all the Patient File tabs.
See also: Patients | |
| Currency button: Click this button (or press CTRL-T) to display the selected patients' View Transaction window.
See The Patient View Transactions Window | |
| Edit button: Select to display all the Contact Entries for the selected patient. | |
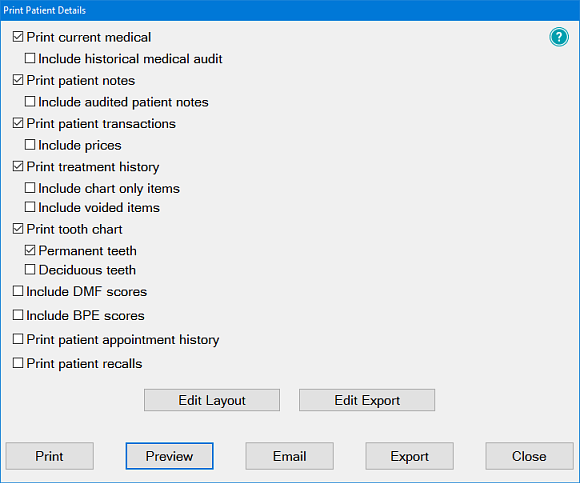
| Print, Preview, Email or Export the selected Contact: This button allows you to print the selected patient’s details, with options as shown below:
See also Print Patient Details under the Details tab section. | |
| Print, Preview, Email or Export the entire Contact List: With options as shown below:
| |
| Delete: Select this button to delete the selected patient contact list entry from the contact list (this will not delete the patient from the system). | |
| Phone: Select this button to record a phone contact with the patient. You have the checkbox option to Mark as complete. With this checked EXACT will remove each patient from the contact list as the phone call to that patient is completed. With this unchecked the patient is not marked as Complete on the contact list until further manual action is taken. In other words, leave the checkbox unchecked if you want a reminder to take further action. Simple configuration:
... or, if appropriately configured, you can dial a patient directly:
| |
| Write to the selected person: Select this button to create either a single letter to the selected patient or multiple letters to patients within the contact list.
You have the checkbox option to Tick as complete when printed. If you check this box, EXACT will remove each patient from the contact list when the letter for that patient is printed, leaving only patients on the list with unprinted letters. With this unchecked the patient is not marked as Complete on the contact list until further manual action is taken. In other words, leave the checkbox unchecked if you want a reminder to take further action. | |
| Email: Select this button to send either a single eMail or multiple eMail messages to the patients within the contact list (if EXDOCe is enabled).
You have the checkbox option to Tick as complete when sent. If you check this box, EXACT will remove each patient from the contact list when the Email for that patient is sent, leaving only patients on the list with unsent Emails. With this unchecked the patient is not marked as Complete on the contact list until further manual action is taken. In other words, leave the checkbox unchecked if you want a reminder to take further action. | |
| SMS: Select this button to send an SMS message to a patient who has a mobile phone number recorded in their patient file.
You have the checkbox option to Tick as complete when message sent. If you check this box, EXACT will remove each patient from the contact list when the SMS for that patient is sent, leaving only those patients on the list who don't have SMS sent. With this unchecked the patient is not marked as Complete on the contact list until further manual action is taken. In other words, leave the checkbox unchecked if you want a reminder to take further action. | |
| Print labels: Select to print a label for the selected person / people on the contact list.
You have the checkbox option to Tick as complete when printed. If you check this box, EXACT will remove each patient from the contact list when the label for that patient is printed, leaving only those patients on the list who don't have labels printed. With this unchecked the patient is not marked as Complete on the contact list until further manual action is taken. In other words, leave the checkbox unchecked if you want a reminder to take further action. | |


Removing services from Appointment Book Quick Service
When you add Services to new campaigns, EXACT automatically enables those services in the Quick Service List dropdown menu in the Edit Appointment screen.

This is so that a Receptionist taking a campaign inbound call can quickly select the relevant service from the dropdown when creating an appointment.
However, EXACT doesn't later automatically remove the services from this quick list.
To prevent the quick service list from becoming long (and not very quick), it is advisable to remove those services that are no longer required in the Quick Service List.
To remove services from Appointment Book Quick Service List
(May require Administrator permissions)
- Make a note of the services that you wish to remove from the list.
- Select Configure > Services to open the Services List.
- For each service that you wish to remove:
- Double-click the service to open the Edit Service Item window.
- Un-check this checkbox: List in Appointment Book Quick Services (as in the image below)

- Select OK to close the Edit Service item window.
Tracking patient campaign contacts
Individual patient contacts can be tracked in the patient file Contacts tab.
To track individual patient campaign contacts
Open the Patients desktop, select a patient and select the Contacts tab for that patient:

Opting patients out of and back into campaigns
Marketing Manager has mechanisms to ensure that patients aren't bombarded with marketing media.
Patients are automatically rested from campaigning after they make a campaign-related booking (the rest period is configurable).
Patients may also specifically ask the practice to opt them out of Marketing Manager promotions, in which case you can manually set a contact restriction on the Product and service information or promotions checkbox under patient Contact Restrictions, as described below.
If you have the Campaign+ integration, patients can opt out through the Campaign+ website, in which case EXACT will auto-set a contact restriction on the Product and service information or promotions checkbox under patient Contact Restrictions.
Procedure for patients to opt themselves out of campaigns
- Patients opt out through the Campaign+ website.
- EXACT receives communications from Campaign+ and auto-checks the Product and service information or promotions checkbox under patient Contact Restrictions:

- EXACT records a Contact entry in the patient file Contacts tab, in which it records:
- The Type as letter or email.
- The Description as the campaign name.
To manually halt campaigns for ONE patient at a time
- Select the patient in the Patients desktop.
- Select the patient Contacts tab.
- Click the Restrictions button at the bottom of the page.
- In the Contact Restrictions popup window, check (tick) the Product and service information or promotions checkbox
- Click the OK button.

Procedure for patients to opt back in to campaigns
This applies for patients who were opted out but elect to opt back in.
The procedure to un-check the Product and service information or promotions checkbox is the reverse of the opt-ins described above: automated after patient selection in the Campaign+ website and manual if requested at the practice
Related content
©2023 Henry Schein One International. All rights reserved.