Versions Compared

Key

  • This line was added.
  • This line was removed.
  • Formatting was changed.

...

...

...

...

...

...

...

...

...

...

...

...

...

...

...

...

...

...

...

...

...

...

...

...

...

...

...

...

...

...

...

...

Info

If you do not have access to some of the areas mentioned here please see a higher EXACT user to assist or amend your security permissions.

If you would like the article as a PDF, use the 3 Dot's in the top right to Export

SETTING UP NHS

Info

PLEASE NOTE: If you have previously done NHS work under your previous PMS you will need to inform us of the highest COT number (claim reference) that you have sent in order for us to ensure that there are no duplications leading to rejected claims.

...

Expand
titleHow to add providers contract number and pin
  1. Go to File > Providers

  2. Chose the provider you need to add the NHS details for in the code box

  3. Click on the NHS Details tab

  4. Click on +1 below the personal no box and enter the contract number and pin number. I would advise setting the Activation date to when the performer started at the practice.

Info

PLEASE NOTE: Unless a provider is added onto your contract for the boards' end and you have received confirmation of this they should not be added to carry out NHS work. If you send claims for a provider before the board have carried out the necessary work there end it will result in rejection responses on all COTs sent.

TRANSMISSIONS & RESPONSES

Expand
titleHow to Transmit

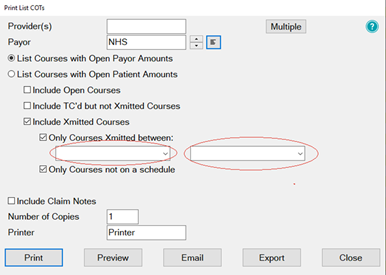
Go to File – Payors or if you have one, the ‘NHS’ button along the top.

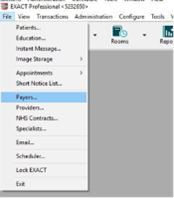
To the right of ‘Sort by name/Sort by code’, find NHS.

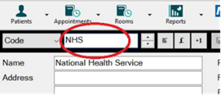
To the right of this screen, click on the button that says ‘Claim’.

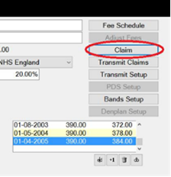
On the next screen, select the providers you wish to bundle claims for, leave blank for all providers, or select multiple to the right. The date field is set to today's date, so it will bundle everything up to today. Click ‘OK’.

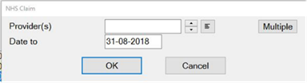
The system will bundle the claims, and once finished, will prompt you to print the list of claims, press print if you would like to print, or cancel to skip this.

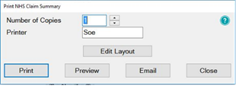
If you get a message saying ‘No Claims Found’, nothing is ready to send, and if you get a message saying ‘There are too many claims for the bundle…’, once finished, you will need to press the ‘Claim’ button and bundle again, to bundle these extra claims ready to transmit.

You will then get the ‘Transmit Claim’ screen click OK, the transmission is complete.
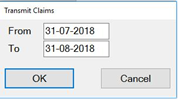
 

...

Expand
titleHow to Resubmit Responses

To amend/resolve any responses you receive;

Click into responses under the NHS dropdown.

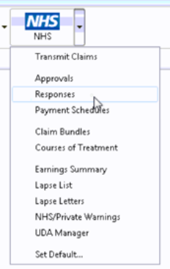
Highlight the responses you want to deal with;

Click on Resubmit in the bottom right-hand corner;

Once you have resubmitted, click on to the Patient icon at the top of your screen and it will load the patient that you have resubmitted the treatment for and allow you to amend the treatment.

Before you TC the treatment back through, please check that you have “prompt for date when charging” checked under your user settings;

You can turn this on by going to configure > user settings then making sure there is a tick in the option shown below which shows under the chart section on the left-hand side.
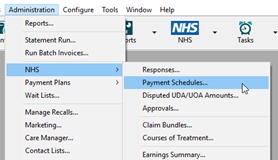
NHS SCHEDULES

Expand
titleViewing NHS Schedules

NHS Schedules will be received once a month, and you will notice they come in when you transmit. To deal with the schedule:

  1. Go to - Administration - NHS - Payment Schedules.

  2. It will ask you to select dates and providers, to do the most recent for all providers, leave the screen as it is and click ok.

  3. A list of schedules will appear, with dates and schedule numbers that will relate to the paper version.

Expand
titleSchedule Reconciliation
  1. Double click on the schedule you wish to check.

  2. This screen will display differences. If it is blank, there are none.  If it has entries:

a. if you agree with the difference, which you can check by double-clicking, click the 'adjust' button at the bottom. This will adjust the amounts on the system, and you are accepting what the board has paid you.

b. If you disagree with the difference, contact the NHS board to discuss the claim. If they accept that the claim should be paid you can resubmit and send the claim again,

  1. Once the differences have been dealt with, by adjusting it will auto tick, but if disagree you can tick the box on the far left.  Once empty, the schedule has been dealt with, close the screen (small cross on the top right), and then highlight the schedule you have just done, and click 'Process Payments' on the bottom left. This will clear the open amount, and put a tick in the box on the far left. The schedule is now processed.

If a response has come back but is not part of a schedule you can resubmit and resend

NHS SCHEDULES

Expand

Viewing NHS Schedules 

NHS Schedules will be received once a month, and you will notice they come in when you transmit. To deal with the schedule:

  1. Go to - Administration - NHS - Payment Schedules.

  2. It will ask you to select dates and providers, to do the most recent for all providers, leave the screen as it is and click ok.

  3. A list of schedules will appear, with dates and schedule numbers that will relate to the paper version.

  4. Double click on the schedule you wish to check.

  5. This screen will display differences. If its blank, there are none.  If it has entries:
    5a. if you agree with the difference, which you can check by double clicking, click the 'adjust' button at the bottom. This will adjust the amounts on the system, and you are accepting what the board has paid you.
    5b. If you disagree with the difference, you cannot resend the claims through EXACT, you will need to ask the PSD for 283 adjustment forms, they can advise on how these should be done, these have to be sent by paper.

  6. Once the differences have been dealt with, by adjusting it will auto tick, but if disagree you can tick the box on the far left.  Once empty, the schedule has been dealt with, close the screen(small cross on the top right), and then highlight the schedule you have just done, and click 'Process Payments' on the bottom left. This will clear the open amount, and put a tick in the box on the far left. The schedule is now processed.

Info

If a response has come back but is not part of a schedule you can resubmit and resend

Expand
titleList Courses of Treatment Screen

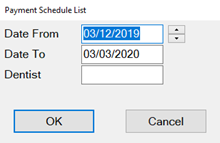
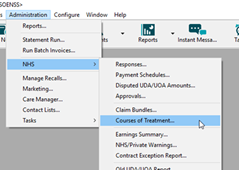
In order to check if there are any Courses of Treatment that have been transmitted to the board within the scheduled cut off dates but have not come back on a schedule please use the steps below:

  1. Go to Administration > NHS > Courses of treatment

    If you have the NHS icon on your workspace you can click on the arrow beside NHS then select Courses of Treatment in the dropdown.

  2. Once the Courses of Treatment screen opens click on the print icon in the bottom right-hand corner.

  3. Set the report as shown below:
    In the circled fields enter to start and end date of the NHS cut off period. This will isolate the claims that should have come back on a schedule but haven’t.

USER SETTINGS

Expand
titleAdjusting Security

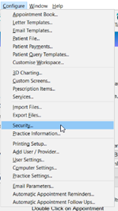
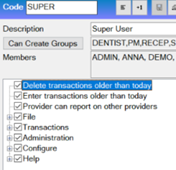
A users security defines what they have the ability to do one the system, these are divided into groups that users are a part of. If you adjust a security setting it will amend it for all users in that group. You will need to be a superuser or admin user to amend security groups

  1. First to find out what security group someone is in, go into Configure > User Settings

  2. Find the user you want to look at and you can then see the security settings underneath the user's name and password;

  3. Then go into Configure > Security

  4. Using the Code section find the group you want to amend. Everyone listed underneath is in this security group and everything ticked it what they have the ability
    to do;

    Image RemovedImage Added
  5. You can then click in these subsections and amend the security settings for that group.

Expand
titleAdding New Users

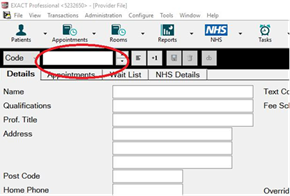
To add a new user or Provider into Exact you must first click on configure > Add User / Provider;

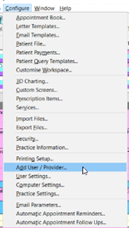
Then on the first window on the Add User Wizard, put in the way you want the user to appear on the appointment book and user name when logging in.

When selecting if they require an appointment book, if they are a provider but aren’t starting yet, still click yes – this is what makes them a provider and not an admin user.

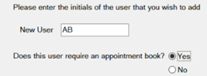
Click  Next > and the next screen will want you to select the security group that the provider requires and add in a temporary password for them to just get logged in (make sure you tick “User must change password at next login”

Press Next> and the next page will be for any additional details you wish to add such a the providers' name and qualifications. This is the section where you fill in the provider type;

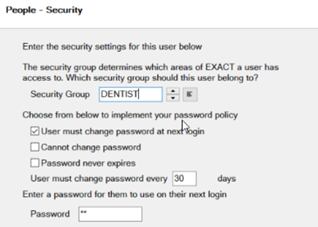
Press Next > and this page you can add in the providers' address/telephone numbers and an email address if they would like to receive an email every time an appointment is made with them.

Press Next > and this section is where you can pick the providers' appointment book colour and text colour.

Press Next > where you will be asked to tick which recall type the provider will set, either dentist or hygienist

Press Next > and you will be prompted to add in the providers working rota, make sure you start this as the correct date that the provider is starting with you.

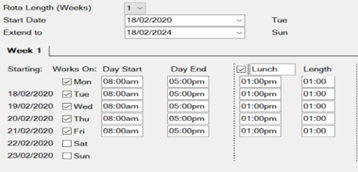
The next two pages will ask you which appointment book (if you have more than one) that you want the provider to show in and how they want their stickman (patient at the door) settings to show.

Press Next > and this is where you can add in the provider NHS details and press Finish, this will then add the new provider to the diary and open their rota from the dates you selected.

CONTACT LISTS

Expand
titleCreating queries

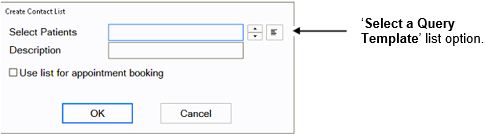
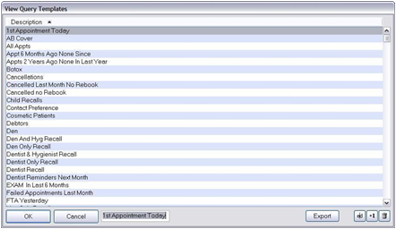
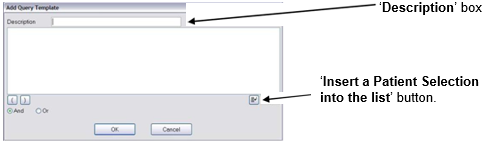
This document is to help you create some commonly used search queries in EXACT. These can be created and used from Administration > Contact Lists to enable you to contact a specific group of patients.

Method

Queries can be created from numerous places within EXACT but the preferred method is as below.

  1. Go to Administration > Contact Lists.

  2. Click on Create List and the following screen will appear:

  3. Click in the select patients' box and the lined menu button (Select a Query Template ) will appear to the right of that box

  4. Click on the Select a Query Template button and this screen will appear:

  5. Click on the +1 button and the Add Query Template box will appear as below:

  6. To start creating your new query click on to the button with the arrow pointing in (Insert a Patient Selection into the list) found under and to the right of the white area and start creating your new search queries as detailed in the options below.

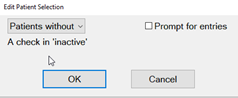
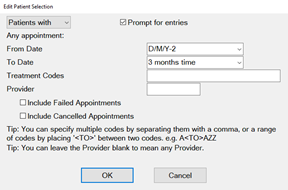
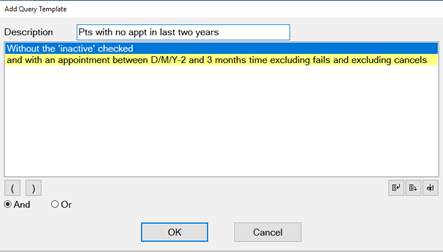
Contact List Example: Searching for patients with no appointments in the last two years

Follow the procedure above and then type in your description (e.g. Patients with no appts in last 2 years) and select the following search conditions:

  1. A check in ‘inactive’, click on OK and select ‘Patients without’ from the drop-down list (this means that your search will only pick up active patients). This should look like this

  2. Click on OK

  3. Any Appointment, click on OK and select ‘Patients without’ from the drop down list and then enter the date code of ‘D/M/Y-2’ in the From Date box and ‘D/M+3/Y’ in the To Date box (this means we are searching for patients with no appointments from 2 years ago up to 3 months into the future, this is done in case some of the patients realise they have not been in for some time and have booked an appointment). The screen should look like this:

  4. Click on OK

  5. The query template should look as below:

  6. Click on ‘OK’ and the query will now be saved into your list of available search queries and can be used at any time.

To run the list click ok to all screens. Your patient search will now start to run. This may take a few minutes.

Contact List Video

Please use the link below to view how to create a Contact List in Exact

https://www.youtube.com/watch?v=Qb-44c7B5l0&t=4s

REPORTING

Expand
titleAdding Reports to Favourites

When you are in Exact Reports you have the ability to add reports that you use frequently into your favourites tab, this will be for the user that is currently logged in and each user will have to add their own favourites in.

Go into reports and highlight the report you want to add into your favourites and press the star icon in the bottom right-hand corner;

You can then choose or add the group as monthly/weekly or daily, depending on the frequency that you run it. With a description, if you would like.

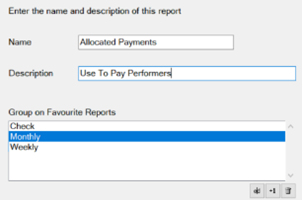
You will then be able to fill out the relevant fields that you use when running the report, like performer and date ranges.

This will then save into the favourites tab to be run easily with the prefilled dates/performers in place

...

Expand
titleStock Sales Report

This report is used to print a list of stock sales for a practice over a period of time. The resulting report shows the following:

  • Open stock

  • Number sold per item

  • Stock on hand

  • Unit Cost

  • Total value sold.

Configuration

  1. In the 'Configure' menu, click on 'Services'.

  2. Double-click each service that is to be set up as a stock item, to open the 'Edit Service Item' window.

  3. Make sure there is a tick in the 'List as Stock Item' checkbox: 

  4. You can also enter the appropriate quantity in the "Number in stock" field, and in the "Full Stock Number" field.

  5. Save the stock item record.

To Run the 'Stock Sales' Report

  1. From the ‘Administration’ menu, click ‘Reports’ and select ‘Stock Sales’:

  2. The ‘From’ and ’To’ Dates can be changed to print the ‘Daily Activity’ report for a previous date or date range. If a date range is selected a report is printed for each day.

  3. The level of detail required is selected by ticking the checkboxes.

Tick

To show

Show Stock Summary

Opening and current stock.

Show All Stock Items

A list of the stock items sold.

Summary Provider Sales

Breakdown of stock sales by provider.

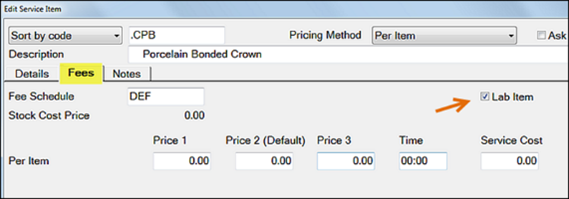
MANAGING LAB WORK IN EXACT

Expand
titleConfiguring Lab Work Done/Due Reports

Setting up your lab companies

  1. Go to File > Specialists

  2. Click +1 located at the top of the screen - this will bring up an 'add specialist' box

  3. Complete the details as specified (how much information is entered is your choice)

  4. Tick the 'Lab' box shown below  - located on the bottom right-hand side of the window

  5. Click OK

Repeat this for each Lab you need to add

Setting up Services as lab items

  1. Select Configure > Services:

  2. Double-click the service to open the Edit Service Item window.

  3. Select the Fees tab and tick the box for Lab item:

  4. Click OK to close this window.

  5. Set up the laboratories that are used as follows:

  • Select File > Specialists.

  • Click the +1 button to open the Add Specialist window:

  • Enter a Code, and a description for the code in the First name field, then enter as much information as required.

  • Recommended: an address, phone number and e-mail address.

  • Be sure to check the Lab checkbox.

  • Click OK.

  • Repeat the above procedure until you have entered all laboratories' details.

  • If entering the service cost once the treatment has been charged or TC’d, click the History   button  within the Chart tab to view the tooth history:

  1. Double-click on the service item to enter a service cost for. You will see that the service cost is the only field available for editing. Enter the cost and click ‘Close’.

  1. With both the service configured and the lab details set up, the next time the service is charted, you will be prompted for a lab and due date.

  1. Select the lab you wish to use by choosing a laboratory from the list button or by using the arrow buttons.

  1. Select the date the lab work is due back and click ‘OK’.

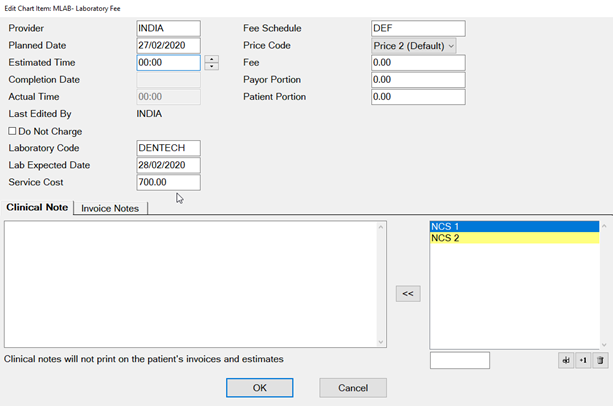
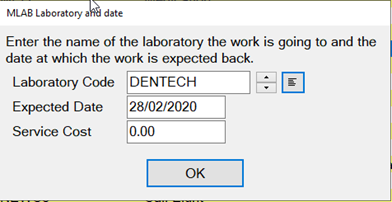
10.  When the lab item arrives, double-click on the appropriate service item and enter the cost of the lab item.

...

Expand
titleLab Work Done Report

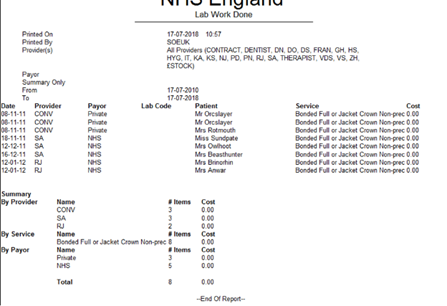
This report is used to print a list of patients who have lab work currently listed against their patient record (i.e., laboratory work has been done for them recently)

For the report to run effectively, initially a certain amount of configuration is required to set up the laboratories that are used by the practice and set a prompt against the services that require lab work.  Once this has been done, then both lab work done and lab work due can be reported.

To 'Run the Lab Work Done' Report

  1. From the ‘Administration’ menu, click ‘Reports’ and select ‘Lab Work Done’:

  2. You can report lab work done for all providers by leaving the Provider(s) field blank, otherwise, enter or select a provider's name. To report on more than one provider, click the Multiple button then select the providers required.

  3. Alternatively, you can select providers who belong to a particular Provider Category; leave the Provider(s) field blank, then enter/select a Provider Category.

  4. To choose patients with a particular Payor, enter/select the appropriate Payor code.

  5. The 'Summary Only' checkbox is used to limit the report to summary only: details are omitted.

  6. The 'From' and 'To' date fields are used to define the date range for the report.


MANAGING WHITE SPACE

Expand
titleCare Manager

Please use the link below to access a video guide for using Exact’s Care Manager

https://www.youtube.com/watch?v=uvpU10fjsdY

...

Expand
titleShort Notice List

The Short Notice List allows you to collate a list of patients who would like to be notified of sooner appointments or of any opening slots if they have had to cancel. Once a space appears you will be able to hover over the gap in the appointment book and click on the puzzle piece icon to alert patients on any appointment spaces that become available.

Enabling the Short Notice List

If the short notice list is not visible on the appointment book you may need to turn this on. In order to do this, you will need to be logged in as an administrator or SUPER user.

Go to configure > practice settings

Add a tick in the ‘Enable Short Notice List’ box located at the bottom left-hand side.

Adding the Short Notice List tab

After you have ensured the Short Notice List is enabled you may need to add it to your appointment book.

  1. Click on the spanner at the bottom of the provider column window

  2. Put a tick in ‘Select tabs for your activity bar

  3. Select ‘Next >’ twice

  4. Select ‘Short Notice List’ in the ‘Available Tabs’ box then click on the chevrons (>>)  to move it across into the ‘Selected Tabs’

  5. Click on ‘Finish’

Info

PLEASE NOTE: If you are an administrator you can add this for all users following the steps below:

  1. Click on Configure > User Settings

  2. Click on the list button and

  3. Select the user from the list you would like to add the Short Notice List to and select OK.

  4. Click on Setup next to ‘Multi ApptBook Tabs’

  5. Click Next

  6. Select ‘Short Notice List’ in the ‘Available Tabs’ box then click on the chevrons (>>) to move it across into the ‘Selected Tabs’

  7. Click on ‘Finish’

Configuring the Short Notice List

Go to the appointment book and go to the short notice tab, there should be a black spanner in the bottom right-hand corner. You may need to be an administrator / SUPER user.

Info

PLEASE NOTE: You can also access the Short Notice configuration by going to Configure > Practice settings and clicking on the spanner next to ‘Enable Short Notice List’.

This will open the 'Short Notice List Settings' window.

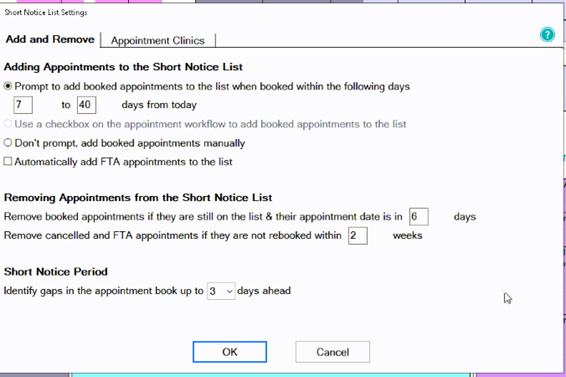
If you would like to be prompted to add appointments to the Short Notice List if booked within the specified date range (this is usually set to appointments between 7 to 40 days but can be amended for the practice’s needs) OR use a checkbox OR don't prompt and add manually. You can add an appointment to the short notice list when cancelling or by right-clicking on the appointment and selecting ‘Add to Short Notice List’

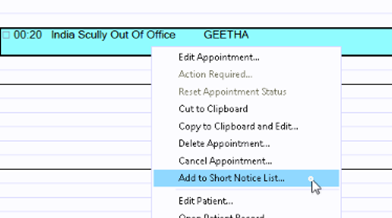
You can Tick/Untick box to add FTA appointments automatically.

You can also decide when to remove appointments from the Short Notice List by setting time intervals in the two removal conditions shown above.

You will need to specify the short notice period itself. So the length of time from today it may find an appointment for- Maximum 5 days

Contact' tab is located to the top middle of the setting screen.

  1. From this section, you can decide how patients are contacted. You can select ‘No SMS’ if you would like to call your patients to advise of short notice gaps, ‘Manual SMS’ if you’d like to decide which patients you will send an SMS to or ‘Automate SMS sending’ and the system will send text messages to all who fit the criteria of the available space.

  2. Then select the size of groups to contact which will limit the number of patients on the short notice list that you contact about the space.

  3. Select the template to send to patients – the default will ask the patient to reply by text message. If you do not have SMS replies you will need to amend this message.

  4. Enter the time you would like to stagger messages by in minutes – this will allow a gap between sending the text messages to allow the patient to reply should they want it before the next person is contacted.

  5. To prevent patients from feeling hassled can limit the maximum amount of gap messages a patient receives within 3 days.

  6. Select timeframe to stop sending SMS if gap within 'x' hours.

  7. 'Appointment clinics' located at the top left of the setting screen.

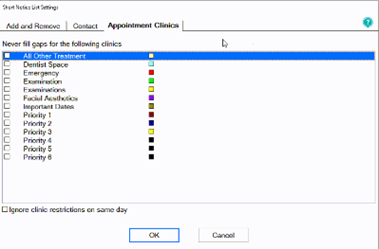
a) Select which clinics you would like to prevent gaps being filled

HELPFUL INFORMATION

Expand
titleWho should I contact for help?

General EXACT Queries

Contact the SOEUK Support Desk on 01634 266 800

NHS Queries (PIN Numbers, List Numbers, Transmissions, Regulations)

Contact the BSO on 02895360333 and select option 4 then option 1

Please make sure if you are querying claims you have the patients H&C number or their date of birth and CHI. 

...