Using Clinipad with Patient Arrival
Default Medical History prompt
By default the Arrival screen shows the Medical History prompt as ticked:
...
Receptionists can un-tick this field if it proves unnecessary.
Background:
This default setting is controlled per patient from the Medical History Configuration screen.
Patient File > Medical (tab) > ![]() :
:
...
The Alert if Medical History is [x] months overdue field is by default set to a value of 1.
Consequently, Medical History will be prompted for update once a month, and the arrival window Send a Medical History form to Clinipad tick-box will be ticked by default, unless the patient has already completed their MedHist forms within the last month.
To disable this auto-prompt for a patient, set the value in the above field to 0, and click OK.
To register the patient as "Arrived" without following the Arrival Checklist
As a patient arrives in the practice, click to check them in on the appointment book screen as normal.
An Arrival screen will appear, allowing you to select which patient information you want updated.
Click the Arrive button

at bottom centre to register the patient as arrived in the normal manner.
To use Clinipad with Patient arrival (summary of procedure)
...
In Reception CliniPad is mainly driven from the arrival window and the appointment workflow (departure bar).
When you mark an appointment as arrived the arrival prompt will appear. Using this window we can decide what forms to send to the CliniPad for patients to complete.
...
Check (tick) to specify which forms to send to Clinipad.
Select a Clinipad hardware device to issue to the patient.
Select Arrive and Send to Clinipad so that EXACT can prepare the Clinipad.
Issue the patient with the Clinipad and offer brief instructions.
When the patient returns it, click the Return button

.
If you need the patient to use it again, click the Issue button

and hand the Clinipad back.
To use Clinipad with Patient arrival (detailed procedure)
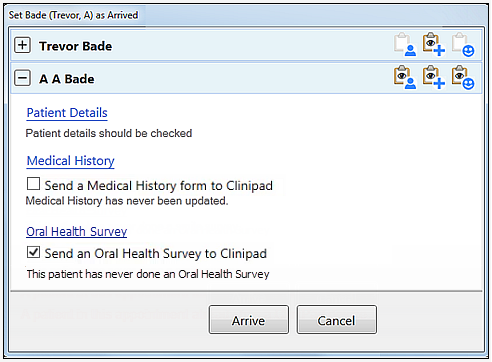
As a patient arrives in the practice, click to check them in on the appointment book screen as normal.An Arrival screen will appear, allowing you to select which patient information you want updated.
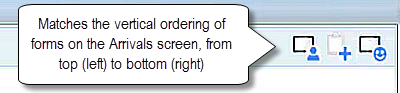
The ordering of icons at top left of the screen matches the vertical ordering of forms on the screen:
Note the two Arrive buttons at the bottom of this screen:

Click the Arrive and Send to Clinipad button to cause EXACT to register the patient as arrived and send the checked forms

to the Clinipad that is selected on the dropdown menu.
Click the Arrive button to simply register the patient as arrived in the normal way.
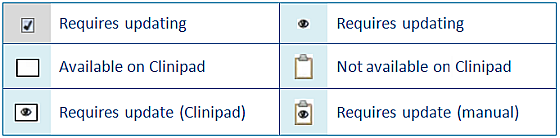
EXACT indicates with a ticked checkbox
 when a form needs to be updated by default. Users can optionally override the default requirement and either tick or un-tick the checkboxes.
To update Patient Details manually, in the EXACT software
Click the Patient Details hyperlink

to open the Patient Details screen, and from where you can complete the fields.
NOTE: Clicking the Medical History hyperlink will cause EXACT to print these forms. which you can then issue to patients to complete manually.
To print out Medical History for the patient to complete
(This makes it quick and easy to update details where you don’t want to use the Clinipad or when one isn’t available)
Click the Medical History hyperlink to open the print dialogue, print the form and issue to the patient.
Form indications:
An icon will appear in the top right corner for each form that the patient can potentially update.
Hover over an icon to see a tooltip description:
...
Oral Health Survey examples:
...
Due
...
Not Due
...
Clinipad form
...
Printed form
...
...
...
Oral Health Survey Checkbox
Checked
...
Unchecked
...
...
Reasons
...
The patient has never completed this survey before.
It has been more than the configured interval since the last survey.
...
The Patient is under the minimum age - 18yrs default,
The Patient has had a survey within the configured survey period - 2yrs default,
The Patient has no dentist appointment today.
Forms that are not due, for example if the medical history was checked recently, will appear white (pale).
Forms that have the "eye" icon require updating and will also be ticked by default in the list.
Uncheck (de-select) these if you do not require them.Available Clinipads:
If you have multiple Clinipad devices, all the available ones are listed in the Complete forms using… dropdown.
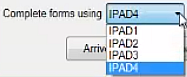
EXACT will advise in red text if no devices are available.
(Manual option, without Clinipad) If you updated the forms manually and don’t want to use Clinipad, or if a Clinipad is not available, simply press the
Arrive button.
Uncheck any forms that you do not require the patient to edit.
On the device dropdown menu, select the device that you want the patient to use and press
Arrive and Send to Clinipad.
Pick up the chosen Clinipad. Check its number at the bottom left on the screen:
...
6. Before handing it to the patient, on the main screen press
...
Change Patient to refresh the screen with the newly arrived patient’s details and forms:
...
Hand the device to the patient and provide basic instructions.
...
The patient selects each form from the list and completes as required, using only a finger or a stylus.
The forms are fixed so any items which don’t appear on them need to be typed into the free text boxes in each section by means of the screen keypad (this appears when you tap into a text box). For example:
...
Many forms can be signed by the patient directly onto the Clinipad device using their finger or a stylus. For example:
...
When the patient selects the Send button the signed form displays for patient review. If the patient is satisfied they tap the Done button:
...
The button on the Clinipad front screen then displays a check (tick):
...
The Clinipad device actions are tracked on the
Clinipad Tab (shown below) and the Clinipad screen.
...
7. Issue the patient with the Clinipad and offer brief instructions.
This will place a session on the CliniPad tab which you can monitor along with any other sessions.
...
You will be able to see the patient’s name, which Clinipad device they have, which forms they are required to complete and how long they have had the device.NOTE: TheIssue button
...
is for re-issuing Clinipad to the patient (the initial issue is activated from the Arrival dialogue's Arrive and Send to Clinipad button).
10. The patient completes the data capture and hands the Clinipad back.
11. Click the Return button ![]() against that patient name.
against that patient name.
This makes the device available for the next arriving patient, and displays the status of the patient's efforts on the screen.
You can see which forms were Updated by the patient and those that had No Change.
12. For forms that were not updated or Not done:
You can Issue again
...
if the patient missed them in error.
Alternatively if you want to accept that there are no changes then you can click the No Change hyperlink and the patient will be removed from the Clinipad list.
13. If there are changes:
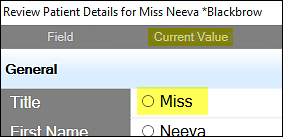
You will see that the form has been Updated. Click this Updated hyperlink to view the changes that have been made in green text:

Compare with the current details and either approve the change by selecting OK, or
If you wish to reject any of the changes that the patient made you can select the current value of each item and then select OK:
The patient will then be removed from the Clinipad list, and changes immediately made to EXACT.
In the case of family appointments checked in using Clinipad, the patient simply has to press change patient on the Clinipad device and they will see the list of patient’s available within the family appointment.
Family Appointment procedures
The initial Arrival dialogue shows the entire Family
Click the + buttons to see details for each family member:
...
Select one family member at a time on the Clinipad:
...
As each patient completes their form, they press Change Patient to move to the next patient.
...
In the Clinipad tab and Clinipad screen, Family members are initially displayed as contracted:
...
Click the expander + icon to display them separately, one line per family member:
...
You can further expand each member line to show the forms due for that member.
Click individual patients to access the patient file.
Managing from the Clinipad tab
To return Clinipad sessions without leaving your current screen
From v11.10 it is no longer necessary to return Clinipads from the Clinipad Screen or Tab.
You can still go to the main window to return a Clinipad session, but the Clinipad return menu has been modified to be more convenient.
It is now available to all users, and it enables you to Return a Clinipad session from any screen, without leaving that screen.
Simply click the down arrow beside the Clinipad icon in the workspace bar, and select the Clinipad to return for your area:
...
This is the row of tabs below the Appointment Book:
...
EXACT has to be configured to display the Clinipad.
To manage Clinipad operations from the Clinipad tab in the appointment book
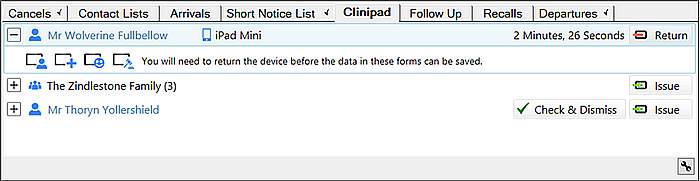
The Clinipad returns tab shows a list of patients (or families) who have been issued Clinipad in order to complete forms.
When they return the device, it allows the user to check-in and manage the changes that patients have made.
...
For each Clinipad device issued to a patient or family there will be one line that shows
An expander for drilling in to more information
...
Drilling in will show a line of all the forms that the patient was asked to complete.
- You can only expand one line at a time.
...
patient
...
To whom the Clinipad device was issued.
In the case of a family the head of family's surname + the number of patients is shown
...
name
...
...
Click a family expander to expand and show one line per family member:
...
- Click individual family members to access their patient files.
- You can further expand family member lines to show the forms due from each family member.
The name of the Clinipad device that has been issued:
...
.
...
For how long the patient / family has had the device:
...
A timer counts up from zero while the device is in use. If the timer goes over twenty minutes it turns red to alert you that the patient may have completed forms:

A Return button for when they hand the device back:

When you click the Return button, EXACT will check to see if the patient has completed all of the required forms.
If they have not completed all their forms, a Forms Incomplete dialogue will pop up to identify which forms are missing, and to give you the option of returning the Clinipad device to the patient:
...
If the patient has completed all the forms, or if you still want to return the device (you are not going to make the patient complete the missing forms), EXACT returns the device to the pool, and the onscreen view changes:
...
With the data returned each line now also shows
...
Whose data has been returned
In the case of a family the head of family's surname + the number of patients is shown:
...
Click a patient name to open their patient file:

Click a family expander to expand and show one line per family member.
- Click individual patients to access the patient file.
- You can further expand the line to show the forms due from each family member.
Each form shows whether the data has been updated:

Depending on your security settings you can click the forms to see the data returned.
...
Returning the device available for the next arriving patient, and displays the status of the patient's efforts on the screen.
You can see which forms were Updated by the patient and those that had No Change.
12. For forms that were not updated or Not done:
You can Issue again
...
if the patient missed them in error.
13. If you have finished reviewing the forms and are not issuing the device back to the patient. Click the Check and Dismiss button to check-in the data:
...
(Note that this button is not shown for a family, it is only shown for individual family members).
...
An Issue button, to use if the patient needs to have the Clinipad device given back to them:
...
Click the Issue button to bring up a dialogue allowing you to send the form.
Click the Once you have clicked the Check and Dismiss button to see if any data needs to be triaged EXACT will display any information you need to triage.
Changes to patient information, and patient’s doctor need to be reviewed before they are written to the database.
Other forms such as medical history or Oral Health Survey do not need to be reviewed.
...
Once the data has been accepted or rejected, or if there were no changes to triage, the patient is removed from the list.
...

To manage Clinipad Form statuses
These are the possible statuses shown in the Clinipad tab and screen:
Clinipad Form statuses for Patient Details:
...
No change
...
Click this to clear the line.
...
Updated
...
Click to bring up a comparison window, which allows you to check the changed data.
When you click OK, EXACT checks in the data and clears the line.
Clinipad Form statuses for Medical History:
...
Not done
...
Patient did not fill in any details.
...
Signed
...
Clinipad Form statuses for Oral Health Survey:
...
Not done
...
Patient did not fill in any details.
...
Blank
...
Patient filled in the Oral Health Survey but there were no details requiring consultation.
...
Needs Consult
...
Patient filled in the Oral Health Survey and there were details requiring consultation.
Click to display this Oral Health Survey.
In this status the Oral Health Survey will also display to the Clinician when moving a patient to the chair.
The Clinician can process it from the Chart tab > Oral Health Survey tab, and Notes can be saved to the Oral Health Survey up until it is completed (once completed it becomes Read Only) See also: Using Clinipad in the Clinic
Managing from the Clinipad Screen
This is an optional feature on the main screen.
EXACT needs to be configured to display the Clinipad icon:
...
TIP: Clinicians can use this screen to monitor Clinipads, rather than opening the appointment book and accessing the Clinipad tab.
This screen has the same functionality as the Clinipad tab used by Receptionists.
...
If Patient details have been updated Compare the CliniPad value with the current details and either approve the change by selecting OK, or
If you wish to reject any of the changes that the patient made you can select the current value of each item and then select OK:
...
If Doctor details have been updated then you will be asked to select a doctor from, your list of Doctors already in your database or you can use the +1 to add that Doctor to your database.
...
Family Appointments
Handling family appointments is a slightly different workflow for both Recpetion and the Patient.
The initial Arrival dialogue shows the entire Family
Click the + buttons to see details for each family member:
...
Select one family member at a time on the Clinipad:
...
As each patient completes their form, they press Change Patient to move to the next patient.
...
In the Clinipad tab and Clinipad screen, Family members are initially displayed as contracted:
...
Click the expander + icon to display them separately, one line per family member:
...
You can further expand each member line to show the forms due for that member.
Click individual patients to access the patient file.
To return Clinipad sessions without leaving your current screen
From v11.10 it is no longer necessary to return Clinipads from the Clinipad Screen or Tab.
You can still go to the main window to return a Clinipad session, but the Clinipad return menu has been modified to be more convenient.
It is now available to all users, and it enables you to Return a Clinipad session from any screen, without leaving that screen.
Simply If you are using the CliniPad Workspace icon you can simply click the down arrow beside the Clinipad icon in the workspace bar, and select the Clinipad to return for your area:
...