Prior to using the Oral Health Services Agreement scheme, a number of configuration steps are required.
The set up may be completed on any computer within the practice.
These steps include:
- Configure Provider Agreement numbers
- Setting your District Health Board which is added to claim forms
- Importing the schools, ethnicities and TFEA scores (for capitation banding)
- Importing the correct fee schedule, services and payor rules
- Importing the schools, TFEA scores and capitation fees
- Importing patient ethnicities
- Updating the existing GDB patients to the new payor
- Configuring the services.
The set up may be completed on any computer within the practice.
Configure Provider Agreement numbers!
If a Provider is to provide services under an OHSA Agreement, that Provider must be configured with an Agreement Number and the name of the Agreement Holder.
...
- Using the correct forms for claims/approvals
- Configuring the services for preferred Charting Graphics
FIRSTLY: A Payor needs to be setup in EXACT called OHSA and the payor type set as OHSA.
Visit File>Payors>+1 - CODE: OHSA, Name: Oral Health Service Agreement For Adolescents
"This payor sets just the payor's portion" option should be selected.
| Table of Contents | ||
|---|---|---|
|
Importing the OHSA Fee Schedule -
...
Please contact
...
Support for the latest version:
| Info |
|---|
| This procedure will import the OHSA Codes, appropriate fees and payor rules. |
Latest Printable PDF: Updating MOH Fees
IMPORTANT PRELIMINARY CONSIDERATIONS:
- Prior to importing your fees it is important recommended that you download and install the latest version of EXACT, otherwise combination codes such as the 1470 won’t may not produce the correct fee.
- Once you have upgraded to the latest version of EXACT, you just need to download the fee file from the Portal and note where you have saved it. When the download is complete you are ready to import the new fees by using the steps described below.
- You need to log in as an Administrator to import the fee file.
- (s).
- Before updating your MOH fees we recommend that you run an Outstanding Treatments Report and TC any outstanding treatments(if the treatment is Incomplete, just tick the Non-‐Completion box. If it is Complete, tick Completion).
...
- Ensure that you have the latest version of EXACT installed.Download the fee file from the Portal and note where you have saved it.
- Login to EXACT as an Administrator.
- Click File > Payors.
- Click the Payor List button
- Select OHSA
- Select OKIn the Payor File,
- With the OHSA Payor now selected, click the Fee Schedule button:
- This opens the List Payor Fees screen, from where you click the Import Fees button to open a browse window.
In the window browse to the MOH July2016 folder that you downloaded, and browse to: C:\Program Files (x86)\Software of Excellence\EXACT\Imports-NZ\Fees - choose this file: ohsafees_2016.csv, from the list then click Open.
- When the following warning message appears, click Yes to continue.
The fees will now import into EXACT, and once the import is complete
the followinga success message will appear
:- just Click OK.
Info This procedure has imported the OHSA Codes, appropriate fees and payor rules. To easily view the treatments that are included in the Standard Services group, the payor codes are prefixed with an asterisk (*).
NB: It will be necessary to run the Service List Set Up wizard to view the MOH Category in the Chart. See section below for more details.
The codes for the OHSA services are all prefixed with DB to easily identify these in your service filetab. They are all included in the category GDBMOH, which is also created when the fee schedule is imported.
...
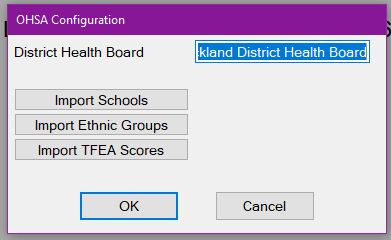
- From the Configure menu, select OHSA to display the OHSA Configuration window:
- Enter the appropriate DHB name.
- Click on Import Schools.
- Click “My Computer”, and select the CD-ROM (or DVD-ROM drive, as applicable)
- Select Data > Imports > MOH >Browse to: C:\Program Files (x86)\Software of Excellence\EXACT\Imports-NZ
- Select SCHOOLS.csv
- Click OK or Open to import the Schools.
...
- From the Configure menu, select OHSA to display the OHSA Configuration window:
- Enter the appropriate DHB name.
- window Click Import TFEA Scores.
- Select My Computer and select the CD-ROM (or DVD-ROM drive, as applicable).
- Select Data > Imports > MOH
- Select the Quality Off folder unless you have complied with the requirements for Quality On payments and this is agreed with your District Health Board, in which case double click on the Quality on folder.
- Select the TFEA_SCORES.csv file.
- If you are not sure where you should be importing this file from, please contact the Help Desk for assistance.Browse to: C:\Program Files (x86)\Software of Excellence\EXACT\Imports-NZ
- Select TFEA_SCORES.csv
- Click OK to import the TFEA Capitation Scores.
Importing the Ethnicities of OHSA
- From the Configure menu, select OHSA to display the OHSA Configuration window:

- Enter the appropriate DHB name.
- Click the Import Ethnic Groups button.
- Click on “My Computer”, and select the CD-ROM (or DVD-ROM drive, as applicable)
- Select Data > Imports > MOH Browse to: C:\Program Files (x86)\Software of Excellence\EXACT\Imports-NZ
- Select the ETHNICTP.csv file.
- Click OK or Open to import the Ethnicities records.
Viewing the "MOH" Category in the Chart
- Open any Patient file .Click & Click on the Chart tab.
- Click on the
 spanner button located under the service list.
- Insert a tick in the check box ‘Select which categories you see in the service list and the order they are shown’ as shown below:


- Click ‘Next’ to open a window similar to the one following:

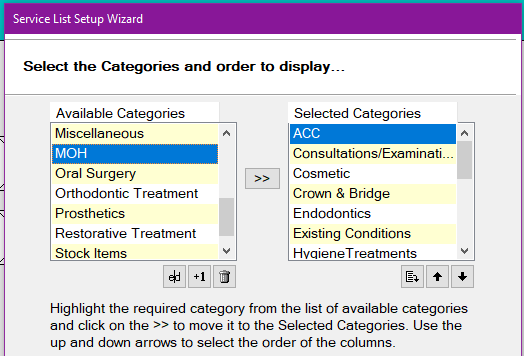
- From the list of ‘Available Categories’, double click on ‘MOH’ to add this category to the ‘Selected Categories’ list.
- Use the
 the Up/Down arrow buttons to position where this category appears in the list. (ie alphabetically, first, or last in the list)
- Click ‘Finish’ to complete the wizard.
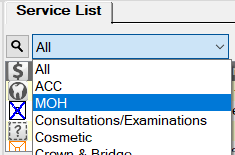
- Select any patient, and click on the ‘Chart’ tab.
- From the Category list (above the Service List), click on the drop down arrow and select ‘MOH’ (as below). This will display all of the OHSA services available.

Configuring the Auto-Create Treatment Plan
This is a per user configuration setting.
It enables a user to double-click a MOH service to have EXACT auto-create a Treatment Plan with the Service.
To configure the Auto-Create Treatment Plan option (per User)
- In Configure > User Settings, check the Auto-Create option and set number of Treatments to 1:

- Click the Save button from the top toolbar.
OHSA and Patient Records
The following information is required for each patient prior to charting to ensure the system functions correctly:
- Patients NHI number
- Full Name
- Date of Birth
- Sex: Male or Female
- Attending School / decile score
- Default ‘OHSA’ payor selected when creating a Course of Treatment (EXACT requirement)
- Providers Name
- Ethnicity (as stated on the patient's enrolment form)
- NHI number (if required)
- Payor, Payor#Agreement Holders Name & Number
- Payee number
IMPORTANT: The patient’s school must be selected from the available list (not typed manually).
If the school is not entered or correctly selected from the list, EXACT cannot calculate the amount to claim as the TFEA (Decile) Scores and Capitation fees are linked to the schools.
...
Creating a New School Record for OHSA
If a school is not in the list to select, you will need to create a new one, otherwise EXACT cannot calculate the amount to claim as the TFEA (Decile) Scores and Capitation fees are linked to the school.
...
- Open any patient’s file.
- On the Details tab, click in the 'School' field then click on the 'List' button
 .
.
A window like the following example will be displayed:
- Click on the
 button the button in the bottom right corner.A window like the following example will appear:
- Enter the school’s DescriptionName, School Code and TFEA (Decile) Score. Click ‘OK’ to save the new record.
- Click ‘OK’ again to save the amended school list.