Search these help files
| The Medical Tab is designed to facilitate fast access to a patient's medical history. |

![]() Video Medical Tab and History Upgrade (requires portal Login)
Video Medical Tab and History Upgrade (requires portal Login)
![]() Training Competencies Checklist
Training Competencies Checklist ![]()
Overview
Purpose
The Patient File Medical tab is designed to
- Promote a standardised workflow for patient medical activities.
- Provide exceptionally quick access to patient medical records.
- Provide strong auditing of historical data.
From this tab users can both display and record the patient’s medical details.

Features
Customisation |
|
Multiple Medical History Form options |
|
Mark Medical records as Reviewed,even if they haven't been edited | Providers can record that they have Reviewed a patient's medical record, whether or not they changed that record. Nurses without edit permissions can record that they have Reviewed read-only medical records. |
Audit trail |
|
Screens per region |
|
Coloured status indicators |
|
Medical icon |
|
Convenient tooltip summary |
|
List of changes |
|
Button to update the Medical History |
|
Medical Notes |
|
View and edit patient preferences |
|
Benefits
Users can review Medical Histories and record them as reviewed
From v11.10 EXACT includes a means of recording that Medical History records have been Reviewed.
Providers can record that they have Reviewed a patient's medical record, whether or not they changed that record.
Nurses without edit permissions can record that they have Reviewed read-only medical records.
Users have immediate access to information
The interface has a flattened architecture, providing immediate access to medical information without users having to navigate through multiple menus or screens.
Detailed popup tooltips facilitate this quick access to information.
The primary immediate-access tool is the Medical History Tooltip, available as an instant display from any tab in the interface:

Users instantly notice the primary medical indicators
Medically significant indicators are specially highlighted and immediately noticeable. For example:
![]()
![]() The medical status icon changes colour and even flashes. Statuses include Alert and and Infectious.
The medical status icon changes colour and even flashes. Statuses include Alert and and Infectious.
![]() Status of the Medical Record is clearly indicated.
Status of the Medical Record is clearly indicated.
Primary medical information is visible from anywhere in the interface
The most important medical information has been migrated out of the medical interface into the toolbar, so that it is visible from anywhere in the EXACT interface:
From any tab in the interface, hover your mouse cursor over the medical icon in the button bar:
|
| ... a tooltip shows the patient's current medical status, medical history, and the most recent notes entered > |
|

Medical history screens can be customised to suit local requirements
- Users have the flexibility to create their own medical data entry screens.
- It is possible to search for patients with particular conditions through the contact list queries.
- It is possible to import medical history forms without having to install new software versions.
With a full audit trail it is possible to track changes to the medical records of each patient
The records of each patient display multiple fields, including the Provider who initiated each change. By activating an Audit trail you can also toggle a display of the voided items in italic type. For example:

Practitioners can also see the audit record of any marked Review when they check (tick) the Show Audit checkbox in the Medical tab:

Requirements
The Medical tab is available by default in EXACT.
Enhanced functionality is available from EXACT version 10.16. An upgrade to earlier version to v0.16 or later includes automated mapping of previous to new functions. For example:
- All existing entries from the Medication notes are moved to Notes (with medication symbol).
- Medical Notes are moved to Notes (with a clipboard symbol).
- The Medical History Text Field is moved to a Note (with a clipboard symbol).
- The Infectious text field is moved to a note with yellow cross.
- Medical History Questionnaires will be shown summarized, with a red cross next to them.
- Prescriptions will be shown with a pill bottle icon next to them.
- The functionality to Mark medical records as Reviewed is available from v11.10.
- The Advanced Medical History Form (with Yes / No / Don't know options) is available from v11.10.
Using
The Medical Tab screen layout

| |
| The Workspace Bar This is customisable, and you can Hide/Show it |
| The patient toolbar, with functions that are independent of tabs |
| Tabs |
| Medical Record Status, showing clearly if the patient records are in-date or not |
| Update patient Medical History Form - this is a detailed pop-up form with checkboxes |
| Add a Medical Note - these Notes will then display in the list on the Medical tab |
| Medical History List - this is a summary of the medical issues and notes, viewable in the Medical tab screen |
| Show an Audit Trail of voided Medical History items |
| Change default doctor or add a new doctor for patient |
| Configure the Medical History Form (requires permission to the Configure-Patient File screen) |
| View details of the highlighted list item, or edit it. |
| Specify patient Next Of Kin |
| View patient Anaesthetic Preference |
| Define the Medical Status Icon (appears in the patient toolbar above). Note: Hover the mouse cursor over this icon to see the Medical History (tooltip) |
Marking medical records as Reviewed
From v11.10 EXACT includes a means of recording that Medical History records have been Reviewed.
Providers can record that they have Reviewed a patient's medical record, whether or not they changed that record.
Nurses without edit permissions can record that they have Reviewed read-only medical records.
Example: a patient's medical record was created 12 months ago.
At today's appointment the Nurse orally reviews the medical record with the patient.
The nurse selects a Mark as Reviewed button to record that the record still applies and is unchanged.
Mark as Reviewed:
Each time a Provider or a nurse opens an existing medical history form on screen, they will see an option to mark the medical history as Reviewed:
Nurse or Provider, from a read-only Medical History Form
| Provider, from an updated or a new Medical History Form
|

Audit record of the Review:
Practitioners can see the audit record of any marked Review when they check (tick) the Show Audit checkbox in the Medical tab:
Circumstances where Mark as Reviewed applies:
- From the medical history tooltip.
- From a read-only view of a patient's Medical History Form.
- From creation of a new patient Medical History Form.
- From update of a patient's Medical History Form.
- From Clinipad Medical History Forms.
To record the Medical Record as Reviewed from the tooltip
- Hover your mouse cursor over the medical alert icon
- Check the patient's medical details against those displayed in the tooltip.
- Click the Mark as Reviewed button:

If your Medical History List has Show Audit checked (ticked) you will see a record of your review in the List.
To record the Medical History Form as Reviewed, without updating
- Check the patient's medical details.
- Open the Medical History Form:

The Medical History Form will open in read-only mode.
- Click the Mark as Reviewed button:


Clinipad:

To create, save and mark the Medical History Form as Reviewed
This is optional for Providers.
- Open the form, review the medical details with the patient and check all appropriate checkboxes.
You'll see an additional checkbox at the bottom of the form - Reviewed by [PROVIDER]:

- To save without a Review record, simply click the Save button.
- To both Save and record the Form as Reviewed,
- Check the checkbox.
You will see the Save button change to a Save as reviewed button.
- Click the Save as reviewed button

- Check the checkbox.
Viewing the Medical Status Icon

![]()
To instantly view MEDICAL STATUS from any tab in the patient desktop
The medical status icon is accessible from all of the tabs in the Patient file, providing a quick visual indication of the patient's medical condition and the status of their medical record.
To instantly view MEDICAL HISTORY from any tab in the Patient desktop
Hover your mouse cursor over the medical icon to display a Medical History (tooltip), showing a summary of the patient's current medical status, medical history, and the most recent notes entered:
| > |
|
When you move your cursor away, the tooltip disappears. You can also click the icon to open the summary on the screen (you will need to click a Close button to close it).
The Medical Status icon can be activated or changed from the bottom right of the Medical tab screen.
Icon states:
| There is no medical history information recorded for this patient. |
| The medical history is up to date, and there are no alerts (for infectious diseases or medical conditions). |
| Medical history up to date, infectious alert. |
| Medical history up to date, medical condition alert. |
| Flashing between Yellow and Red indicates that both Infectious and Alert have been set. |
| Any of the three statuses can also have a note icon attached, which shows the record needs updating. This can be because the medical notes are more than the set number of months overdue, or because someone has ticked the Update Medical History at next opportunity checkbox at the top of the screen. |
Activate / change the Medical Status icon
The medical Status icon is an important feature of the EXACT interface, providing instant medical status information, and functioning as a launch point for the Medical History (Tooltip).
To activate or change the medical status icon
Open the Medical tab and click the appropriate icon(s) at the bottom right of the screen:


The yellow and red icons can both be active at once, and the user settings configured to alternately flash each one, so that you are aware both conditions apply.
All changes are audited
Each time that you change this field, the change is written to the medical history list in the form of "Alert set to on" or "Infectious set to off".
The entry is automatically marked as void, so it only shows in the Medical History List when you tick the Show Audit check box.
To activate / de-activate the flashing of the Medical Status Icon
The flashing property of this icon can be activated or de-activated per EXACT system user.
- Select Configure > User settings...
- From the user Settings screen, under the Patient File area, select or de-select the Med Alert Flashing field:


- Re-start EXACT for the settings to take effect.
Viewing the Medical Record Status
What is the Medical Record Status?
Medical records need to be kept up to date. The Medical Record Status is a highly visible indication of how in-date a patient's medical record is. It indicates whether the record is in date, needs to be updated, or has not yet been created.
Location
The current status of the patient's medical record, (with the date it was last updated), displays at the top-left of the Medical tab screen, colour-coded for easy visual identification:


Statuses
Records are up-to-date. |
Records are older than the specified age, or the Update Medical History at next opportunity checkbox next to it is ticked (you can place a tick in this checkbox to force an update of the patient's medical record). |
Medical details have never been entered (this status may also appear as a blank yellow bar). |
Prompt to Update Medical History at next opportunity
You can optionally prompt an update of the medical history form for a patient:

![]()
Select (check) this check box to inform the system that the medical history form is out if date (even if it isn't), or the system has no limit set for updating medical histories.
The system will automatically uncheck this checkbox when the medical history is updated.
How do you update the Medical Record?
Either
- Click the
 button at the top of the Medical tab, or
 - Hover the mouse cursor over the medical icon then click the button there.
Viewing the Medical History tooltip
To temporarily display a summary of the Medical History
From any tab in the interface, hover your mouse cursor over the medical icon in the button bar:
|
| ... a tooltip shows the patient's current medical status, medical history, and the most recent notes entered > |
|
The tooltip will continue to display as long as the mouse cursor remains over the icon or the tooltip itself.

The tooltip display depends on what medical history has been configured (the top area), and what notes have been created for this patient (the area below the line).
From version 11 Medical Notes can be hidden from the tooltip, although they (and their historical iterations) will always be viewable in the Medical Tab.
From v11.10 the display has a Mark as Reviewed button - click this to indicate that the medical conditions apply as at today's date.
Actions that you can perform in the Medical History tooltip:
To update /Edit the Medical History configuration:
Click the Update Medical History button ![]() to open the Update patient medical history dialog, where you can specify the custom screen used for the medical questionnaire, and customise other settings.
to open the Update patient medical history dialog, where you can specify the custom screen used for the medical questionnaire, and customise other settings.
To record the Medical Record as Reviewed (from the tooltip)
(For example, it was updated 12 months ago, and at today's appointment you have confirmed that the record still applies at today's date)
- Check the patient's medical details.
- Click the Mark as Reviewed button:
If your Medical History List has Show Audit checked (ticked) you will see a record of your review in the List:
To add a Note or a pop-up note for this patient:
Click the Add Note button and complete the Add Note dialog.
You can also add a pop-up note so that when you open this patient's records a note will appear automatically on the screen.
To OPEN a summary of the Medical History
Click the medical icon ![]() in the button bar.
in the button bar.
Although the same information is displayed, the tooltip now has a ![]() button, and will continue to be displayed until this button is clicked, or click the
button, and will continue to be displayed until this button is clicked, or click the ![]() button to edit the medical history, or the
button to edit the medical history, or the ![]() button to add a note.
button to add a note.
Note: The ![]() button and
button and ![]() button are also available on the Medical tab itself.
button are also available on the Medical tab itself.
Medical Notes
The Medical Notes facility is for adding notes and pop-up notes to the patient record.
The note type is differentiated by icon: ![]()
![]()
![]()
![]()
![]()
![]()
![]() .
.
Because there needs to be a complete audit trail of Medical Notes, the software does not allow deletion.
However, from EXACT version 11, Medical Notes can be edited in a way to hide them from the Medical History tooltip.
All iterations of a Medical Note (full history) can be viewed by means of the Show Audit option in the Medical tab.
Adding a Medical Note
The Notes feature enables you to add various notes to a patient's file to record information, and as reminders to yourself or other staff of important information. Notes can be configured to pop up under specified circumstances
To add a medical Note
- Access the Add Notes window by any of these means:
- From anywhere the
 button is available (is in the menu bar above the tabs), or
 - Click the
 button on the Medical tab or on the Medical History Tooltip, or
 - Add a Note by means of the Notes tab.
- From anywhere the

Entry Date | This defaults to today's date when you open the dialog. | |
Entry Time | This defaults to the time the 'Add Notes' dialog was first accessed. | |
Entered By | This defaults to the name of the currently logged-in user. | |
Pop-up Note | Click this checkbox box if the note is to be a pop-up note. This will cause the note to be displayed whenever the patient's record is accessed in EXACT. When 'Pop-up Note' is selected, the pop-up options below become active. (See also To Create a Pop Up Note) | |
Colour | Applies to pop-up notes, and allows you to select a background colour for the note from the drop-down menu. | |
Pop-up Options | Click this button to view and select the options governing the pop-up note's behaviour - when it is to be displayed (based on which trigger/s), and for which EXACT users. | |
Notes | You can choose a note type by clicking on the appropriate icon above the entry box: | |
| ||
| ||
| ||
| ||
| ||
| ||
| ||
| Click a pre-set Quick Note template name in the list at the right, then click the 'Move Left' button to add the note text to the text box. You can then edit the text as required. | |
When you have finished with the 'Add Note' dialog, click the | ||
Hiding a Medical Note from Medical History Tooltip
It is not possible to delete a Medical Note, but you can hide it from the Medical History tooltip.

To hide a Medical Note from the Medical History Tooltip
- Select the Note.
- Click the Edit button
 .
. - Replace the Note text contents with either a dash "-" or the word "ERASED", and press Enter.

- Click OK.
- This note will then normally not be visible in the Medical History Tooltip, but will be visible in the Medical tab:

All of its historical iterations will be visible in the Medical tab when you check (tick) the Show Audit checkbox:

Viewing and using the Medical History List
The list of medical details and notes is in the main part of the Medical tab screen, arranged by date:


List contents
The list contains the patient medical history and notes, including
- Medical History Questionnaires
- Medical History Scanned Forms
- Notes
- Prescriptions
To view pop-up details of listed items
You can double-click most item types in this list to view a more detailed popup.
NOTE: There is no popup for prescriptions - you will see one line for each prescribed item though, and text as will fit on the remainder of the line. In most cases there is nothing further to show because the window is full width.
The Type column has a graphic and label to show what medical details were entered on that date:
|
|
|
|
|
|
|
|
Actions that you can perform in the Medical History List:
To Sort the list
The list is only sorted by Date, by default with the most recent at the top.
Optionally click the Date column header to toggle the sort order:
![]() Most recent record at the top.
Most recent record at the top.
![]() Oldest record at the top.
Oldest record at the top.
To Add a Note or a pop-up note for this patient:
Click the Add Note button and complete the Add Note dialog.
You can also add a pop-up note so that when you open this patient's records a note will appear automatically on the screen.
To customise the column display:
Click ![]() and then hide / show / re-order the display columns.
and then hide / show / re-order the display columns.
To view the full details of listed medical history items:
Double-click the listed item, or select / highlight it and then click the ![]() button to view all details.
button to view all details.
NOTE: There is no popup for prescriptions as most prescription information is already visible.
To edit a selected / highlighted list item (apart from a prescription):
Click the ![]() button or press CTRL-E.
button or press CTRL-E.
This will open the record, and after you edit it, it will save under today's date.
To view the previous (unedited) details, tick the Show Audit checkbox. The original record details are distinguished by being shown in italic type.
To show an Audit trail (history) of items in this list:
Select ![]() Show Audit. The historical details of each item display in italic type. For example:
Show Audit. The historical details of each item display in italic type. For example:

To update / edit the Medical History configuration:
Click the ![]() 'spanner' button to open the Medical History Configuration dialog, where you can specify the custom screen used for the medical questionnaire, and customise other settings.
'spanner' button to open the Medical History Configuration dialog, where you can specify the custom screen used for the medical questionnaire, and customise other settings.
Customising the display for the Medical History List
- Click
 to display the Column Settings window
- Follow the instructions in the window and then click OK.
Showing an Audit Trail of Medical History
- Select
 Show Audit.
The historical details of each voided item displays in italic type. For example:
- To hide the Audit again, de-select
 Show Audit.
Viewing full details of a Medical History item
This applies to the listed Medical History type:

- Either double-click the listed Medical History item,
- or -
- Select it and then click the
 button.
A read-only pop-up displays details on that item. For example:


Editing a Medical History List item
Requirements and limitations:
- It is possible to edit all items except prescriptions.
- The edit button is access controlled from the Add/Edit Medical Histories field in Configure > Security:

To edit an item in the Medical History List
- Select the listed item (except for prescriptions).
- Click the Edit icon
 and then update the screen that displays (this is the same as that item's initial creation screen).
The edit item will be saved with the current date and time, and the current user login.
Viewing FULL or SUMMARISED Medical History List
The Medical History List is often complex and large. To facilitate this form fitting on the screen, by default EXACT displays a summarised version, with just the ticked fields listed.
However, you can optionally change the default value to display the FULL Medical History, as described below.
This setting affects both
...the Medical History Tooltip: | ... and the Medical History List: |
|
|


To toggle between viewing the full Medical History and the summarised version
- Select Configure > Custom Screens...
- From the Custom Screens window, either double-click the Medical History, or select it and then click the Edit button:

- In the Edit Custom Screen, either select or de-select Do not summarise, depending on which you require:
 Do not summarise This shows the summarised version.
 Do not summarise This shows the full version.
- Click OK and return to the Main screen.
Updating Patient Medical History Form
The system may require you to update the patient's medical history if you have Prompted to update the Medical History at the next opportunity.
Or you can at any time manually update the patient's history.
Option to update by means of a printed form:
You may wish instead to print out a questionnaire and have the patient fill it out before the appointment, and you can then enter the results into EXACT at a later time.
To update a patient's Medical History
Click the Update Medical History button ![]() on either the Medical tab or the Tooltip:
on either the Medical tab or the Tooltip:
| or |
|


The practice's current medical history custom screen for that patient displays.
This custom screen has been pre-selected from options in the Medical History Configuration settings.
See Medical History Configuration for form options: Simple, Default and Advanced.
In most cases, you can update the screen by simply clicking options on-screen. Note that instead of a simple OK button, you are required to confirm changes by means of a dated button:
![]()
Sample Medical History Forms
Simple:

Default:

Advanced (showing completion):

This Advanced form provides three options for each parameter: Yes, No and Neither (Don't know)

Printing patient details, with Medical History
Upgrades to this report:
EXACT v12.3 SP5
From EXACT v11.3 SP5 there is an option to print an audit trail of all medical history entries for a patient, by means of the Include all medical history checkbox in the Print Patient Details screen.
EXACT v12.8
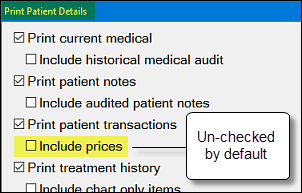
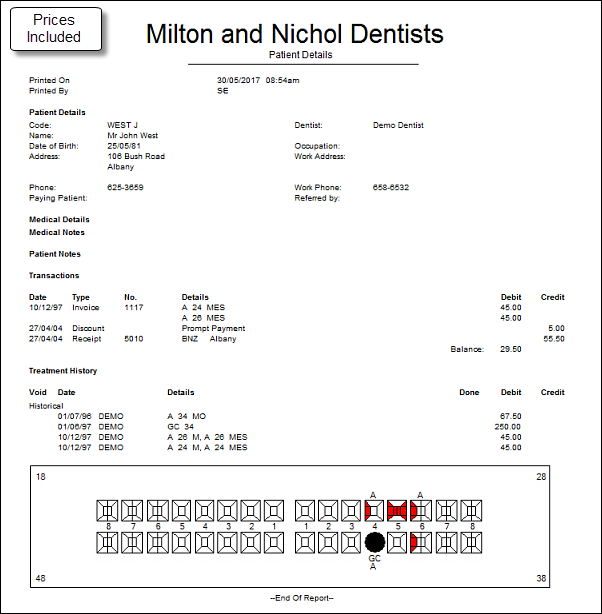
From v12.8 the Print Patient Details dialog has a checkbox option to ![]() Include Pricing. This is a sub-option underneath
Include Pricing. This is a sub-option underneath ![]() Print patient Transactions and applies to ALL Pricing:
Print patient Transactions and applies to ALL Pricing:
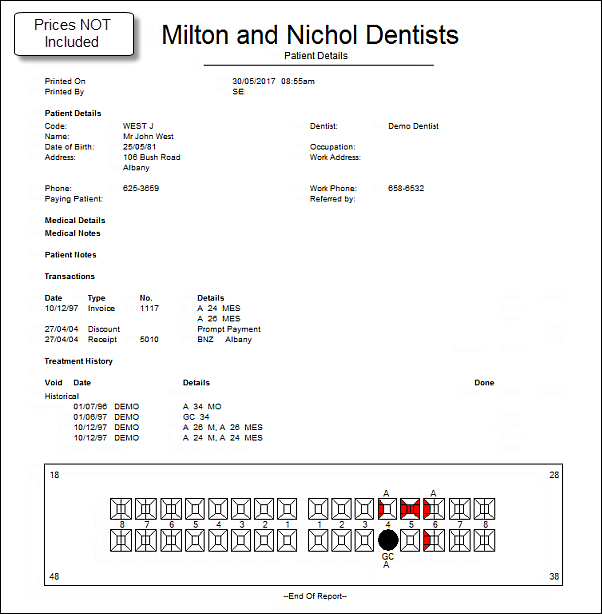
Scenario for not printing prices: The practice is moving areas/Dentists, the treatment history is required, but the estranged Dentist does not want to show the price of services.
This report uses the SOEstd1.408 layout:
Configure > Printing Setup... Reports tab and Edit window:


Some practices will now be automatically switched to the default Print Patient Details Report
The standard Patient Details Report historically had option of hiding prices, so practices that did not want to print prices had to choose the No$ layout file, which shipped as a selectable layout within EXACT.
These practices are now able to use the default Print Patient Details Report. To this end, on upgrade to v12.8 the EXACT software automatically switches to the new SOEstd1.408 layout even if the practice is using a customised PRX.
IMPORTANT: EXACT automatically switches the VREPORT.layout value to SOEstd1.408, even if your practice is using a customised PRX for VREPORT.layout. If this applies to you and you wish to continue using your custom PRX, you will need to manually switch back to your custom PRX layout after upgrading.
To print Patient Details
With a Patient selected in the Patient desktop, select the Print button.

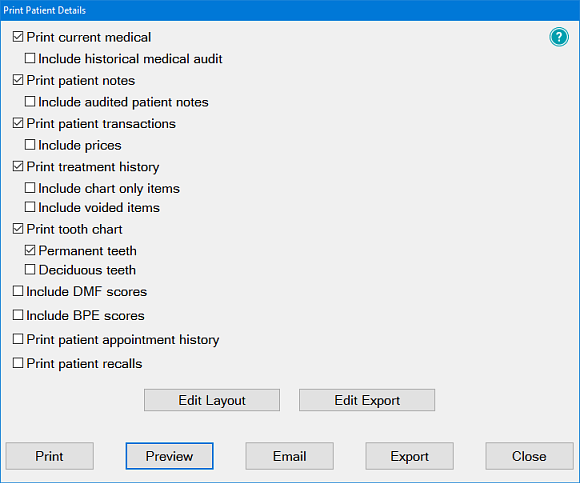
The Print Patient Details Screen displays:
This window allows you to print the currently selected patient's details by clicking the Print button ![]() in screens such as the Patient Details window, the Contact List window and the Recall Lists window.
in screens such as the Patient Details window, the Contact List window and the Recall Lists window.
TIP: You can also view the details rather than printing them, by selecting the Preview button (see below). This option is useful for seeing what each of the report options does to the printed output before you make your final selection and click the Print button.
The patient's basic details (name, date of birth, address, contact details, last recall date) will be printed. In addition, any or all of the following options may be selected to be viewed or printed out:
| Select this option to print a summary of the patient's medical details, including medical history, their medical record (or a note to say if it has not been initialised); any infectious notes, current medication, and any medical notes. |
| This is intended for audit purposes, and not for transferring data to another clinician. If you check this checkbox, the printout will have ALL historical medical history entries, including those that were changed within the same day (whether from error correction or update). |
| This option will print any patient notes (as recorded on the Notes Tab of the Patient Details window). |
| Select this option for a summary of the patient's transactions, including invoices, receipts, estimates, etc., and what treatment the transactions relate to. |
| Show the prices of services on the report. |
| Click this option for a summary of the patient's treatment history, including historical and current treatment and their charges. If you wish to include individual Chart only items (those items recorded on a patient's chart to represent existing conditions), and/or voided treatment items, click the appropriate checkbox. |
| Click this option to print a representation of the patient's tooth chart, using the checkboxes to choose to show either deciduous or permanent teeth or both. |
| Click on this checkbox if you wish to include the patient's DMF (Decayed, Missing, Filled) scores from their Perio tab. |
| Click on this checkbox to include the current patient's Basic Periodontal Exam score in the Patient Details report. |
| Tick this option to display/print the patient's appointment dates, times, which provider the appointment was with, and the appointment status. |
| Click the 'Print' button to send a copy of the Patient Details to the printer. |
| Click the 'Preview' button to view the Patient Details on the screen. If you wish to print the details after viewing them, there is another 'Print' button on the Preview screen, or you can print an individual page of the preview screen. |
| Click the 'Email' button if you wish to email the patient details to the patient, with a copy to the specialist if required. |
| Click the 'Export' button if you wish to export the report from EXACT as a 'csv' file, to be opened by other applications such as a spreadsheet program. |
| If you wish to exit from the 'Print Patient Details' dialog, click this button. |
Sample print output:
Further options:
Select the Preview button to view the details rather than printing them. This option is useful to see what each of the report options does to the printed output before you make your final selection and click the 'Print' button.
Select the Export button to export a .CSV file with the patient details
Printing an Audit of All Medical History
(EXACT v11.3 SP5 and later)
This is intended for audit purposes, and not for transferring data to another clinician.
The printout will have ALL historical medical history entries, including those that were changed within the same day (whether from error correction or update).
To print an audit of ALL Medical History
- With a Patient selected in the Patient desktop, select the Print button.
The Print Patient Details Screen displays:

- Print as normal, being sure to check (tick) both Print patient medical and Include all medical history checkboxes:

Sample output:

Exporting patient details, with Medical History
This enables a user to export patient details (including medical history) to a .CSV file.
To export patient details and Medical History to a .CSV file
- Click the
 Print button from any screens where it is accessible, to display the Print Patient Details print dialog.
 - Select the Print treatment history option.
- Optionally select the Include chart only items and Include voided items.

- Select the Export button.
- Specify a filename and location for the .CSV file, and select the Save button.
- Follow any prompts that appear.
The .CSV file will open automatically on creation.
Further options:
Select the Print button to print the selection.
Select the Preview button to view the details rather than printing them. This option is useful to see what each of the report options does to the printed output before you make your final selection and click the 'Print' button.
Configuring a printable patient Medical History
You may need to configure a printable version of the questionnaire for a patient to complete, and to allocate time before the patient's next appointment so that there is time for their history to be updated.
Both of these can be configured from the Medical History Configuration screen, which you access from the Medical tab:

![]()
To configure a printable form for the patient's Medical History:
- First ensure that a printable custom Medical History Form has been created from the Patient File Configuration > Custom Medical Questionnaire.
If you need to create a new custom screen, or edit an existing one, you can do this (provided you have the appropriate security permissions) via the Configure > Custom Screens menu item.
- In the Medical tab, click the Configure (spanner)
 button to open the Medical History Configuration screen, and then select the Custom Medical History option:
- Specify the custom screen used for the medical questionnaire by any of these methods:
- Select from the dropdown menu:

- Type the appropriate code.
- Select with the
 (up/down) buttons.
 - Click the
 (List) button to display the available options, select an option, and then click OK:
This questionnaire has been configured from the Patient File Configuration > Custom Medical Questionnaire. If you need to create a new custom screen, or edit an existing one, you can do this (provided you have the appropriate security permissions) via the Configure > Custom Screens menu item.
- Select from the dropdown menu:
- Browse for the Printable Version. This allows you to specify the name of the document template file that can be printed. Enter the name of the template file, or click the
 button to open the Document Details window to find it or to create a new one.
 - If you wish to have the patient answer a medical questionnaire at their next appointment, you can allow extra time for this prior to their next appointment. To do this, specify how many minutes early they are required to be, in the If MH needed request pt come in x minutes early field.
This extra time consideration propagates through to both SMS and Letter reminders, with a merge field that states "Please arrive XX minutes before your appointment time to update your medical history."
Changing default Doctor or adding New Doctor
If configured, the patient's default doctor displays at the bottom of the Medical tab screen:


To change the default doctor
- Click in the Doctor text field to display selection controls:

- Select a doctor by either scrolling the records with the up/down arrows
 , or
, orclicking the Select a Doctor button
 and selecting from the View Doctors screen, from which to select a different doctor:
To add a New Doctor
- Select the View Doctors screen as described above.
- Click the
 button to display the Add Doctor dialog:
- Complete the fields and click OK.
The new Doctor will display in the View Doctors window
Specifying patient Next Of Kin
To specify a non-patient as Next Of Kin
In the Medical tab, click the Non-patient radio button and then type details in the text box that displays:


To specify a patient as Next Of Kin
- Click the Patient radio button and then click in the text box to display the selection controls:

- Use the (up/down) buttons or
use the
(List) button to display the View patients window, from where to select the patient's name:
View/set patient Anaesthetic Preference
If the patient has a particular preference for a specific type of local anaesthetic, view / type it in the Ana. Pref text box at bottom right of the Medical tab screen:

![]()
All changes are audited
Each time that you change this field, the change is written to the medical history list in the form of Date/time, User, and a comment "Ana. Pref changed to xxxx"
The Entry is automatically marked as void, so it only shows when you tick the Show Audit check box.
Configuring
Configuring Medical History
IMPORTANT: If you want to change your Fixed Medical History Form between Simple, Default and Advanced be aware that prior medical history information will not be retained on the new form, which will start from blank. 
(EXACT will warn you of this fact when you attempt to change)
Tthere is an option to require that the Medical History be reviewed in the surgery, and if this is required, whether a Dentist counter-signature is required on the form.
An Advanced version of the form allows three answer options: Yes, No and Don't Know:
This form also expands on some of the answers to prompt the patient to answer more fully. For example the Hepatitis field now asks about Hepatitis A,B,C or D, and the Blood pressure field now prompts for high or low blood pressure.
Configuration Options:
The Medical History configuration is per Provider. i.e. Providers in your practice can use different configurations.
From the Medical History Configuration you can configure as follows:
- Set an alert for overdue medical notes (this can also be done from the Configure > Patient File screen).
- Choose whether to customise a form or select a fixed template.
- If using a custom form, specify the custom screen used for the medical questionnaire.
- If using a Fixed form, select from options: Simple, Default and Advanced (see samples below)
- For Clinipad, require that the Medical History Form be reviewed in the surgery by a Dentist.
- With this option, also require that the Dentist counter-sign the form after reviewing it with the patient.
- By default the Receptionist will be prompted at patient arrival to complete a medical history form, but this can be disabled so that it is not prompted.
To configure Arrival procedures for Medical History
- Select either
Configure > Appointment Book > Arrival Options > Medical History
or
Patient File > Medical (tab) >
 :
:
Users without permissions to the Configure-Patient File screen will not see this configure icon.
This screen includes custom settings per user that were previously configurable in User Settings.
- Decide whether to use a Custom medical history form or a Fixed template.
----If Custom---- - Specify the custom screen used for the medical questionnaire (the system comes with a default screen, but this can be customised or you can create new screen options by means of the Configure > Custom Screens menu item):
Choose the required Medical Questionnaire by either
- Entering the appropriate code, or
- Using the (up/down) buttons, or
- Click the (List) button to display the available options, select an option, and then click OK:
This questionnaire has been configured from the Patient File Configuration > Custom Medical Questionnaire.TIP: If you need to create a new custom screen, or edit an existing one, you can do this (provided you have the appropriate security permissions) via the Configure > Custom Screens menu item.
----If Fixed---- - Select the Fixed Medical History radio button. You'll see that the drop down menu becomes accessible:
- Select either Simple, Default or Advanced option from the drop down menu (see screen samples further down this page):
Default is available from v11.3 SP5.
If you use Simple, on upgrade to v11.3 SP5, Simple will still remain applicable unless you change it.
Advanced is available from v11.10.IMPORTANT: If you want to change between these options, be aware that prior medical history information will not be retained on the new form, which will start from blank. EXACT will warn you of this fact when you change:

- Configure the Alert if necessary.
The Alert if Medical History is [x] months overdue field is by default set to a value of 1.
Consequently, Medical History will be prompted for update once a month, and the arrival window Send a Medical History form to Clinipad tick-box will be ticked by default, unless the patient has already completed their MedHist forms within the last month.

To disable this auto-prompt for a patient, set the value in the above field to 0, and click OK.
- Select a user from the User settings for dropdown list:
(The options that you configure in the User settings for box will apply to this Provider only)

- Checkbox - specify whether the Medical Alert must flash for this user.
Leave this box checked to cause the medical alert icon shown below to flash at the top of a patient’s details view if the patient has a medical condition. This is useful too in circumstances where a patient has both the medical and infectious alerts active, as it will alternate between each icon. However, some users prefer to have the flashing icon turned off as it can be distracting.

Prior to v11.10 this setting was in the Configure > User Settings window.
- Checkbox - specify whether the Medical History Form must open when this user selects Move to Chair to move the patient from reception to clinic.
If set, this option will cause the medical history tooltip to open in a window when either of the "Move to chair" buttons (Patient preview, or Sidebar appointment book) is clicked. This allows the provider to view the patient's medical history and update it if required.
Prior to v11.10 this setting was in the Configure > User Settings window.
(Clinipad only) Checkboxes - specify a strategy for this User's review of the Forms, with options as follows:

Clinician review and signature is not required.
The form only has a patient signature area.
The patient completes and signs the form independently in Reception and hands it back to the Receptionist.

In this scenario,
When the patient fills in the medical history form as part of the arrivals process, they are not asked to sign the form, and a PDF copy of the form is not created.
When the patient goes into the surgery and the dentist reviews the medical history, some text informs them that there is new medical data that needs to be signed.
Using the Update MedHist using Clinipad then sends the new data back to Clinipad where it can be reviewed with the patient, and this time there is a signature box present for the patient (but not for the Dentist in this scenario).
Once the patient signs this, Clinipad generates a PDF.

This scenario is exactly as the one above, but when the patient signature box appears, so does a signature box for the Dentist to counter-sign, after which EXACT generates the PDF.
- Select OK to save the Medical History Configuration.
Sample Medical History Forms
Simple:
Default:
Advanced (showing completion):
This Advanced form is available for both on screen and Clinipad.
It features questions with three answer options: Yes, No and Don't know:
It expands on some of the answers to prompt the patient to answer more fully. For example the Hepatitis field now asks about Hepatitis A,B,C or D, and the Blood pressure field now prompts for high or low blood pressure.
It has new fields for Hearing or Sight Impairment, Depression, Stroke, Nervous Problems, Tuberculosis, Severe Headaches and Cold Sores.
Open Medical History on 'Move to Chair'
When a patient moves from reception to the chair in the clinic, it is useful to have the patient's Medical History open automatically on the clinic screen. Most Providers will particularly want to review this Medical History with new patients.
This automated display can be optionally configured from the Medical History Configuration window.
If set, this option will cause the medical history tooltip to open in a window when a user selects either of these buttons:
- Patient preview > Move to chair.
- Side bar appointment book > Move to chair.
To configure an auto-display of the Medical History on Move To Chair
- From the Medical tab, click the Configure button to open the Medical History Configuration.
NOTE: Users without permissions to the Configure-Patient File screen will not see this configure icon.

From EXACT v11.9 this screen includes custom settings per user that were previously configurable in User Settings.
- Select a User from the dropdown list:
The options that you configure in the User settings for box will apply to this user only.
- Check (tick) Open Medical History on 'Move to Chair' to specify that the Medical History Form must open when this user selects Move to Chair to move the patient from reception to clinic:

- Click the OK button to save.
- Repeat this procedure for all applicable users.