Patient prescriptions are issued, stored and viewed from the patient’s Prescriptions tab.
Any items that you wish to prescribe need to be added into EXACT.
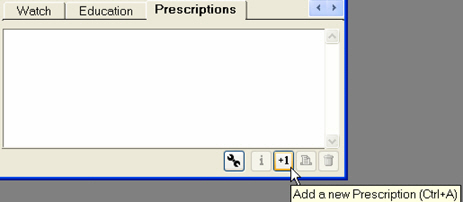
Hover your mouse over the tab to see a tooltip description:

To add prescription items:
Select Configure > Prescriptions.
Click the the +1 button

to display the Add Prescription window:
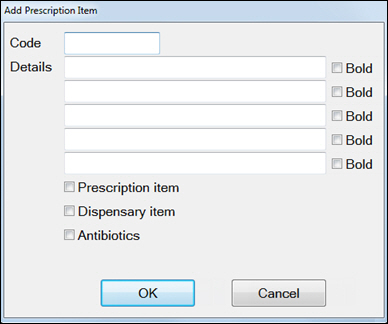
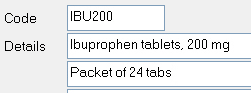
Enter an appropriate Code, description and other details (such as dosage instructions) in the Details field:
Check the Bold checkbox against any field that you want to display in EXACT in bold text.
Where appropriate, check checkboxes to identify this Item as a Prescription Item, Dispensary item or Antibiotics.
Click the OK button to save the details.
Issuing Prescriptions
Select the patient in the Patient Details window, and select the Chart tab.
Select the Prescriptions tab in either the upper or activity bar sub tabs (depending how you configured the Activity Bar / Sub Tabs).
At the bottom of the Prescriptions tab pane, click the +1 button (Add a new Prescription):
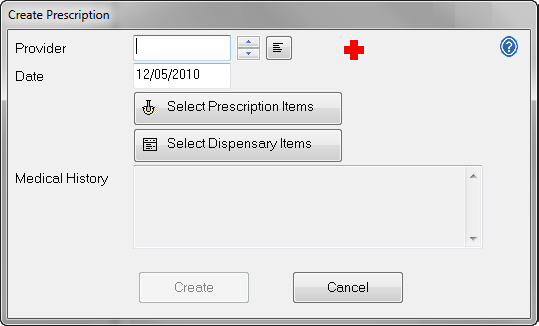
A Create Prescription window displays:
Notes:
If the patient has a medical alert displayed in their Patient Record, it will also be displayed in this window (as in the example above) in case the condition affects their medication.Any notes from their medical history will display at the bottom of the window.
Before prescribing any medication, check the patient’s full medical history. While some medical alert information is presented in the Prescription window, this is intended as a prompt when creating a prescription, and is not a substitute for reviewing the patient's full medical record in the Medical tab.
If you are logged in as a provider, your ID will automatically appear in the Provider field. If not, use the

list button to select the provider who is authorising the Prescription.
The Date field will already have today’s date. If the Prescription date is to be different, click in the field and use the

button to change it.
Click the Select Prescription Items button to select prescription items, or the Select Dispensary Items button to add items from the Dispensary.
The procedure for each is the same. A window displays:
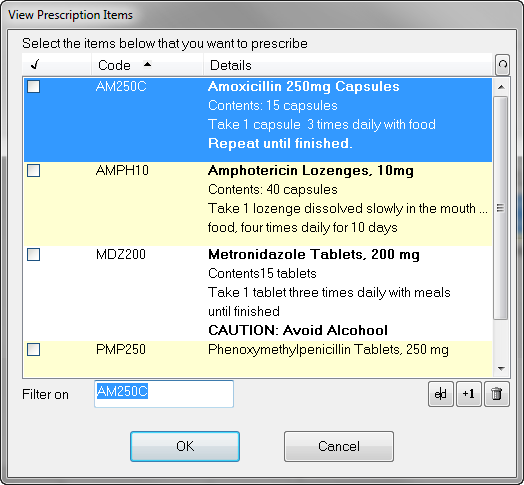
To select the items you wish to prescribe, click the checkbox next to the item. If you make a mistake, click a checkbox again to de-select that item.
If a listed item has incorrect details, highlight the item by clicking it and then clicking the

Edit button, and then editing the item.
If the item you want to prescribe is not listed, but you know its details , click the +1 button to open the Add Prescription window, and add the item. Once you have saved it to to the database, it will be listed in this window and you can add it to the patient's prescription.
TIP: If there is an existing item similar to one you wish to dispense or prescribe, you can choose this item and edit the details at the time you print the prescription or print the dispensary item.
When you have selected all the items you wish to prescribe to the current patient, click the OK button.
If you have just added prescription items and wish to add dispensary items as well, repeat the above procedure from the point of selecting the button, using the Select Dispensary Items button.
When you have completed adding all items, click the

Create button to create the prescription record.
Once a prescription is issued to a patient, a record is stored in the Prescriptions tab for future reference.
Viewing a Patient’s Prescriptions
Select a patient, open the ‘Chart’ tab and click on the ‘Prescriptions’ sub-tab in the activity area:
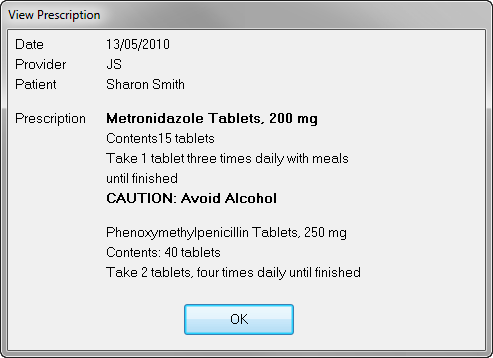
Double-click on any item to display it.
Print Prescriptions
The Print Prescription dialog enables you to print a patient's prescription once it has been issued (created).
If you have email enabled, you can also email a copy of the prescription to the patient, with a copy to the provider and/or specialist if required.
NOTE:
Before the prescription is printed, you can edit the details in the Print Prescription dialog window. This is useful if the prescribed item is slightly different from the item stored in EXACT, for example, if you wish to prescribe 20 antibiotic tablets and there is only an existing item with 30 tablets. Editing the quantity on the label saves you having to create a new item. The edited prescription details are saved against the patient's record rather than the original prescription item.
You cannot edit a prescription in this way if you are reprinting it.
Please contact SOE Support personnel if you need help to modify the layout to accommodate a new printer or label stock.
Procedure:
Due to limits of label space, up to three items can be included on each prescription. If the layout file (PRX) enables it, these are positioned so as to enable printing on a label.
The layout is able to be modified by users with appropriate security privileges, using the

button.
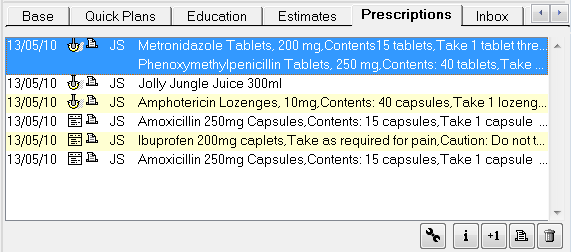
Once the prescription has been printed, the Prescription tab of the Chart window is updated to show what date the prescription was created, the first few words from the drug list, and is marked with a Print icon ![]() to indicate it has been printed:
to indicate it has been printed:

As can be seen from the example above, icons on each of the prescription lines give you an instant visual indication whether an item is a prescription item

or a dispensary item

.
Once a prescription has been printed, if required, you can click the

button to reprint it.
If you preview the prescription without printing it, EXACT doesn't 'know' that you have not printed it, so will mark the item as printed. In this case, use the print button to 'reprint' it as described above.
Printing a Dispensary Item
The Print Dispensary dialog enables you to print a patient's dispensary prescription once it has been issued (created). If you have email enabled, you can also email a copy of the prescription to the patient, with a copy to the provider and/or specialist if required.
NOTES:
Before the prescription is printed, you can edit the details in the 'Print Prescription' dialog window. This is useful if the prescribed item is slightly different from the item stored in EXACT, for example, if you wish to prescribe 20 antibiotic tablets and there is only an existing item with 30 tablets. Editing the quantity on the label saves you having to create a new item. The edited prescription details are saved against the patient's record rather than the original prescription item.
You cannot edit a prescription in this way if you are reprinting a prescription.
Please contact SOE Support personnel If you need help to modify the layout to accommodate a new printer or label stock.
Procedure:
Up to six items can be included on each dispensary prescription. The layout is able to be modified by users with appropriate security privileges, using the

button.
Once the prescription has been printed, the Prescription tab of the Chart window is updated to show what date the prescription was created, the first few words from the drug list, and is marked with an

icon, to indicate it has been printed:

As can be seen from the example above, icons on each of the prescription lines give you an instant visual indication whether an item is a prescription item

or a dispensary item

.
Once a prescription has been printed, if required, you can click the

button to reprint it.
If you preview the prescription without printing it, EXACT doesn't 'know' you have not printed it, so will mark the item as printed. In this case, use the print button to 'reprint' it as described above.