Its important to be able to see the treatment history for a patient. There a number of way to do this as shown below.
View Tooth History
Use the Quick Chart Menu to quickly view the history of tooth treatments.
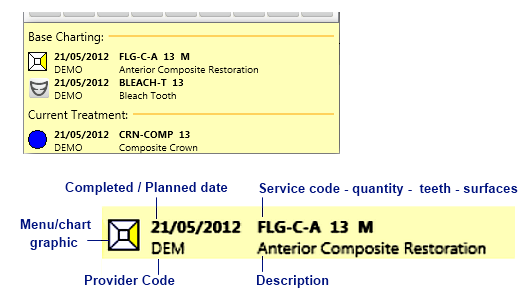
As you move focus from tooth to tooth, the menu includes a history differentiated into Base Charting, Historical Treatment (History of previous work, notes, Xrays on a tooth) and Current Treatment (treatments being added today in the current Treatment Plan).
History layout:
If the treatment list is too long for the screen, a scroll bar will appear on the right hand side of the treatment list. By default it will be scrolled to the bottom to show the most recent treatment.
To view details of History list items:
Double-click an item in this list to display a read-only window with the details. For example:

View Xray Image Displays with an EXAMINE Pro Installation
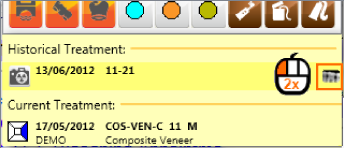
With EXAMINE Pro installed you may see an Xray icon, which you can use as follows:
Hover over the Xray icon to see a tooltip overlay of the Xray. Only one type of tooltip is shown at a time depending on where the user hovers i.e. only notes or only a custom screen or only an x-ray.

Double-click the icon to launch EXAMINE Pro image viewer to see the image/s in detail.
Treatment History
The View Patient History button is located above the Treatment Planning area between the 3D and New treatment plan buttons:
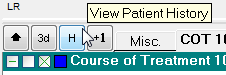
Select the View Patient History button to display the Tooth History window:
This shows a record of the patient’s historical and current treatment, including:
The date the treatment was completed or planned
The provider who completed or planned the work
A graphical representation of the service (if applicable)
The service code including tooth number and surfaces
Particulars of each line item
The total fee
The patient and payor portions of the total fee
Any clinical notes, invoice notes or custom screens that are attached to services.
Details of any treatment that has been flagged as Failed, for inclusion in the Clinical Audit (tick the Show Failed checkbox to display Failed treatments).
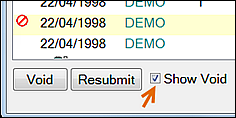
(Optional) Voided items - these are not deleted, simply hidden from view by default. Check the Show Void checkbox to view voided items, which are identified by the voided icon:

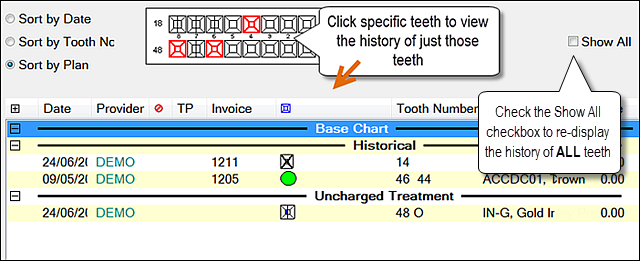
Treatment can be sorted in three ways:
 | Sort by Date arranges treatment carried out by date |
 | Sort by Tooth No groups treatment by tooth. |
 | Sort by Plan groups treatment within a Course of Treatment |
Historical Treatment is sectioned into areas for:
Base Chart items
Historical Chart items
Current uncharged treatment items
The Base and Historical sections display treatment that has been completed and either charged or added to history.
The Treatment Planning area displays treatment currently planned for the patient. The treatment text is displayed in the colour of the provider logged on when the treatment was charted.
To collapse and expand ALL sections of the history list
The list opens expanded and you can see all items.
Use the two buttons at bottom right to collapse all or expand all.
You can then use the normal + - icons to expand or collapse specific sections.
To display the history of specific teeth only
To search Treatment / Tooth History
Use the Search field to search for anything that matches the entered text, including Service names, Notes, Custom screens (both field names and data), and provider codes.
While the search uses exact matching, it is not case-sensitive. For example, searches for both EXAM or exam will match any of the following:
Full Examination
EXAME
Patient came in for exam and Xrays.
Once you click the search button the resulting matches display in a Search Results window:

The search text remains in the Search field until the Tooth History window is closed, enabling you to edit and refine your search criteria and conduct further searches
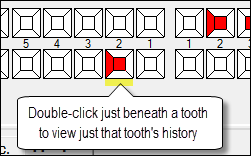
Viewing historical and current treatment for a specific tooth
From the Patient desk > Chart tab ensure that either the Permanent or Deciduous Tooth Chart is displayed.
Double-click just under or above the required tooth (i.e., not directly on the tooth itself), and the Treatment History window will open displaying only treatment for that tooth:
Reading Notes in Treatment / Tooth History
Where services have clinical notes attached, the symbol appears to the left.
The Tooth History window displays only the first four lines of each note - if a note is longer than four lines, three dots will appear next to the symbol.
Double-click the symbol to read the entire note.

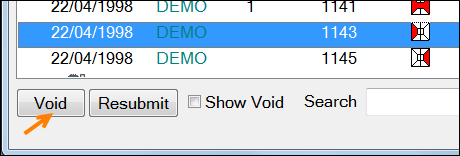
Voiding historical Treatment Items
Select the Treatment line to be voided
Click the Void button:
A warning will display:
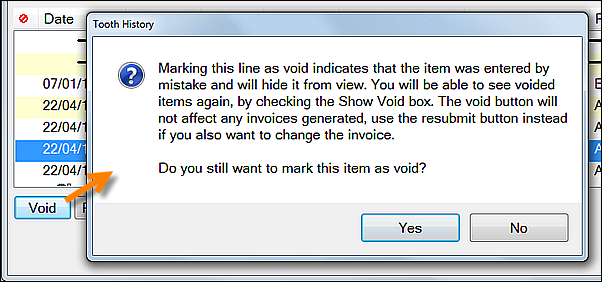
Click Yes to confirm that you wish to void this treatment or click No to return to the previous window.
NOTE: Voiding an item in history does not affect the patient’s account.
If the item to be removed has a related invoice that must also be altered, it is recommended that you first ask your administrator to correct the transaction before you void.
Depending on the method chosen, it may automatically void the treatment in clinical history for you.
To display voided Items
Items that have been voided are identified with a voided icon:

Voided items are not displayed by default in Treatment / Tooth History.
To display them, check (tick) the Show Void checkbox:

Displaying Voided Items
Items that have been voided are identified with a voided icon:

Voided items are not displayed by default in Treatment / Tooth History.
To display them, check (tick) the Show Void checkbox: