Quick Charting is useful to reduce the number of clicks and be able to do it in one area, speeding up the charting process.

The Quick Chart menu is a customisable hover menu that displays as you move your mouse cursor over the Tooth Chart, It provides an information summary and the capability to quickly apply both Services and Quick Plans to the highlighted tooth.
As you apply Services and Quick Plans to the chart, EXACT adds them to a Course of Treatment below the chart. Before using Quick Charting its important to configure it - Quick Charting Configuration
Hiding and Showing the Quick Chart Menu
To hide the Quick Chart Menu, Right-click the Quick Chart and select Hide Quick Chart Menu:

To show the Quick Chart Menu, Move your cursor over the chart, right-click the yellow tooltip and select Show Quick Chart Menu:

Move the Quick Chart Menu Across the Chart
To move the Quick Chart Menu by means of the mouse, Drag your mouse left and right to move the menu horizontally only:

To move the Quick Chart Menu by means of the keyboard

Use the left and right arrow keys to cycle through the teeth over multiple rows.
Using Quick Charting
All teeth are always visible on the chart:

The menu applies to the highlighted tooth only:

Each icon in the hover menu represents either a Service or a Quick Plan that can be quickly applied to the tooth. If you hover over the icon you will see a tooltip identifying that service or Quick Plan.

Quick Plan icons are identifiable by the triple lined overlay:

The Treatment menu.
This menu lists both Historical and Current Treatments for this tooth in the yellow Tooltip box.

You can configure the menu with a set of icons that best apply per patient. So, for example, you may load the menu with crown and bridge services when planning treatment for one patient, and load the menu with cosmetic services for another patient.
Quick Chart Features:
Add or remove services depending on the treatment you are planning.
Change the icons and colours for services.
Change the size of the Base menu and the Treatment menu, to be able to display more or less icons.
Multiple colours for Historical Treatment:
Historical treatments are illustrated in different colours, These colours are set in the Service Item window.

Blue is the default colour for current / planned Treatment:

Assign Services to Teeth
To assign services to teeth in the chart
Either
Select a service as described above and left-click, right-click or double-click a tooth area to chart the service to that area, or double-click the service to apply it
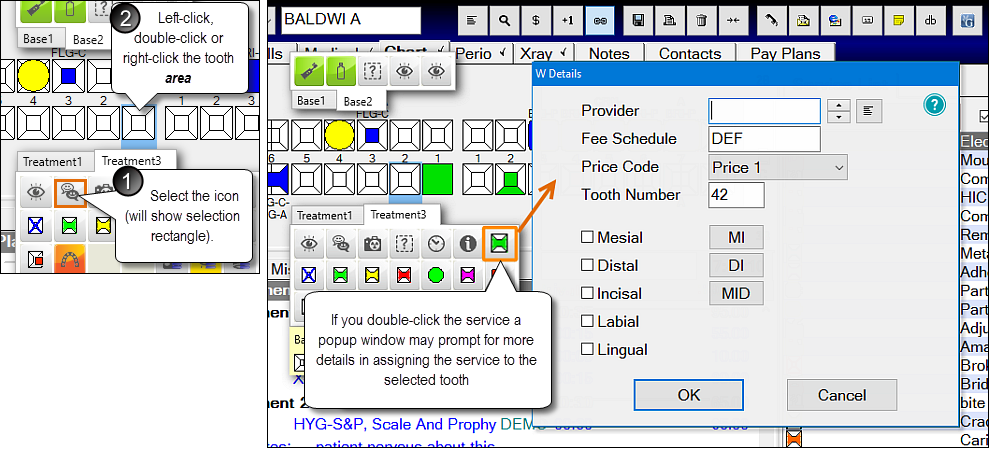
The service colour highlight will appear on the tooth.
While selected on the Quick Chart Menu this service is a toggle - click to apply and click again to remove the service, across multiple teeth.
Simultaneously, the service will be listed below the chart:

Because the service remains selected, click repeatedly to apply the same service to other teeth.
To remove a service from a tooth
(You must have the same service selected)
Check what service it is by hovering the mouse cursor over the service:

Select that same service from the Quick Chart Menu or from any other service list.
With that same service selected, left-click or right-click the service on the tooth to remove it.
Assign Services with Further Options
If you double-click some services, they have further applicable options than a simple click.
In these cases, you will see instructions on the resulting pop-up screen. For example:

Once Quick Charting is enabled and configured (view Quick Chart Configuration if this has not been configured) you can start charting with less clicks and spend less time searching through categories to find the treatment you need.
The Quick Chart menu is a customisable hover menu that displays as you move your mouse cursor over the Tooth Chart, It provides an information summary and the capability to quickly apply both Services and Quick Plans to the highlighted tooth.

Enabling Quick Charting (reveal/hide Quick Charting)
To enable Quick Charting, hover over a tooth and Right Click the yellow box displaying the tooth charting then click Show Quick Chart Menu.
To hide Quick Charting, hover over a tooth and Right Click the Quick Charting service or yellow box displaying the tooth charting then click Hide Quick Chart Menu.

Using Quick Charting
The tooth chart is always visible with Quick Charting displaying above and below (if this is not the case, review the help article Quick Charting hiding the Tooth Chart).

The menu applies to the highlighted tooth only:

Each icon in the hover menu represents either a Service or a Quick Plan that can be quickly applied to the tooth. If you hover over the icon you will see a tooltip identifying that service or Quick Plan.

Quick Plan icons are identifiable by the triple lined overlay:

The Treatment menu lists both Historical and current treatments for this tooth in the yellow Tooltip box.

Historical treatments are illustrated in different colours, to set these colours open the service item window
Navigate to Configure - Services and select the service from the list
ORHighglight the service in the Service List and click the e|d button
With a Chart Graphic selected, choose Set Colour... to determine the colour of a historical treatment.

Note: Charted services will stay as the planned colour (default colour is blue) until treatment is completed. |
Assigning Services to Teeth
There are two ways to assign a service to a tooth using Quick Charting,
Select a service then left or right-click in the area you wish to apply the service
Select a service then double-click the service to select FGI Details for the tooth to apply the service
The service colour will appear on the selected tooth
(Tip: With the service still selected, click again to toggle the service off/on the tooth.)Simultaneously, the service will be listed on the charting window
Once the service has been selected once, you can now chart the service across multiple teeth with a simple click over the required teeth. The service will remain selected until a different service is selected.


Removing Services from Teeth
Check what service has been charted by hovering the mouse cursor over the service
Select that same service from the Quick Chart Menu or from any other service list
With the same service selected, left-click or right-click the service on the tooth to remove it

Assigning Services with Further Options
If you double-click some services, they have further applicable options than a simple click.
In these cases, the pop-up screen will appear when you are charting the service.
