Adding Clinipad to the Workspace and Activity bar
Practitioners such as Receptionists who use Clinipad frequently are advised to add the Clinipad shortcut to the Workspace bar (at the top of the screen) and / or add the Clinipad Tab to the appointment book activity bar (below the appointment book), so that it is quickly accessible.
TIPS:
If you add the link to the Workspace bar users can access it from any screen.
For Receptionists the link is most useful on the Activity Bar (below the appointment book)
The procedure is the same for both areas.
To add the Clinipad Window shortcut to the workspace bar
...
Right-click the workspace bar and select Customise...
...
...
In the Select tabs dialogue, select the the Clinipad icon in the left pane and move it to right pane by clicking the >> button.
...
...
Position it in the right pane by moving it with the up and down arrows.
NOTE: This position determines the horizontal ordering of the shortcuts on the workspace bar.
...
Select the OK button.
Check that it displays as a shortcut on the workspace bar.
...
To add the Clinipad Tab to the appointment book activity bar
Click the Configure button at bottom right of the Appointment Book
In the Wizard, check (tick) Select tabs for your activity bar:

Click the Next> button, and then click the Next> button on the following screen.
In the Select tabs dialogue, select the the Clinipad icon in the left pane and move it to right pane by clicking the >> button.

Position it in the right pane by moving it with the up and down arrows.
NOTE: This position determines the horizontal ordering of the tabs on the appointment book activity bar.
Select the Finish button.
Check that it displays as a tab.

To configure Clinipad availability to computers
...
Clinipad arrival options integrate with the Appointment Workflow Arrivals Task List, presenting an electronic alternative to manual / paper-based arrival tasks.
The functionality of the arrivals task list is configured with the Appointment Workflow, so please refer to Configuring Appointment Arrival Options and its sub-topics.
To configure the Forms used on CliniPad go to Configure->Appointment Book.
...
Open the Consents tab and proceed as follows:
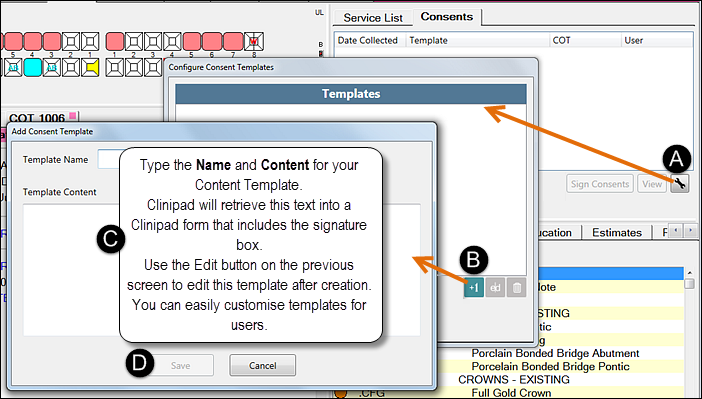
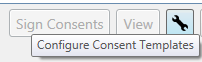
Select the Configure Consent Templates button to open the Configure Consent Templates window.
Select the +1 button to open the Add Consent Template window.
Type a Template Name and then type or paste the appropriate text for the Template Content.
Clinipad will use this text to populate a Consent Form, to which it will add a signature box.
Note that you can easily edit this template by means of the Edit button in the previous window.
When complete, select the Save button.
Repeat this procedure to create as many Consent Forms as required and then Close the templates window.
When you click the Templates window Close button you will not see these Form templates in the Consent tab - the tab is for displaying completed, signed Consents only.
Refer to Clinipad Consent Forms for details on how Clinicians use the template Consents.
...
Select Configure > Appointment Book, and in the Appointment Book Setup screen, select the Arrival Options button to display the Appointment Arrival Options window.
In the Appointment Arrival Options window, select the Contact Consent tab:

