How do I find an available appointment? | Example:
You have received a phone call from a patient who wishes to book an appointment with a particular provider, and want to search the appointment book for a vacant time slot. Options- View the appointment book for that provider, and look for available slots that suit the patient.
- Create an appointment on the clipboard, which automatically creates an entry in the Hold List. You can then use the Appointment Search function in the Hold List to find a suitable single appointment. See Using the Appointment Search Window.
- If you need to co-ordinate multiple patient appointments the procedure is slightly different - see Co-ordinating multiple patient appointments.
To create an appointment in the clipboard and the Hold list- Double-click the Clipboard to open the Edit Appointment window.
- In the Edit Appointment window, enter or select the patient's name.
- If the provider name is not defaulted, select the provider, and if known, the type of service.
- Click the Save button to create an appointment on the Clipboard and an entry in the Hold List.
|
How do I recall patients for an appointment? | The procedure below will guide you through the most common recall method: to send an SMS message to patients who have a mobile or SMS Home number in their patient record, and a letter to those who do not. Patients will each receive only one SMS message or one letter. If you need more information, or you wish to use other recall methods, please see the "Managing Recalls" section. To recall patients for an appointmentStep 1: Create a recall list. - From the Administration menu, select Manage Recalls...
- If any monthly total recall messages are displayed, click OK
 to close them. to close them.
Step 2: Select the patients to be recalled: - When the recall lists window displays, double-click the recall list.
- The list of patients in the recall list will be displayed. (Usually, you would contact them all, but if there are any you do not wish to be in the list, click the checkbox at the left-hand end of the line to remove them).
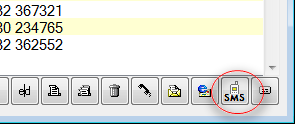
Step 3: Select and configure the SMS recall method: - At the bottom right-hand corner of the window, click on the SMS button:
 - The 'Contact by SMS' dialog is displayed:
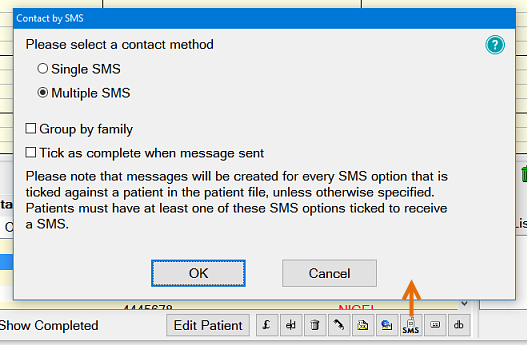
If you wish send family SMS's together, tick the 'Group by family' checkbox. - Click the button. The 'Contact Patients' window is displayed:
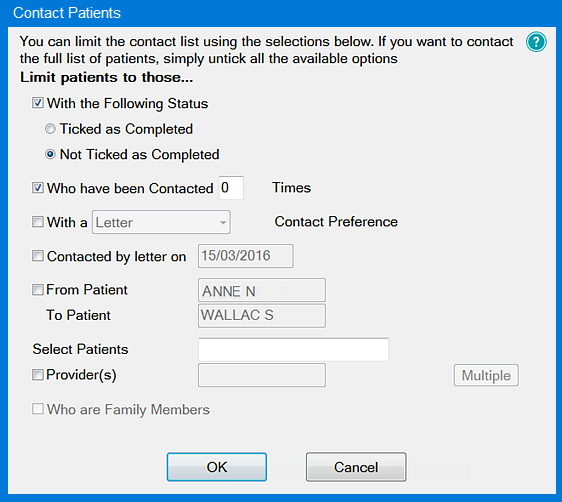 - Tick the checkbox next to "Who have been contacted ... times", make sure it says "0 times".
(This will ensure those patients who have already been contacted are not contacted again). - If you wish to limit the recalls to just those for a particular provider, or just a particular recall type, select the appropriate boxes, otherwise accept the other defaults.
- Click the button when done.
Step 4: Stagger SMS: what you choose for this option depends on how many patients were in your original list. 
- If the list is short, then select "Send all SMS straight away".
- If the list contained many patients, you can click "Stagger SMS sending", and edit the delivery times so that your receptionist isn't swamped with lots of patient reply calls all at once.
- Click the button when done.
Step 5: SMS Details 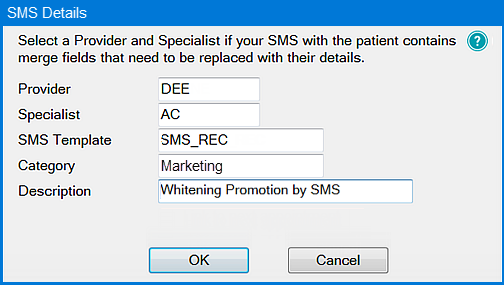
- If the defaulted Provider isn't the one the patient appointments are with, click in the 'Provider' field and either type the appropriate code, or use the (list) or (up/down) buttons to select the code.
Generally, merged information related to a specialist wouldn't be required for a recall, but if this is to appear in the SMS, select the appropriate code in this field.
The SMS template to be used for recalls can likewise be selected.
Category and Description are used on the Contacts tab and elsewhere in EXACT for easy identification of patient contacts (so that you can see what an SMS, letter, email, etc. are about without needing to open the items).
Click the button when done.
Step 6: Edit the SMS text and details: 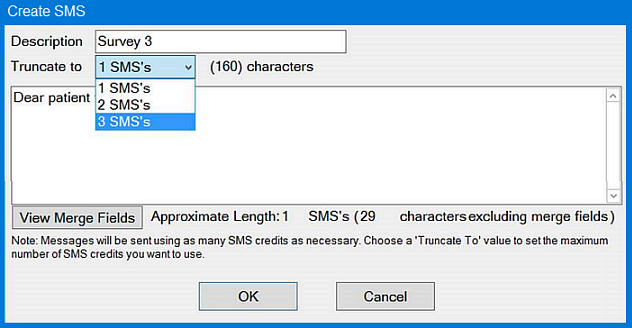
- If you wish this message to be sent as a 'Flash' message to phones that are Flash-enabled, click the checkbox. (This will mean the message is displayed immediately on the recipient's phone without them selecting it).
- Edit the message text if necessary. For example, because the merge fields may make the message longer than the 'Approximate Length' indicated, you may wish to change some of them to actual values so you get a better idea of actual length. In the message above, you could replace [practice.name] and [location.phone].
You may also wish to add extra information relevant to the recall, such as the preferred times to call the practice.
Step 7: Send the message. Once you have finished editing the message and clicked the button, the recall messages will be either sent immediately, or - if you have set up staggered recalls - queued for sending at scheduled times. If the latter, you can see them in the Email Outbox, by clicking on the Email outbox icon icon on the top right of the EXACT screen:

- If you wish to view more info about the SMS, you can hover your mouse cursor over the message to display a tooltip with the message contents.
- If you hover it over the graphic in the
 column, a tooltip will tell you when it is scheduled to be sent. column, a tooltip will tell you when it is scheduled to be sent. - If you hover it over the graphic in the
 column, a tooltip with the system status will be displayed. (In this example, there is an error because the connection to the gateway is not set up correctly). column, a tooltip with the system status will be displayed. (In this example, there is an error because the connection to the gateway is not set up correctly).
Step 8: Select patients to whom recall letters should be sent.  SMS appointment reminder sent to recipient SMS appointment reminder sent to recipient
 SMS message received by gateway (not yet delivered) SMS message received by gateway (not yet delivered)
 SMS delivery failed (where SOE is the SMS provider; password is wrong, insufficient credit, etc.) SMS delivery failed (where SOE is the SMS provider; password is wrong, insufficient credit, etc.)
 SMS status unknown (TXTConnecxions / Icetrak / 4Production) SMS status unknown (TXTConnecxions / Icetrak / 4Production)
 SMS failed or not sent to gateway. (With SOE as the SMS provider, if you are using staggered recalls, and there is a SMS failed or not sent to gateway. (With SOE as the SMS provider, if you are using staggered recalls, and there is a  clock symbol in the column this icon means that the SMS is waiting to be sent at the scheduled time.) clock symbol in the column this icon means that the SMS is waiting to be sent at the scheduled time.)
 SMS status unavailable (other SMS providers) SMS status unavailable (other SMS providers)
- For the remaining patients, the 'Contacts' column will be empty. These are the ones to whom a letter will be sent.
- Click the 'Write to the selected person' button:

The 'Contact by Letter' dialog is displayed:
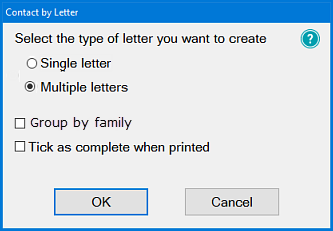 - Click the 'Group by Family' checkbox if you wish to have family member's letters printed together (for inclusion in one envelope), otherwise leave the default settings, and click the button.
- When the 'Contact Patients' dialog is once again displayed, tick the checkbox next to "Who have been contacted ... times", to make sure it says "0 times". (This will ensure those patients who have already been contacted by SMS are not contacted again).
- If you wish to limit the recalls to just those for a particular provider, or just a particular recall type, select the appropriate boxes, otherwise accept the other defaults.
- Click the button when done. The Document Details window is displayed.
Step 9: Document Details dialog - as with the SMS message, there are merge fields that are provider-specific, so you may need to select the appropriate provider. - From the templates displayed, choose the appropriate one for a recall letter.
- If you need to edit the details, click the
 button to edit the document. The document will be opened in Presentation Manager if it is installed. button to edit the document. The document will be opened in Presentation Manager if it is installed. - When the recall letters are ready to send, click the
 button to print them. If you need labels for the envelopes, you can click the Print Labels button button to print them. If you need labels for the envelopes, you can click the Print Labels button  to access the 'Print Mailing Labels' dialog. to access the 'Print Mailing Labels' dialog.
|
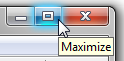
Where has my View Week gone? | Q: When I open my appointment book, the Week View pane at the top isn't showing. Where has it gone, and how do I get it back? A: It is still there, just hidden. This can happen if you (or someone else) maximised the Day View' area, so it is over the top of the Week View area. To re-display your View Week pane - Ensure that the appointment book is maximised by clicking the button at the top right-hand corner of the appointment book:
 - Move your mouse cursor anywhere over the bar at the top of the Day View area, so that it changes from a pointer into a cursor like this (see highlighted area below):
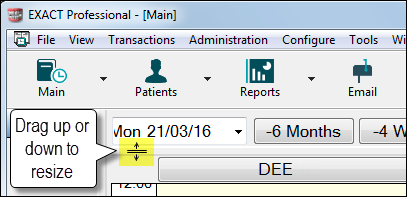 - Drag down the screen until the Week View area is the size that you want it to be.
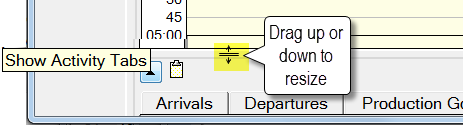
To resize the Activity Tab area - Click the
 button to display the tabs. button to display the tabs. - Drag the border between the Day View area and the Activity Tabs:
TIP: The appointment book settings are saved per user. The next time you log in, the book should appear the same as when you logged out.
|
| If the Appointment Book window is not maximised, it is possible for it to occupy the whole screen and yet for the bottom of it to not be visible, so it appears that the toolbar has disappeared. Check the top right-hand corner of the window - if it looks like this, it is not maximised: Windows 7 Windows XP  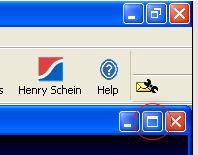
Click the 'maximise' button shown circled above; the appointment book will be maximised, with the frame 'clipped' to the sides of the window, and the toolbar will be visible again. |
How do I delete a patient appointment? | Appointments are usually deleted from the appointment book by dragging them with the mouse to the Bin  , which is located in the bottom of the appointment book. , which is located in the bottom of the appointment book. You can drag Appointments to the Bin from either the Clipboard or the View Day area. View deleted appointments by double-clicking the Bin. To Drag an Appointment to the Bin - Click the appointment and hold your finger on the left mouse button.
- Keeping the mouse button down, move the mouse so that the cursor is over the Bin.
- When the lid on the Bin opens
 , release the mouse button. , release the mouse button. - A warning will appear for you to confirm you want to delete this appointment.
- Click ‘Yes’ to delete the appointment or ‘No’ to return to the previous window.
You can also delete an appointment in other ways:
- By dragging it to the Clipboard. You can then make a new appointment for the customer by dragging it from the Clipboard to another appointment slot.
- By right-clicking on it, and selecting either 'Delete Appointment' or 'Cut to Clipboard'. |
How do I set up blocks in the Appointment Book? |
- Double-click using the right mouse button in the ‘View Day’ area where you want to add the Block or Clinic. This will display the following window:
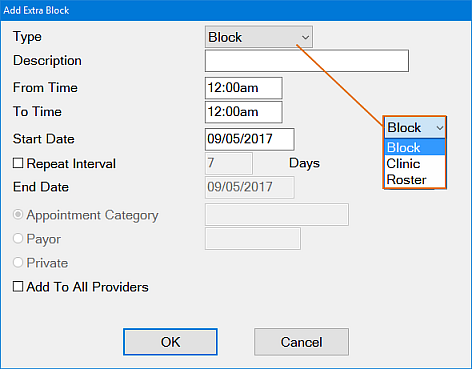
- Click the
 button in the ‘Type’ field to make your selection. button in the ‘Type’ field to make your selection. - Enter a description, (e.g., “Meeting”, “Emergency time”, etc.)
- Enter the ‘Start’ and ‘End’ times.
- Enter the start date; this defaults to today's date, but may be overwritten as required.
- If this is not a "one-off" block, and is to be repeated on a regular basis, click in the "Repeat Interval" checkbox. This will activate the "Days" box for you to enter an appropriate number, and the "End Date"; this defaults to today's date, but may be overwritten as required.
- Enter the ‘Appointment Category’ field if you are adding a Clinic. If you are adding a Block, you will not be able to select an Appointment Category.
If this clinic is just for a single payor, click the "Payor" button instead, and select the appropriate payor from the drop-down menu.
If this is a private clinic, click "Private" instead. - A Block or Clinic can be added to all Providers’ appointment books, e.g., when blocking off bank holidays.
To do this, place a tick in the ‘Add to All Providers’ checkbox to block the time off for everyone in the appointment book. - Click the ‘OK’ button to add the Block/Clinic to the appointment book or click ‘Cancel’ to return to the previous window.
There are also two methods to delete a Block or Clinic. The method you choose will depend on whether you want to delete just one Block/Clinic for a selected day or multiple repeats of a Block or Clinic. |
How do I change an appointment time or length? | To change an appointment time Do one of the following: - Double-click on the appointment to edit the details, and change the date and time of the appointment
- or - - Drag it to a new time in the appointment book.
- or - - Drag it to the clipboard, and from there to a new time.
To alter an appointment length Do one of the following: - Drag the bottom border of the appointment up or down to make it shorter or longer.
- or - - Double-click on the appointment and edit the details.
|
How do I set up a Family Appointment? | 
IMPORTANT: Prior to using this function ensure you have entered information into the Family Members section of the Patient Details tab. TIP: When booking family appointments you can select the members of the family that you would like to book into the appointment. To book a Family Appointment- To open the Edit Family Appointment window either
Select an appointment time and double-click to bring up the Edit Appointment window, from where you can click the Create Family Appointment button: 
- or - Click the +1 button at the bottom right corner of the Hold List and then click the Create Family Appointment button in the Edit Appointment window that displays:  >> >> 
2. In the Edit Family Appointment window, locate the first member for the appointment by entering their name into the Sort By field: 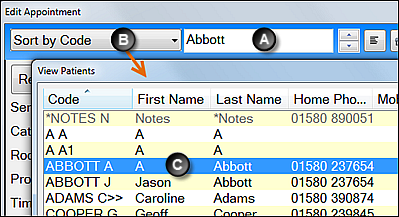
All family members will be automatically selected to attend the family appointment: 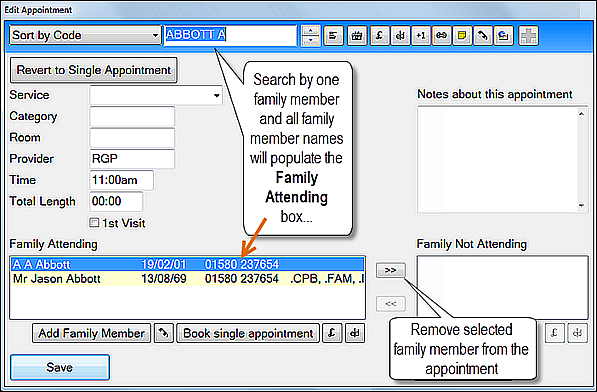
3. Use the >> button to remove family members that are not to be booked into this appointment. 4. Enter information regarding the Service, Category, Room, Provider, Time, Total Length, and optionally type Notes about the appointment. 5. Click the Save button 6. If saving back to the Hold List, drag into an available appointment slot 7. When the family comes in for the appointment, The family members will appear individually in the Arrivals tab allowing you to indicate which of the family members have arrived for the appointment by checking the checkbox against each patient (this will then activate the correct number of stick people to appear at the door in the surgery). 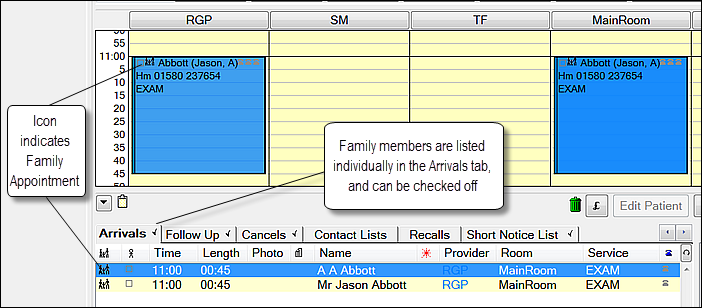
8. (If using Appointment Workflow) When you click the Family appointment as Arrived, the appointment workflow Arrivals Task List will show family members individually, allowing you to deal with outstanding issues (such as Medical History Update) per patient. 9. (If using Appointment Workflow) When the family appointment is completed, the Departure Task List will show each family member, again allowing you to deal with outstanding issues (such as Collect Mobile number) per patient: 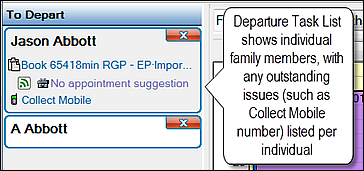
As family appointments are completed (once they have been seen in the surgery), you will need to check which - if any - members of the family require any additional appointments. Follow the steps below to do this: To book further appointments for family members- Double-click on the appointment in the appointment book. The following screen then appears:
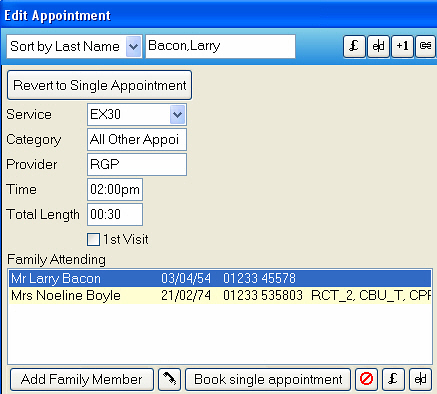
- If there is more treatment required, that is listed to the right of the patient’s name. Highlight the required patient and click on the ‘Book Single Appointment’ button. This will place them onto the clipboard and Hold List.
- Double-click each entry on the clipboard or within the hold list; this will produce the ‘Edit Appointment’ screen for that patient.
- Double-click the next required appointment and then select ‘Save’. You are now ready to book an appointment for this patient by dragging it into a convenient appointment time or using the search function.
|
Transferring appointments between Providers? | There are two common reasons you may want to transfer patient appointments en masse: Provider has left A provider has left the practice and you want to change their patients and/or appointments over to a new provider. This User Search and Change function can be used when a provider has left the practice and you want to change their patients and/or appointments over to a new provider. IMPORTANT:
Because of the changes this utility may make to the database, before you proceed it is imperative that you ensure that:
- All other users are logged out of EXACT
- You make a full backup of the system.
If you are at all uncertain about using this utility, please contact the Support Desk. To run the Search and Change utility for a Provider who has left:- Click the Search and Change option at the bottom of the Administration menu:

- The first screen is informational; read the instructions carefully, then click the Next > button.
- From the Type of Search and Change screen, select the first option:
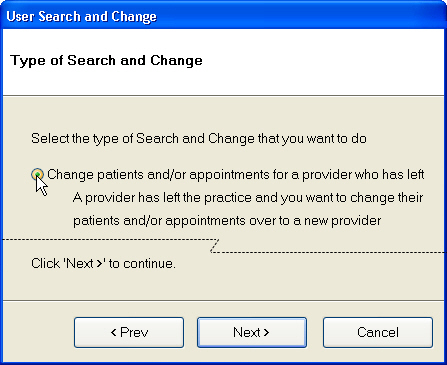
- Click the Next > button.
- The following screen will display:
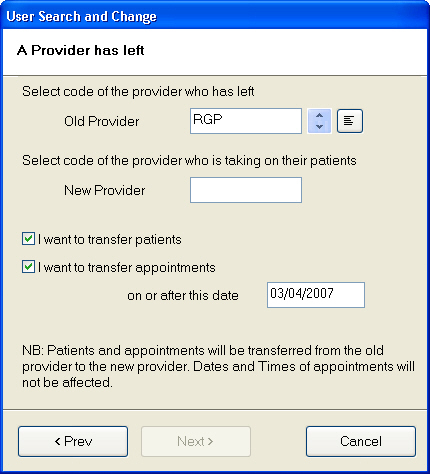
- Enter the code for the ‘old provider’ who has left, or select using the
 or or  buttons. buttons.
All providers will be listed, whether active or inactive. - Enter the code for the ‘new provider’, or select using the or buttons. Only providers of the same type as the ‘old provider’ (i.e., dentist, hygienist, etc.) may be chosen.(You may not transfer between different types of providers).
- You may transfer patients, appointments, or both. If you select appointments, the date field will default to today’s date, but may be changed to a later appointment date if required.
- The Next > button will be greyed out until all fields have been filled out correctly.
When you click it, you will be given some final instructions before you opt to abort the process, make changes, or finish the search and change.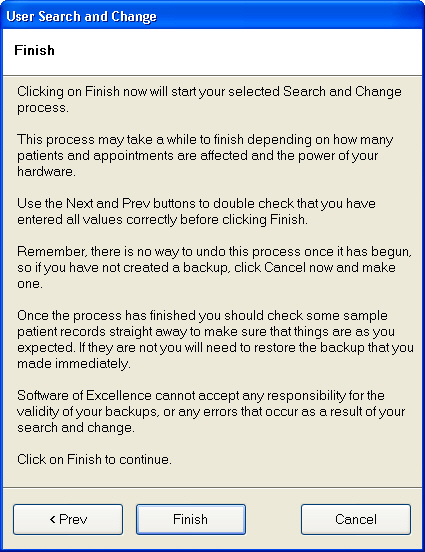
Read the instructions on the screen carefully. Note that if the change involves many patients, and your system is busy, the 'Search and Change' process may take quite some time to complete.
Up until the Finish button is clicked, you may still abort the process and use the < Prev button to make changes to your selection criteria. Provider is on leaveA provider is on leave, so you want to transfer a group of appointments. This User 'Search and Change' function can be used when a provider is taking some time off and you want to change appointments that have already been booked with them over to another provider. IMPORTANT:
Because of the changes this utility may make to the database, before you proceed it is imperative that you ensure that:
- All other users are logged out of EXACT
- You make a full backup of the system.
If you are at all uncertain about using this utility, please contact the Support Desk. To run the 'Search and Change' to transfer appointments between Providers:- Click the “Search and Change” option at the bottom of the Administration menu:
- The first screen is informational; read the instructions carefully, then click the
 button. button. - From the "Type of Search and Change" screen, select the last option:
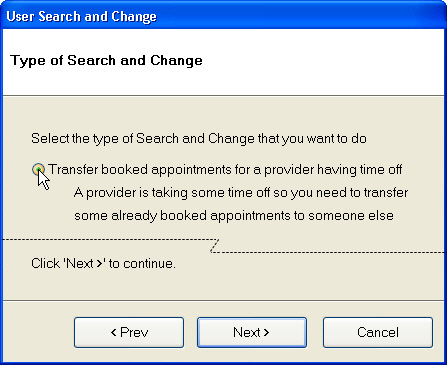
- Click the button.
- The following screen will be displayed:
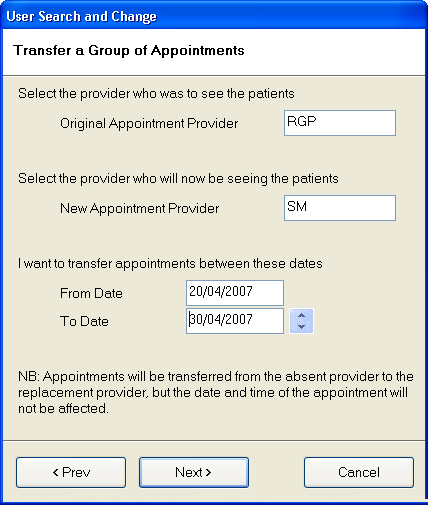
- Enter (or or select using the or buttons) the code for the provider who was booked to see the patients.
- Enter (or or select using the or buttons) the code for the provider who will now be seeing the patients.
IMPORTANT: Only providers of the same type as the original provider (i.e., dentist, hygienist, etc.) may be chosen. You cannot transfer between different types of providers. - Select the ‘From’ and ‘To’ dates for appointments; both dates must be today or in the future, and are inclusive.
- The Next > button will be ‘greyed out’ until all fields have been filled out correctly.
When you click it, you will be given some final instructions before you opt to abort the process, make changes, or finish the search and change.
NOTE: Read the instructions on the screen carefully. Note that if the change involves many patients, and your system is busy, the 'Search and Change' process may take quite some time to complete.
Up until the Finish button is clicked, you may still abort the process and use the < Prev button to make changes to your selection criteria.
|
| It is easy to set up days when the practice is closed for business due to statutory holidays, maintenance or training. These days are automatically added into all appointment books. NOTE: Only users with Administrator security privileges can configure holidays.
The dates of movable annual holidays (such as regional bank holidays that don't have a fixed date each year), will either need to be edited once a year, or they will need to be set up a few years in advance. To add a Holiday or 'Clinic Closed' day:- Select Configure > Practice Settings
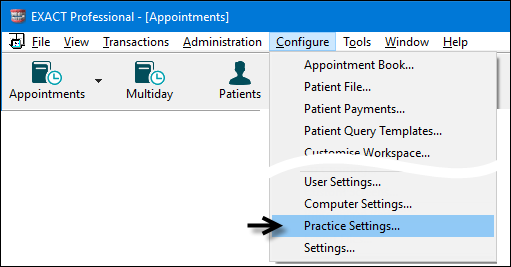
- Click the
 button on the Practice Settings screen: button on the Practice Settings screen: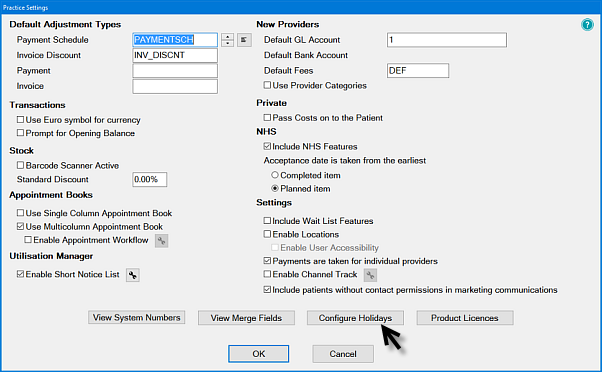
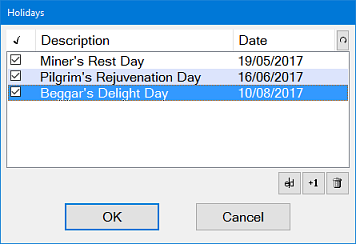
The Holidays window displays: 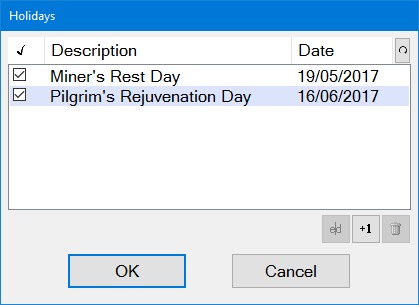
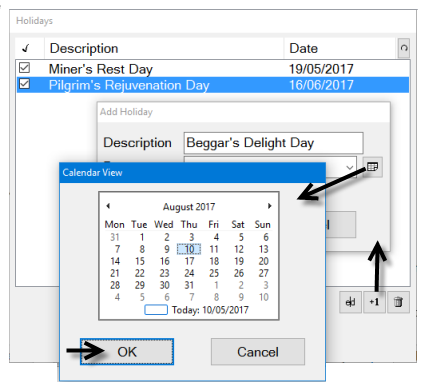
- To add another holiday, click the +1 button, then type a Description and assign a Date by means of the drop down menu, and click OK:
- Check the holiday details in the Holidays window and save by clicking the button:
To Deactivate a HolidayWhen a new holiday is added, it defaults to active, with a checked checkbox against its Description. To retain the holiday in EXACT but have it set to inactive, simply un-check its checkbox and select OK to save: 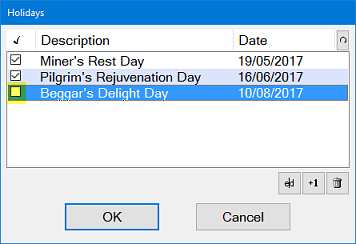
An active holiday indicates the practice is closed on that date. An inactive holiday indicates the practice will still be open. To Edit a Holiday RecordTo change the description and/or date for a holiday: - Select the appropriate record in the Holidays window.
- Click the Edit button .
- Change the details as required.
- Click the OK button to save.
|
| To set the appointment colour and treatment plan colours for providers, go to File > Providers. To set the colour and financial details for a Provider- From the File > Providers screen, Details tab...
- Click the Set Colour buttons to set colours for Text Colour and COT Colour.
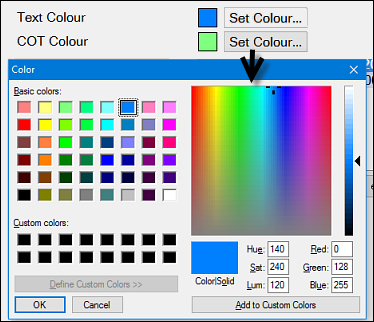
Ensure that the text colour is easily readable. TIP: When setting text colours, choose a slightly darker shade of the Treatment Plan and appointment book colours, for the ‘Text’ colour. This will ensure consistency throughout the program.
- Click OK to save your changes.
- Set the financial details as described below:
Fee Schedule: 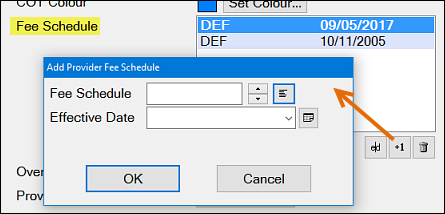
This field sets the fee schedule the provider will use. The Default fee schedule is DEF. Change to an alternative fee schedule if required. Add, Edit and Delete from the Fee Schedule area. | Override Pricing: 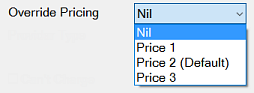
This setting overrides the Patients Price Code (1-3) setting in the Patient File. By default this is set to Nil, which constrains EXACT to use the Patient’s Price Code. However, if you specify a specific Price Code, all fees recorded by this provider will be from the specified price code set in the Fee Schedule. | Provider Type: Identifies the Provider’s speciality: 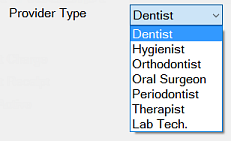
| Provider No. | 
If required, specify the Provider’s code number. | | An Australian Company Number (ACN) is required for some Providers for tax purposes. | | An Australian Business Number (ABN) is also required for some Providers for tax purposes. | Can’t Charge | 
Use the check box to prevent the provider from charging. Generally, this is used only if the provider charges under an alternative provider code or becomes inactive. | Can’t Receipt | 
Use the check box to prevent the provider from being available in the ‘Patient Payments’ window. | Not Active | 
Use the check box to identify Providers who are no longer practicing at the practice. All provider details and transactions are still visible but the provider is not displayed in various areas of EXACT. |
- After entering the above settings, click OK to display the Select Security Group window:
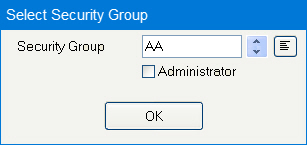
- Select a security group for the Provider and click OK again to save the basic Provider settings.
Other Appointment Book Appearance optionsAll other appointment book appearance options can be set under the Configure > Appointment Book menu option. On this screen , there is an  button. Click this to access and edit the appearance options, including colours. button. Click this to access and edit the appearance options, including colours.
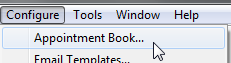
Users with appropriate security access can customise the appointment book appearance to optimise viewer interpretation. To customise the Appointment Book Appearance:- Click Configure > Appointment Book... to display the Appointment Book window:
 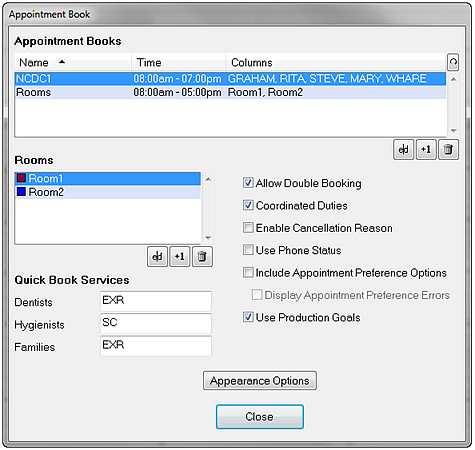
- Click the Appearance Options button to open the Appointment Book Appearance window:
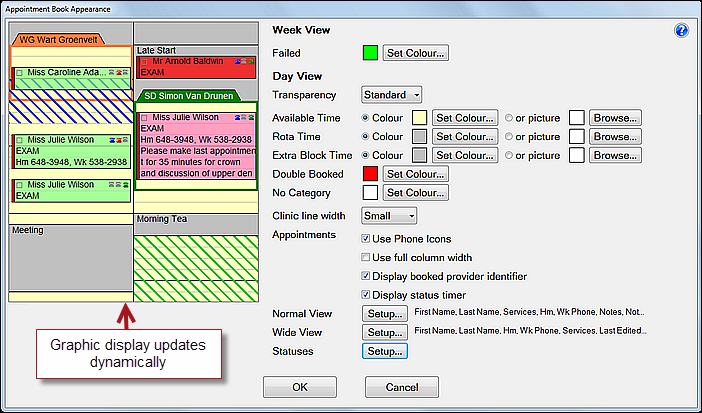 - Change the parameters at right and view your changes in the dynamic graphic display at left (see parameter explanations below).
- Check that you haven't used the same colour for conflicting options, such as white for both 'Available time' and 'No Category', and then click OK when finished.
Week View Options:
| Colour week view by 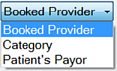
| Not displayed in the preview graphic display. This is the default Practice-level week view. It can be overridden per user from Configure > User Settings. Colour the week view by Booked Provider, Category, or Patient's Payor, depending on which you find the most useful to visually differentiate appointments. |
| Failed | Highlight the FTA (Failed To Arrive) appointments with a custom colour. |
Day View Options:Colour day view by
| This is the default Practice-level week view. It can be overridden per user from Configure > User Settings. Differentiate appointments in the Day View according to one of three sets of colours: - The colours set up for the Booked Provider for each patient, or
- The colour of the appointment Category code (usually used only for clinics), or
- The colour assigned to the Patient's Payor.
| Transparency | Set the degree of colour Transparency: None, Standard, Medium or High. | (picture as background) | See below for how to use a picture as a background. | Available Time
| Available Time is used for: - Blocks of times not yet assigned to an appointment
- Clinics
- Time assigned as otherwise unavailable.
| Rota Time | Permanent time assigned for providers on rotas. | Extra Block Time | Appointment book time blocked off as unavailable for patient appointments, including meal breaks, staff meetings or training. By default this is grey. | Double Booked | This time shows up on the appointment book when any appointment book time overlaps, apart from available time. Use a bright, distinctive colour for this. | No Category | Appointments booked with no treatment category. | Clinic Line Width | Time booked for clinics is shown as diagonal stripes on the appointment book: from the top-left to bottom right for payor clinics, and from the bottom left to top right for private clinics. Set the width of the stripe to either small, medium or large. | Use phone icons | Optional indicator:  . Displayed in greyed-out mode, and can be clicked to show patient contact status. Status displays must be decided per practice. . Displayed in greyed-out mode, and can be clicked to show patient contact status. Status displays must be decided per practice. | Use full column width | Leave this unchecked to overlay appointments within clinics or blocks, or check to use the full column width: 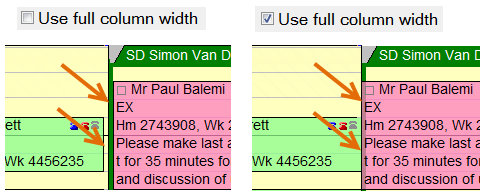
| Display booked provider identifier | 
Many practices historically coloured appointment blocks by Provider. When coloured by Status (stage of care) there is an option for a vertical colour indicator that identifies the Provider for the appointment (EXACT version 11.3 SP5 and later). | Display status timer | 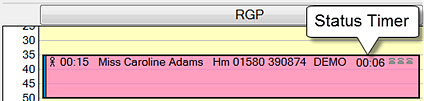
Optionally add a Status Timer (hours:minutes) to the appointment book for these Statuses / stages of care while the patient is physically within the practice: Arrived, In Chair, Treatment Completed (EXACT version 11.3 SP5 and later) | Normal View and Wide view Setup | Choose which patient/treatment details are textually displayed in the appointment block, and in what order, for views where the columns are normal and also for views where the columns are very wide (for example, with a wide screen monitor). This includes how the patient's name is displayed, the planned procedure, the patient's contact number, relevant notes, and the Patient ID. A 'blank' is also included if you wish to insert blank space between details in the appointment block. See below for details. | Statuses Setup | 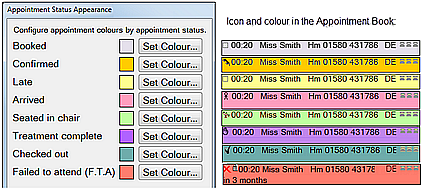
Each appointment book user can configure a set of coloured appointment statuses that visually differentiate appointment book blocks according to the patient stages of care within the dental practice: Booked > Confirmed > Late > Arrived > Seated in chair > Treatment complete > Checked out | FTA (Failed to Arrive) |
To select Normal View Appointment Fields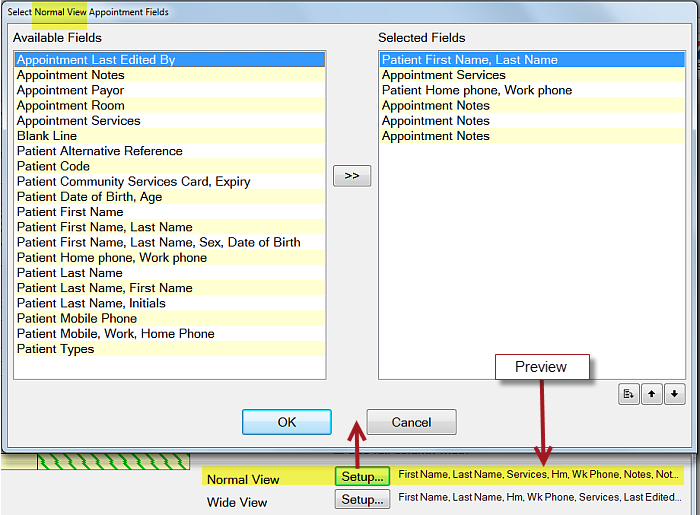
To select Wide View Appointments FieldsTo select Normal View Appointment Fields
To use a picture as a backgroundClick the 'picture' radio button and use a graphic such as a photo, texture, sketch, logo, etc. as a background. The graphic must be accessible on your computer/network via the Browse button. The graphic is displayed at 100% size, so if small it will be 'tiled' (the available space will be filled with multiple 'tiles' of the same image). If it is larger than the space it is to be displayed in, it will be cropped (truncated) to fit, from the right and bottom of the graphic. A small sample of the chosen graphic displays in the box next to the Browse button. Tip: If you choose to use a graphic for the background, choose one that is not too 'busy', or if you can, edit the picture using a graphics program to reduce the contrast, increase the brightness, or reduce the colour depth, to give it a pastel effect. Alternatively, use a 'texture' graphic or other subtle background. |