Search using key words
![]()
Maximise practice revenue by pro-actively securing bookings from those patients with open treatment plans / courses of treatment.
Available from EXACT v12.9, where it is called "Opportunity Manager". Renamed in v12.10 to "Care Manager".
Portal video: Care Manager
Portal blog and video (webinar): Patient Treatment Opportunities -> Revenue
Purpose
Care Manager is a tool for maximising practice revenue by targeting patients who have open (incomplete) treatment plans / courses of treatment.
Because these patients are a captive market, they provide an optimal return on your marketing effort.
Open treatments are targeted and listed if they haven't been booked within the next 3 months including:
- Open treatments that haven't yet been booked at all,
- Open treatments that are already booked, but for more than 3 months ahead of the current date - these represent opportunities for you to advance the booking date and secure earlier revenue.
Care Manager automatically generates a list of possibilities where practitioners can identify, track, and prioritise open treatments, and then contact patients by phone to book appointments for these treatments:
Features
| All actions can be conducted from a Care Manager window |
|
| Users see an icon colour-change notification when patients with open treatments have been assigned to them |  |
| Users can quickly view and action only their own assigned patients |  |
| Filter the list of opportunities by multiple criteria |  |
By default Care Manager displays patient open treatments first by the most valuable treatment for the oldest date, so users can best secure potential revenue |  |
Users contact patients directly from the Care Manager using the 'Contact' button Once a course of treatment has been selected and 'Contact' clicked, a dialog will open where users can:
Care Manager can send Planned URL links to patients using the 'Contact' button. This allows a practice to send a patient a link to book a specific appointment from within a Course of Treatment. | 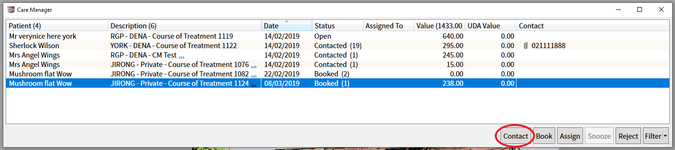  |
| Users can make telephone call notes against patient's by clicking the telephone numbers |  |
| Click to directly open the chart for an open treatment |  |
| Quickly view all existing open treatments for the current patient, so that in a single phone call you can cover all potential treatment bookings by clicking the three blue dots hyperlink in a patient's Description (treatments) column |  |
| Multi-select opportunities by means of CTRL-click or SHIFT-click, then use the Assign, Snooze or Reject buttons |  |
Assign patients to EXACT users for contacting |  |
Temporarily hide open treatments where patients have requested time to consider them before being contacted |  |
Inform dentists if their patients reject open treatments, so that dentists can update and rationalise charting records and values |  |
Book appointments directly from Care Manager by means of the Book button |  |
Contact patients directly via Email or SMS through Care Manager using the Contact button | |
| Access to Care Manager: Through the Configure > Security screen Practice Administrators can control and differentiate access to Care Manager by practice roles |  |
Performance: When records are added, edited, or deleted, only the rows for those records are updated dynamically on-screen; there is no reload of the entire table. |  |

Benefits
Care Manager benefits the practice in these ways:
- Focusses marketing efforts where they produce the greatest return - within the captive market of existing prospects.
- Automatically prioritises high value treatments.
- Drives practitioner efforts to identify open Treatment Plan / COT opportunities.
- Improves the quality of clinical data by facilitating the clearing out of old treatment plans / COTs.
- Complements the List Outstanding Treatment Report by providing a quick view of the overall outstanding treatment value and number.
Requirements/Limitations
Requirements:
- EXACT v12.10 or later.
- Users must have been configured with appropriate security rights to manage listed Care Manager open treatments.
- To view an alert that open treatments have been assigned to a user, the Care Manager icon must have been added to the Workspace Bar for that user.
- No module registration is required.
Limitations:
- Care Manager calculates opportunities only from the date that it is activated; it does not calculate pre-activation-date opportunities.
Consequently, opportunities will not immediately display at activation.
- Initially the Manage Opportunities screen is presented as a non-modal window (it can be dragged about and "floats" over the EXACT window), but this will later be modified to a modal window).
- Will only bring in new Opportunities from the date of upgrading to v12.9+ . SOE Support can run a tool to populate older opportunities if required
- In v12.9 the features was called "Opportunity Manager", but from v12.10 onwards is "Care Manager".
Using Care Manager
Adding the Care Manager button to the workspace bar
- Right-click on the workspace and select Customise ....

- In the Customise Workspace window:

- Select Care Manager in the left pane.
- Click the >> button to move the Care Manager icon to the right pane.
- Use the Up and Down arrows to position the icon (where the top icon in the list will be at the extreme left of the Workspace bar).
- Select OK.
- Check that the Care Manager icon / button is on the workspace bar:

Display the Care Manager Screen
To display the Care Manager screen
Click the Care Manager button on the workspace bar:
| Display all open treatments |
| Display all open treatments (note that of these you have been assigned patients with open treatments) |
| Display just your assigned patients |

If you cannot see this button on the workspace bar, either
- Check that it isn't hidden due to insufficient space on the bar (click the expansion button [>>] on the workspace).
- or -
- Add this button by following the steps in this topic: Adding the Care Manager button to the workspace bar.
The Care Manager screen

This screen displays the following:
- Open treatments that have not been booked in the next 3 months.
- Open treatments that have been booked, but more than 3 months in the future.
By default this list is sorted by Date and then Value, but it can also be manually sorted and filtered as described below.
An important figure to note is the (total) in the Value column header - this represents the total value of your current open treatments.
Your goal should be to keep this figure low, and to keep the listed open treatments as low as possible - in doing so you will be maximising your revenue from this potentially lucrative source.
NOTES:
Initially the Care Manager screen is presented as a non-modal window (it can be dragged about and "floats" over the EXACT window). In future releases it will be a modal window.
Performance optimisation: When records are added, edited, or deleted in EXACT, only the affected rows are updated (there is no reload of the entire table).
The system calculates open treatment opportunities only from the date that Care Manager was activated; it does not consider treatment history before the activation date. Consequently, when you activate Care Manager you won't immediately see Opportunities.
Outstanding treatment is also reported in the List Outstanding Treatment Report.
What causes an open treatment to be added to the Care Manager screen?
A dentist charts out a Treatment Plan / Course of Treatment for a patient, and Saves.
Theoretically that treatment is immediately open (it hasn't yet been booked), and qualifies for listing in the Care Manager screen. However, the system allows a period in which the patient books in reception, or otherwise books during that day, and if the patient does not book for treatment, that open treatment is later added to the Care Manager screen.
Default Table Ordering:
The logic is that by default (this can be changed) users will first see the most valuable opportunity from the oldest open treatment date.
By default the table is primarily ordered in ascending Date order, with oldest Date at the top and most recent at the bottom.
It is sorted secondarily by descending Value; so that within one date the highest Value is at the top and the lowest value is at the bottom.
Columns
| Patient | The Patient column header includes a (count) of the number of patients in the column. This may not equate to the number of open treatments in the Description column, because a single patient can present multiple open treatments. The Patient column is not the primary sort criterion, so multiple open treatments for a single patient may be spread throughout the table. If you intend phoning a patient, it is sensible to group all of that patient's open treatments together for flexible booking arrangement. There are two ways to group a patient's open treatments: To group a patient's open treatments together in the table list of patients: Click the "Patient" header cell to establish patient Name as the sort order. The list will re-order alphabetically, and each patient's open treatments will then be grouped together within the bigger patient list. To display only one patient's open treatments and hide all others Click the three blue dots hyperlink in a patient's associated Description column:
Only open treatments for that patient will then display (in this example, 1 patient with 3 opportunities):
NOTES: To return to / redisplay the unfiltered list De-select the filters. |
| Description | The Description column header includes a (count) of the number of open treatments in the column. Open treatments are defined as:
The code in this column is concatenated from codes for Provider - Payor - open treatment description. For example: DAVE - Private - Course of Treatment 1028 / Treatment Plan 1028 Hover your mouse cursor over a code to see it as a hyperlink to that patient's Chart tab:
To open the associated chart tab for a listed open treatment Click this link to open the Chart tab for the patient. Note that it opens the patient chart but does not open the specific treatment plan / COT, so you may still need to choose the correct treatment tab.
When you book any open treatment within the next 3 months, all of that patient's open treatments disappear from the Care Manager screen, so that the patient is rested from repeat marketing contact |
| Date | The Date that the Treatment Plan / COT was created or last edited. This date changes dynamically within the table when a Provider updates the treatment plan / COT. Table ordering: By default the table is ordered as follows:
|
| Status |
Tooltip summary: Hover your mouse cursor over a Status entry to view a tooltip summary:
|
| Assigned To | An open treatment or multiple selected open treatments can be assigned to any practitioner / EXACT user who is configured with appropriate security rights.
|
| Value | The Value column header includes a sum of the values in the column. This is the Total financial value of the open treatment (non-completed) items in the patient treatment plans / Courses of Treatment. Note that patients do not have to book to cover this total value - they may book incremental treatments. Table ordering: By default the table is ordered as follows:
|
| UDA Value (12.00) | (UK) The UDA Value column header includes a sum of the NHS UDA values in the column. |
| Contact (phone) | Contact patients by phone by clicking phone numbers within the Care Manager screen so that the contact can be tracked by the software:
Optionally add Notes so that they are visible as tooltips from the Status column entries:
All contacts with the patient are also recorded in the patient's Contacts tab, as category "Care Manager":
|

Buttons

| Contact | The 'Contact' button in Care Manager allows users to send Email & SMS communications to patients directing them to book appointments in their course's of treatment. Using the Planned URL, patients can be directed to book specific appointments through online booking.
Once a course of treatment has been selected and 'Contact' clicked, a dialog will open where users can:
Edit/Send Selecting the 'Edit/Send' button will open the edit message windows for Email or SMS for users to review, edit and send communications. Send Selecting 'Send' will automatically send the message with no review/edit option. This provides users with a fast action option, saving time when templates do not require editing before sending. |
| Book | Once the patient agrees telephonically to make a booking for a treatment plan / COT, select that specific item in the table and then click the Book button to open the Edit Appointment window for that patient, automatically opened over the Appointment Book:
From here you can create the booking as normal and confirm with the patient. |
| Assign | Practitioners with appropriate security rights can assign open treatments to other practitioners with the same security rights. In EXACT the assignees will then see a notification that they have at least one assigned open treatment with Open, Booked, Contacted and/or Snoozed status:
|
| Snooze | Click to postpone the attempted booking for one week |
| Reject | Normally practitioners Reject the attempted booking when a patient is not interested in booking open treatment, but your practice may have other reasons to set specific bookings as Rejected. For example, Receptionists may "Reject" opportunities that they know are infeasible, as a means of identifying them for the Dentists to de-activate or delete from the Chart tab. When you Reject an opportunity, it is not deleted, it is simply assumes the Status of Rejected. Rejected opportunities don't by default display in the list. Security requirement: Users must have security permissions to Reject opportunities. See Configuring security rights for Care Manager Optionally use the filter to display just the Rejected opportunities:
|
| Filter |


Watch for patients who have been assigned to you
Prerequisites:
- The Care Manager icon must have been assigned to the Workspace Bar.
- You must have security permissions for Care Manager.
To watch for patients that have been assigned to you
- Watch for the red Alert icon on the workspace bar, which indicates that you have at least one assigned patient with Open, Booked, Contacted and/or Snoozed status:

- Click the dropdown and opt to view only My assigned Patients:

This displays patient open treatments based on a preset filter with only you specified:

You will then see only your assigned patient treatments in The Care Manager screen.
Viewing just your assigned patients
You may be Assigned patients if you have the appropriate security rights.

To check whether you have any assigned patients
Locate the Care Manager icon in the workspace bar.
Green highlighting indicates that no patients have been specifically assigned to you.
Red highlighting on the icon indicates that you have assigned patients:
To view a list of just YOUR Assigned patients
If the Care Manager icon on the workspace bar displays with red highlights, click the dropdown arrow on the button and select My Assigned Patients:
To return to / redisplay the unfiltered list
De-select the filters:

Sorting and filtering the Care Manager list
Default ordering of the Care Manager List
To facilitate users securing the most likely and valuable potential revenue, EXACT by default displays patient open treatments by the most valuable treatment for the oldest date.
To sort the Care Manager list by column ordering
- Click any column header to order the entire list by that header.
- Click again to reverse order by that header.

To filter the Care Manager List
- Open the Care Manager screen by clicking the icon in the workspace bar.
- Click the Filter button at bottom right to display the Filter dialogue:

Note that the Assigned To user list is limited to those with Care Manager security rights - see Configuring security rights for Care Manager
3. Select and de-select as required.
To return to / redisplay the unfiltered list
De-select the filters:
Assigning Care Manager patients to practitioners
Prerequisites for practitioners to assign and be assigned patients in Care Manager:
- Active-status.
- A selected open treatment or multiple selected open treatments can be assigned to any practitioner / EXACT user who is configured with security access for Care Manager. See Configuring security rights for Care Manager
To assign Patient open treatments to a practitioner:
- In the Care Manager screen select an open treatment or SHIFT-click / CTRL-click to select multiple open treatments.
- Click the Assign button.
- Select a practitioner from the dropdown menu, and then click OK:
- The practitioner's name will appear in the Assigned To column against that open treatment:

Result:
In EXACT that practitioner will see a notification that they have at least one assigned patient with Open, Booked, Contacted and/or Snoozed status:
They can click this icon to display all open treatments for all practitioners.
Or they can click the dropdown and opt to view only My Assigned Patients:
Snoozing (postponing) Care Manager patient treatment bookings
To Snooze (postpone) booking appointments for Care Manager patients

- Select the patient open treatment in the list.
- Click the Snooze button.
By default the date is advanced one week.
- Optionally click the calendar icon to set an alternative date.
- Click OK.
The open treatment now has a Snoozed status in the Care Manager Status column.

Rejecting Care Manager patient treatment bookings
To Reject Care Manager open treatment plans / COTs
- In Care Manager, select a listed open treatment or use CTRL-click to select multiple.
- Click the Reject button.
- Confirm Yes when prompted:

- The status in the Status column changes to Rejected.
NOTES:
When you Reject an open treatment, it is not deleted, it is simply assumes the Status of Rejected.
Rejected open treatments don't by default display in the Care Manager list, but you can set the filter to display them (![]() Status >
Status > ![]() Rejected):
Rejected):
What happens to Rejected open treatments?
Dentists typically filter to display the Rejected open treatments, click them to load the treatments in the Chart, and then delete or de-activate their associated planned treatments:


To display JUST the Rejected open treatments
Set the filter to only ![]() Status >
Status > ![]() Rejected:
Rejected:

Contacting patients and booking open treatments
Care Manager lists open Treatment Plans / COTs for which no appointment booking exists in the next 3 months.
Either the patient has no appointment booked, or they have an appointment booked more than 3 months in the future, in which case there is an opportunity to bring the appointment forward and secure earlier revenue.
For tracking purposes, contact from within the Care Manager window is by phone only, and you can optionally add a Note that is associated with each phone call.
To contact patients and book open treatments from Care Manager
- Use the available utilities such as the Filter or ordering of columns to locate the open treatments in the Care Manager screen.
- When you contact the patient you may want to discuss all of their open treatments, so group those treatments in Care Manager as follows:
Click the three blue dots hyperlink in the Description column:
Only that patient's open treatments will then display (in this example, 1 patient with 3 treatments):

This filtered list includes all of this patient's open treatments with these Statuses: Open, Booked, Contacted and Rejected.
- Click a displayed phone number against the patient open treatment:

- Discuss the possible treatment/s with the patient and attempt to secure a booking.
- Whether secured or rejected, type a note in the Contact Notes text box, and click OK:

The Status will change to Contacted in the list:

The Notes are visible as tooltips from the Status column entries:

All contacts with the patient are also recorded in the patient's Contacts tab, as category Care Manager:

- If the patient agrees telephonically to make a booking for a Treatment Plan / COT, select that specific item in the table and then click the Book button to open the Edit Appointment window for that patient, located over the Appointment Book:


- From the Edit Appointment window, create the booking as normal and confirm with the patient.

This appointment is sent to the clipboard at the bottom left of the appointment book.
From here, simply drag the appointment into the book or click the Search icon to use the Appointment Search to locate a suitable appointment slot:


NOTE THAT ALL THE PATIENT’S OPEN TREATMENTS ARE “BOOKED”:
With a single appointment booked, all of that patient's open treatments are removed from the Care Manager list, so that the patient is rested from further internal marketing contacts.
To achieve this, the logic has to be applied that all of the patient's open treatments are booked, so if you Filter the list to include Booked status, you will see their Status as "Booked":
You can optionally select and Reject the remaining listed open treatments that for now are set incorrectly as "Booked".
Opening Care Manager open treatments in the Chart tab
To open a Care Manager listed treatment plan / COT in the Chart tab:
- In the Care Manager list, click the treatment plan / COT:

The Chart tab opens for that patient:
Note that it does not open at that specific treatment, so you may need to still select the appropriate treatment tab:

- Select the appropriate Treatment Plan / Course of Treatment:

Discuss the treatment options with the patient.
Because the patient file is open, you can also refer to any further information that is accessible from tabs in the Patient desktop:

Managing open treatments that you reject
Your practice may want to create a policy on how to manage the Treatment Plans / COTs that practitioners have marked as Rejected, to stop them accumulating in patient charts.
A typical process is outlined below:
To manage Treatment Plans / COTs that practitioners have marked as Rejected
![]() Normally managed by Dentists
Normally managed by Dentists
- In the Care Manager screen, use the Filter to display just those Rejected treatments that are assigned to you:

- With these items displayed, click any one to load all of that patient's Treatment Plans / COTs in the Chart.
Note that all treatment plans / COTs load, with the default selected treatment not necessarily being the one that you are targeting.
- In the Chart, from those listed, select the appropriate Treatment Plan / COT:
Delete or de-activate the planned treatments that are associated with the Rejection, or deal with it in any other manner that your practice determines as appropriate. For example:
Configuring security rights for Care Manager
To configure security rights for Care Manager
- Select Configure > Security.
- Select a User Group (e.g. DENTIST).
- Check (tick)
 Administration and Care Manager:
- To allow this user group to mark selected patients as Rejected (where the patient is contacted but rejects the planned open treatment), also check Reject Selected Patients:
- Save by means of the Save button in the top button bar.
